
Easy SOQ Compliance
Learn the process for crafting winning proposals that conform to strict requirements.


This article appears in Issue 144 of InDesign Magazine.
Working in a deadline-driven world, designers and marketers in the architectural, engineering, and construction services (AEC) industry are often tasked with developing proposals and statements of qualifications (SOQs) that respond to Requests for Qualifications (RFQs) or Requests for Proposals (RFPs). RFQs and RFPs are often issued by public agencies allowing firms to compete for (and win) projects.
For example, to solicit multiple firms for engineering services to design a new water pipeline, a city’s RFQ may ask for the team qualifications, organizational structure, project experience, and so on. It may go a step further to ask for project-specific information, such as how the firm will actually perform the work, the schedule for completion, and more. The city’s goal is to provide a fair and transparent process that allows multiple firms to compete. The goal for each engineering firm is to produce an SOQ that responds to the RFQ and ultimately wins the work. Figure 1, shows what an RFQ and an SOQ actually look like.


Figure 1. Top: A sample RFQ lists common requirements for a municipal project. Bottom: The conceptual design for an attractive and compliant SOQ combines style with substance.
First and foremost, when responding to an RFQ/RFP you must be responsive to the requirements set forth in the RFQ/RFP, and you must submit it by the deadline. Missing even a single detail may result in disqualification. (I could write an entire book on the horror stories of designers missing a required form or—gasp!—submitting the SOQ three minutes late.) No pressure, right? Let’s also throw in the fact that you are gathering data from multiple sources—databases, Word files, spreadsheets, PDFs, other InDesign documents, hand-written notes, and so on—to pull together into a cohesive, compliant, and compelling document that results in a win. The entire process seems daunting.
Let’s dissect the requirements of the sample RFQ (Figure 2) and look at some InDesign tricks that make the process easier. Our goal here is to maximize efficiency and consistency.

Figure 2. The highlighted text is our set of instructions for making sure this document is compliant.
It All Begins with Styles
Before we start designing the actual SOQ document, let’s do a little prework to get the paragraph styles ready to go. Because of the flexibility AEC marketers require to respond to RFQs/RFPs, I always begin by setting up a master document containing two foundational paragraph styles—Body and Header—and base the remaining styles on them (or on styles based on them). By strategically planning out my styles this way, I can make modifications in just two places to affect all the formatting of my text. Later on, when I’m creating the actual documents that will house the SOQ, I can load those styles from my master document. (If you need basic instruction on working with styles, check out this video for tips on how to create paragraph styles quickly and this one for a description of how to base one style on another.)
Creating the SOQ Document
Once you have your styles set up, it’s time to start creating the SOQ document. Focus on perfect compliance because a non-compliant submittal could result in disqualification. The first requirement states: “All submitted SOQs must be in 8.5″ × 11″ format with 0.5-inch margins on all sides and shall not exceed 20 single-sided pages in length.”
Let’s begin by creating a new document. In the New Document dialog box, choose the Letter preset from the group of Print document presets and turn off the Facing Pages option. Set the number of pages to 20 (Figure 3) and the margins to 0.75 inches on the top and bottom and 0.5 inches for the left and right. The larger top and bottom margins are there to reserve space for the master page header and footer elements. We don’t want anything outside of the required 0.5-inch margin. Click OK.

Figure 3. As a timesaver, you can add the number of required pages when you create the new document.
Now that you have your 20 pages ready, go ahead and load the styles you created in your master document as part of the prework. To load styles, navigate to the Paragraph Styles panel menu and choose Load Paragraph Styles. Then, navigate to your InDesign file with the styles in it, and click Open. Check all the styles to confirm they loaded as expected.
The next requirement states: “Respondents must provide the requirements listed in the Evaluation Criteria… ”
First, let’s create an outline in the document by setting the Evaluation Criteria headers in the Header paragraph style. Then, you can furiously dig through files to place, move, paste, create, and otherwise add content (but don’t add the forms yet—more on that later).
Cleaning Up the Mess
Now that we have a very rough draft of our SOQ, it’s time to pause for some document housekeeping. Because we brought in content from multiple sources, it’s quite likely that the Swatches panel and all of the styles panels are overflowing with duplicates and unused items. (Why do we have 20 swatches that are the same blue?) You can go through each panel, right-click its panel menu, and choose Select All Unused to delete items not in use. Or, for the paragraph and character styles, you can run this handy script. If you have some stubborn swatches that InDesign claims are being used somewhere in the document, simply right-click one in the Swatches panel and choose Find This Color (Figure 4).

Figure 4. InDesign now makes it easy to find exactly where swatches are used in your document.
Whew, that’s better. Now let’s continue bringing the document into compliance.
The requirements state: “Text must be in Times New Roman.” When an RFQ requires a specific typeface, assume that all text in the SOQ should be in the required typeface.
If you’re used to working within your brand standards, which do not include Times New Roman, you might wonder at this point if you’re going to have to change every single style in your document.
Fortunately, the answer is no because we were clever right from the beginning: We based all of the paragraph styles on Body and Header, so you have to change the typeface in only two places. Just right-click the Body paragraph style and in the Paragraph Syle Options dialog box, choose Basic Character Formats on the left. In the Font Family menu, choose Times New Roman (Figure 5). Repeat for the Header style.

Figure 5. Creating paragraph styles that are based on Body and Header gives you so much flexibility when you need to change the typeface to respond to an RFQ.
Using Preflight Profiles to Stay Out of Trouble
Continuing through the requirements, notice the “Minimum font size is 11 pt.” We already redefined our Body style to be Times New Roman 11 pt, but you may have used other styles for smaller text, like captions and figure references. How do you deal with the size requirement? Do you have to use the Find feature repeatedly to locate anything smaller than the 11 pt minimum?
Nope! Instead, we’re going to use the Preflight panel.
At the bottom of the InDesign window, you’ll find your document profile. The default setting is [Basic] (working). You’ll find it next to the tiny red (or green) dot that indicates any errors in the document. Click the disclosure triangle to the right of the error information, and choose Define Profiles.
Click the + sign at the bottom of the Preflight Profiles dialog box, and name this profile “11pt minimum.” On the right, expand the TEXT area, scroll down to Minimum Type Size, select it, and type “11pt” in the field (Figure 6). Click OK.

Figure 6. This simple preflight profile could make all the difference between a win or a disqualification. Okay, maybe that’s overstating things a little bit, but it will give you peace of mind.
Now to put our new preflight profile to use: Return to the bottom of the workspace, click the disclosure triangle to the left of your document profile, and select the 11 pt minimum profile. InDesign will check the file for errors, and the dot color will indicate whether you have any, including text that is smaller than 11 pt anywhere in the document. If the dot is green, the document is error free. If the dot is red, click the disclosure triangle to the right of the errors and select Preflight Panel (or choose Window > Output > Preflight). The panel will tell you how many errors you have, what they are, and where they are located (Figure 7). Handy, right? Rule #1 for efficiency is to let your computer do the work whenever possible.

Figure 7. Not only can you see all document errors in the Preflight panel, but you also can navigate directly to each by clicking the page numbers.
Placing PDFs in the SOQ Document
The final sentence of requirements states: “Respondents must provide the requirements listed in the Evaluation Criteria, including the Required Forms.”
PDF forms are a common requirement in SOQs and proposals. These forms may include a Conflict of Interest disclosure, a Certificate of Insurance, or any of thousands of other options. I have three tricks that I employ for placing PDFs in InDesign.
Placing multipage PDFs with a script
This is easily my most-used script in InDesign. Gone are the days when you select the PDF, choose All Pages from the Import Options dialog box, and painstakingly place each page one by one in your file. The Place Multipage PDF Script automatically places all 8.5″ × 11″ pages perfectly! To access the Place Multipage PDF script, choose Window > Utilities > Scripts. In the Scripts panel, choose Application > Samples > Javascript > PlaceMultipagePDF.jsx. To run the script, simply double-click it. In the Choose Document dialog box, you can select either a new document or an open document that’s listed in the menu. (Warning: If you choose an existing document, make sure you place it on an empty page. Otherwise, the PDF pages will auto-generate on top of your text.) You can read more about this script and others here.
At this point, you might be wondering what to do if the forms have content outside of the margin requirements. Do you have to fix each page manually to be compliant? No, you do not. Read on.
Creating an object style for placed PDFs
Using the Place Multipage PDF script, place the PDF in a new document. Then, with one object frame selected, resize it to fit within the margin requirements. With the frame still selected, choose Window > Styles > Object Styles and create a new object style. In the New Object Style dialog box, name your style “Form” and choose Size and Position Options. In the Size section, select Height & Width for the Adjust option. Note that InDesign detects the height and width of the selected frame. Under Position, choose X & Y for the Adjust option (Figure 8).

Figure 8. The Size and Position Options in the New Object Style dialog box allow you to assign any frame an exact size and location on the page.
Again, InDesign detects the coordinates based on the selected frame. Perfect! Now navigate to Frame Fitting Options under Basic Attributes, visit the Content Fitting section, and choose Fill Frame Proportionally from the Fitting menu. Make sure the Align From reference point is set to center (Figure 9). Done!

Figure 9. Make sure Fill Frame Proportionately is selected since you reduced the size of the frame to fit within the margins. You don’t want any part of the form to be hidden outside the frame.
But what about the rest of the pages? Do we have to apply the Form object style manually?
Nope! (But I think you knew I would say that.)
Applying an Object Style with Find/Change
In the Find/Change dialog box (Command/Ctrl+F), go to the Object tab. (You never noticed it before, did you?) Here, in Find Object Format, click the Specify Attributes to Find icon. In the Find Object Format Options dialog box, choose Style Options under Basic Attributes. In the Object Style menu, select [None]. (Object frames that are generated by the Place Multipage PDF script have the [None] style.) Repeat the above steps in the Change Object Format section, but choose your Form style from the Object Style menu. Make sure the Search menu is set to Document (Figure 10). Click Change All, and—voilà!—InDesign sizes and positions all your placed PDFs correctly.

Figure 10. The Find/Change Object Style feature accomplishes what could take hundreds of manual steps with just a few clicks.
Troubleshooting tip: Once you have changed all, click the trashcan icons to clear the selections. Otherwise, InDesign will remember these settings, and unless you pay very close attention, you’ll get unexpected results on future searches.
Now, all of the pages are within the margin requirements. At this point, if you want everything part of one file, you can select all of the pages in the Pages panel, right-click, choose Move Pages To, and designate the end of your SOQ document.
Simplify Your Process with Running Headers and Text Variables
With content in the file and the required PDF forms, we need to make sure each page has the appropriate Evaluation Criterion. We want page numbers and a master page header on each page, but you don’t need to make a special master page for each section if only the page header is different. Instead, you can use running headers.
A running header is a text variable based on a paragraph style. For our submittal, because each Evaluation Criterion is in the Header paragraph style, you can assign the running header to Header. To set up a running header, navigate to Type > Text Variables > Define (Figure 11).

Figure 11. By defining text variables within a document, you open up a world of efficiency.
Click Running Header and then Edit (Figure 12).
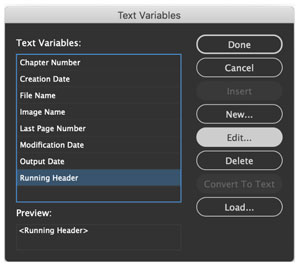
Figure 12. You can edit the Running Header variable to automate page headers for each major section of a document.
In the Edit Text Variable dialog box, choose Header from the Style menu. You can leave the rest of the default settings (Figure 13).

Figure 13. With these settings the Running Header variable will automatically reflect the first Header paragraph on each page.
Next, we need to put our Running Header variable to use. On the A-Master page, draw a text frame and navigate to Type > Text Variables > Insert Variable > Running Header (Figure 14).

Figure 14. After you insert a text variable in a frame, you will see its name in brackets.
Now, the running header will automatically match the text set in the Header paragraph style on each page. That works great for the first five requirements, but the form pages still have the wrong running header, because there is no text with the Header style on those pages for the variable to draw from. What’s a marketer to do?
First on Page is the default setting for Use in the Edit Running Header dialog box. But that doesn’t mean that the text has to be on the page. If any part of a text frame containing Header text touches the page the text variable can “see” that text and use it. So, you can add the Evaluation Criterion text in the Header paragraph style on the pasteboard with a little bit of the frame overlapping the first page of the forms (Figure 15). Now, all of the forms have the correct running header (Figure 16).

Figure 15. Note how the text frame with the text in the Header style is slightly overlapping the page. As long as some part of the frame is on the page, the Running Header variable will recognize it.

Figure 16. The running header now matches the text in the Header style.
That is cool, but we have only scratched the surface of all you can do with text variables. Let’s look at another example. On several of the forms and throughout the document, we need to add the RFQ number assigned for this pursuit. Rather than type it repeatedly (and risk mistyping it), you can create a Custom Text variable. Navigate once again to Type > Text Variables > Define. This time, choose New and in the New Text Variable dialog box, give your variable a name (I used RFQ#). For the Type option, choose Custom Text. In the Text field, type the RFQ number as assigned (Figure 17). Click OK.
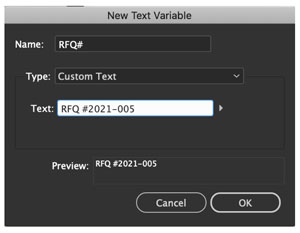
Figure 17. To save time and help ensure compliance, use a Custom Text variable to automate specific content throughout a file.
Now, when you have to include the RFQ number in the form, you can draw a text frame, put the cursor in it, and use Quick Apply by pressing Command+Return (macOS) or Ctrl+Enter (Windows). Start typing RFQ to automatically select that variable (Figure 18). Press Return or Enter, and InDesign enters the RFQ# variable in the text frame. Repeat as needed, and save yourself loads of time!

Figure 18. Selecting a Custom Text variable you created earlier (RFQ#) in Quick Apply is an easy shortcut to add specific text throughout your document.
Efficiency and Accuracy: A Winning Combination
Now you know my secret weapons for creating perfectly compliant SOQ documents: styles, scripts, the Preflight panel, running headers, and text variables. These efficiency tools will free you to polish your submittal and create a document that wins!
Commenting is easier and faster when you're logged in!

Recommended for you

InDesign Magazine Issue 126: Charts and Graphs
We’re happy to announce that InDesign Magazine Issue #126 (October 2019) is...

InDesign Magazine Topic Index Now Available Online
Locating the articles you want is faster and easier than ever before, thanks to...

Adobe Mobile Apps for Designers
Is your mobile device part of your creative workflow? If not, it should be. Here...