
Easy, Efficient Image Effects with Lightroom Presets

Maybe you want to apply a standard fix to a batch of photos you’re importing into Adobe Lightroom. Or perhaps you’re looking for effects that mimic toy cameras or old film, or that add a cool color. You may just want a really quick—but good-looking—way to convert color to black and white. If any of these sound like your Lightroom work, you should try Lightroom presets. They make it easy to apply anything to your images, from a standard subtle fix to something more creative. In this article, I’ll explain how to create, save, share, and manage your own presets, and how to find loads of free presets that other people have made.
What Is a Preset?
A preset is little more than a set of instructions that tell Lightroom how to adjust its Develop panel sliders (Figure 1). You can’t do anything with a Lightroom develop preset that you couldn’t do by manually adjusting the sliders. The benefit of presets is that you can change multiple sliders simultaneously, so it’s a lot faster than completely manual tweaking.
Figure 1. A Lightroom preset is just a set of instructions to Lightroom as to how to adjust sliders and configure settings in the Develop panel. Click the image below to see a larger version.

Once you’ve applied a preset to an image, you’re not stuck with the results. You can open any of the Develop panels and adjust the sliders to fine-tune the effect (Figure 2). You can also completely remove the preset’s effect by choosing Edit Undo (Ctrl/Cmnd-Z). Unlike Filters in Photoshop, you can’t fade out or blend the preset effect except by manually adjusting the sliders.
Figure 2. After applying a preset you can open the Develop panel and make further adjustments to the image. Click the image below to see a larger version.
In addition to the Develop presets I’ll talk about in this article, there are presets to add metadata to your images, and to configure import and export settings. Lightroom stores each preset as a .lrtemplate file in the appropriate Presets folder.
Using Develop Presets
There are three common ways to apply Develop presets. For images already in Lightroom, you can use the Quick Develop panel in the Library module or the Presets panel in the Develop module. You can also apply a Develop preset as you import images, a good way to quickly fix a group of photos that share a problem (Figure 3).
Figure 3. You can apply Develop presets to an image in the Develop or Library modules or when importing images. Click the image below to see a larger version.

I’ll show you how to work with Develop Presets in the Develop module. Just be aware that you can apply them in the Import dialog or the Library module as well.
Built-in Presets
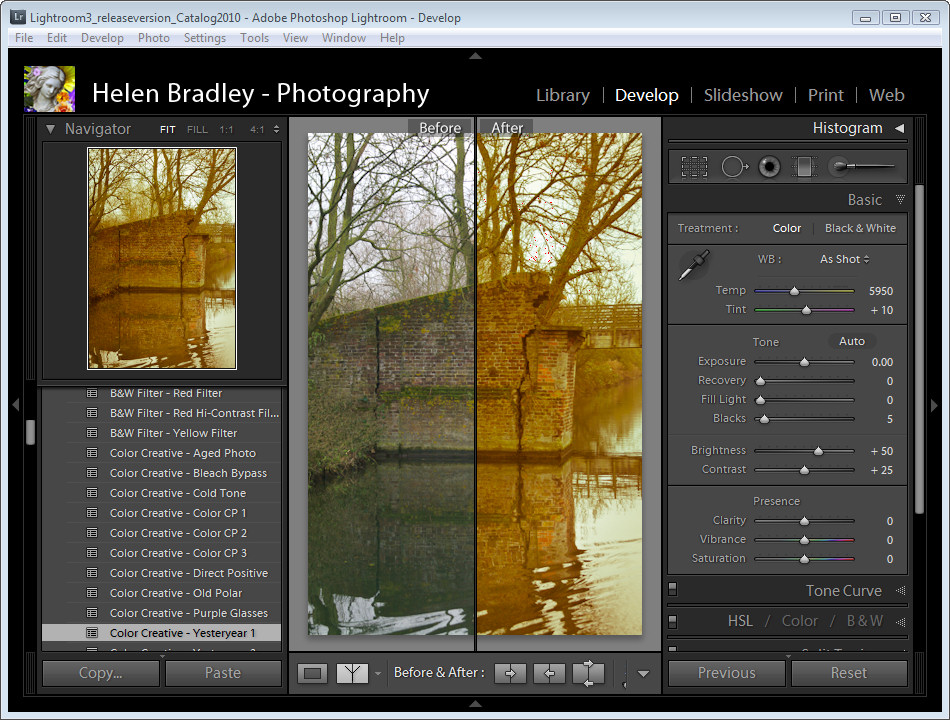
Lightroom comes with more than 50 presets. To see them at work, select an image and go to the Develop module. Open the Presets panel on the left and click on the triangle to the left of the words “Lightroom Presets” to see the full list. As you mouse over a preset, the Navigator panel in the top-left corner shows you how the image would look with that preset applied (Figure 4).
Figure 4. Hover over a preset to see the effect of it on the currently selected image. Click the image below to see a larger version.

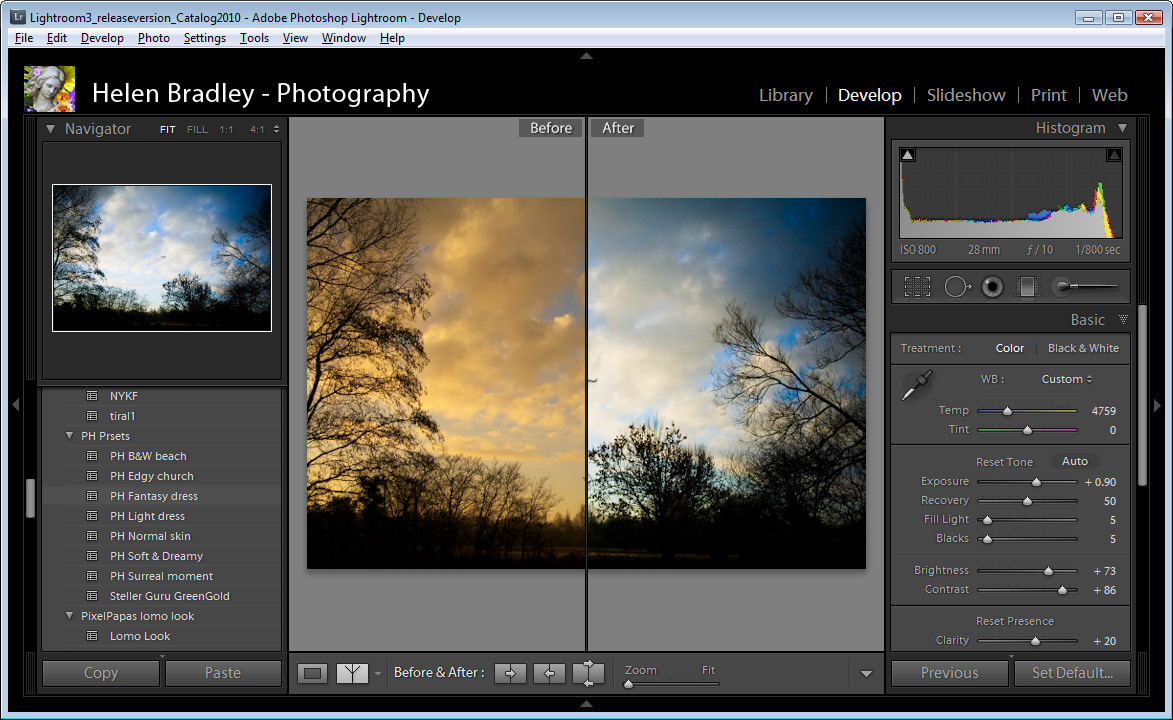
When you see a preset that you like, click it to apply it to the image. You may notice that the sliders in the panels on the right of the screen change position as you click (Figure 5). It’s important to understand this connection between the preset and the slider settings, especially when you make your own presets.
Figure 5. Presets change the settings applied to the image in the Develop panels down the right of the screen. Click the image below to see a larger version.
DIY Presets
To help you make your own presets, I’ll walk you through the steps of creating a Split Toning effect. First, select any image and go to the Develop module. Open the Split Toning panel and increase the Saturation in both the Highlights and Shadows. Adjust both Hue sliders to select colors to add to the Highlights and to the Shadows. Adjust the saturation of each color using the Saturation sliders and use the Balance slider to control where the colors change from being applied to shadows and to highlights (Figure 6).
Figure 6. To create a preset, first apply some changes, such as this split toning effect to an image. Click the image below to see a larger version.

Now click the plus symbol opposite the Presets panel name in the Develop module and the New Develop Preset dialog will open. Type a name for your preset and from the Folder dropdown list, either select User Presets or click New Folder and create a new folder in which to store your presets.
In the panel below you’ll see that there are checkboxes for the settings to be stored in the preset. Choose carefully! If you leave everything checked, then any change you have applied to the image will be included in the preset—typically not what you want. I recommend clicking Check None to disable everything and then deciding which settings to apply with this preset.
If you’ve been following along and have created a split toning effect, then the only checkbox you need to select is Split Toning (Figure 7). Do this and click Create.
Figure 7. Select the settings you have applied using the Develop panel options to include in your preset. Click the image below to see a larger version.

To test the preset on a new image, select an image, open the Presets panel, and find your preset. It will be in the User Presets folder or the new folder you created to store it in. Notice that when you hold your mouse over your preset you can preview how it will affect the image in the Navigator panel (Figure 8). Click it to apply it to the image.
Figure 8. To test your preset, try it out on another image to see it works as expected. Click the image below to see a larger version.

If you make changes to the settings you’ve stored in a preset—for example, if you change a color used for the Split Toning effect—you can update the preset settings by right-clicking the preset name and choosing Update with Current Settings. From the dialog, select the settings to include and click Update.
Preset Design Considerations
When you’re designing your own presets, there are some things to consider. You’ve already seen that limiting the settings stored in the preset is important because you won’t want to apply fixes peculiar to one image to every other image.
You should also think about the Lightroom features in your presets. For example, to create a preset that includes a vignette (darkened edges), you can either use the Lens Correction panel or the Effects panel. If you apply the vignette using the Lens Correction panel’s Lens Vignette sliders, the vignette is applied to the un-cropped image. If you later crop the image, you may crop out the entire vignette or just one side of it. To ensure the vignette is applied to every image in the same way—cropped or not—use the Effects panel settings to create a post-crop vignette instead.
When you create a preset, consider also creating one that removes the effect (Figure 9). This will save you having to wind back the history or undo the settings if you decide you don’t like the setting on a particular image. For example, to create an undo preset for your Split Toning effect, open the Split Toning panel and drag both Saturation sliders to zero. Set the Balance slider to zero and then create the undo preset, again selecting only the Split Toning checkbox, and click Create. Now you can add a split tone effect or remove it with a single click.
Figure 9. Create a preset that removes settings changed by another preset. Click the image below to see a larger version.

Some Lightroom features can’t be applied using a preset, including the Crop Overlay tool, Spot Removal tool, Red Eye Correction, and the Adjustment Brush. However, changes made using the Graduated Filter can be in presets (Figure 10).
Figure 10. Graduated Filter adjustments can be included in presets but changes made with the Spot Removal tool, Red Eye Correction and Adjustment Brush cannot. Click the image below to see a larger version.

Yet another consideration is how many changes one preset should incorporate. The more changes you include, the more cumbersome it is to apply only portions of the preset. For instance, say that one preset alters contrast and color, applies a vignette, and adds film grain. You’d have more flexibility if you make three presets instead: one for the contrast and color, one for the vignette, and one for the grain.
Finding Free Presets
There are thousands of free Lightroom presets on the Web (Figure 11). When you find a preset you like, just download it and unzip it if necessary. In Lightroom’s Develop module, right-click a folder in the Presets panel, browse to select the preset file (it will end in .lrtemplate), and choose Import.
Figure 11. There are plenty of free presets online, such as this faux HDR look from Wizel. Click the image below to see a larger version.

When you add presets this way you may find they are automatically applied to any image that was selected. To undo the change, check the History panel list and click to select an earlier history state, or press Ctrl/Cmnd-Z.
I like the following sources for free presets. Look for readme.txt files in the zip archive that will help you learn more about how to use the presets and usage rights.
Matt Kloskowsk’s Lomo presets
LifeInDigitalFilm LR/ACR Preset: Agfa RSX II 100
X-Equals Holga templates
PixelPapa’s Lomo Look
Wizel’s LOMO+LUCIS preset
New York State of Mind presets
Adobe’s Julianne Kost also has many free presets on her blog.
Manage Your Presets
You’ll find it easier to manage presets if you place them inside folders in the Presets panel. You can create a folder by right-clicking in the Presets panel and choosing New Folder. All the folders you create will be on the same level; you can’t nest folders inside each other. You can drag and drop presets in the Presets panel to rearrange them. I like to add a new folder for each set of presets I download. I also add my name to the name of those presets I plan to share online so they’re easy to identify (Figure 12).
Figure 12. Use folders to organize your presets and add your name your own so you can easily identify them. Click the image below to see a larger version.

If you’ve downloaded and installed presets that you never use, right-click the preset and choose Delete to remove it from Lightroom.
To give presets to other people, right-click the preset name and click Export. Save the file in a location of your choice with the extension .lrtemplate. You can then compress this into a zip file and share it.
It’s smart to work with presets in Lightroom. Whether you’re a professional or amateur photographer, presets can give you creative options as well as fast-track solutions for getting creative with your photos.
This article was last modified on January 6, 2023
This article was first published on August 25, 2011
Commenting is easier and faster when you're logged in!

Recommended for you

How to Prepare Screen Captures for Print
Excerpted from Real World Print Production with Adobe Creative Cloud by Cla...

A Film Technique for Your Digital Photography
Before Picture Elements (“pixels” for short) were a gleam in some IB...

Creating Silhouettes in Photoshop with Remove.bg
I reviewed the revolutionary cutout tool remove.bg a couple of months back, and...