

When a scene is wider than your widest lens, merging images into a panorama is a great solution. Shoot a bunch of photos with some overlap, and use software to merge them into a single panoramic image.
You’ll find a panorama merge feature in Adobe Photoshop, Adobe Camera Raw (which comes with Photoshop), and Adobe Photoshop Lightroom. But don’t assume they’re all the same. Their differences give you more ways to resolve potential panorama issues.
Photomerge in Adobe Photoshop
In Photoshop, the Photomerge command (choose File > Automate > Photomerge) lets you select and combine multiple images into a larger single image.
Choosing Photoshop panorama options
On the left side of the Photomerge dialog box, the first four Layout options are different projections for photographic panoramas. Most of the time, Auto or Spherical work well. The last two options (Collage and Reposition) are more useful for graphic arts tasks with flat content, such as when you scan or photograph sections of a large poster and want to make them into a single image.

Below the file list are four options. You can usually just select all of them. Blend Images Together uses masks to create a seamless visual transition between images. Vignette Removal evens out lighting by compensating for lenses that are darker near frame edges. Geometric Distortion Correction compensates for lenses that bend straight lines.
Content Aware Fill Transparent Areas helps fill in blank areas around the edges of a panorama. Even when the result isn’t perfect, as a starting point it saves time compared to filling in all empty areas by hand.
What you get is an unsaved Photoshop document. Each source image becomes a separate layer with an editable mask that blends it with adjacent images. If you selected Content Aware Fill Empty Areas, there’s an additional layer at the top with one merged copy of all other layers plus the synthesized Content Aware Fill areas.

In this animation, compare how a merged Photoshop panorama looks when the top layer created by the Content Aware Fill Empty Areas option is shown and hidden. The feature created an unwanted clone of the crossing gate at the left edge, but it’s easy to remove with a cloning or healing tool.
In practice, you probably won’t need to edit the Photoshop panorama layers individually. Consider merging or flattening them to reduce file size.
Alternate Routes into Photomerge
If you’re like me, you don’t enjoy navigating file system dialog boxes. Instead of picking images in the Photomerge dialog box, you can select images in Adobe Bridge and choose Tools > Photoshop > Photomerge. You can also select images in Lightroom and choose Photo > Edit In > Merge to Panorama in Photoshop.
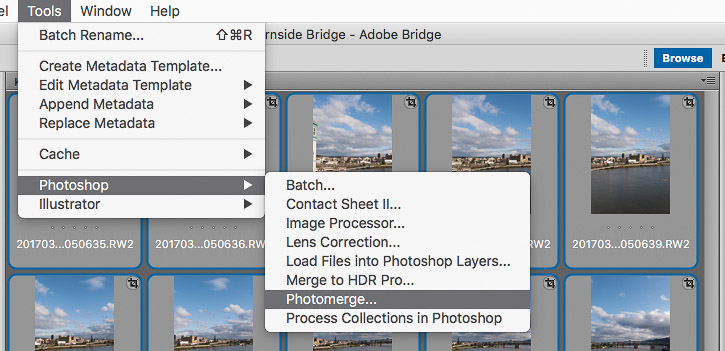
You can create a panorama directly from Adobe Bridge by sending selected images to Photoshop.
Merge to Panorama in Adobe Camera Raw
Adobe Camera Raw is a plug-in module that comes with Photoshop, for editing images saved in camera raw format. It has a Merge to Panorama command that’s available when you select multiple images loaded into Camera Raw.

In Adobe Camera Raw, you’ll find the Merge to Panorama command on the menu that appears when you click the menu button in the Filmstrip.
If Photoshop already has a command for creating panoramas, why do you need the same capability in Camera Raw? It’s because they don’t work the same way:
- Camera Raw saves a merged panorama as a DNG file. You can edit a DNG file using the full Camera Raw feature set, potentially preserving more image quality than a Photoshop file as you edit settings such as highlights, shadows, and white balance.
- Unlike a layered Photoshop panorama, a DNG panorama is a single object.
- A DNG format panorama uses less storage space than a Photoshop format panorama. The 13 raw files of the river bridge panorama are 20MB each. They result in a 150MB DNG file when merged using Camera Raw or Lightroom. In Photoshop the same images merge into a Photoshop panorama file with a size ranging from 269MB to 1.3GB, depending on the bit depth and options used. Of course, if you convert a DNG panorama into a Photoshop file because you need to make edits only Photoshop can do, the file size will increase accordingly.
- Unlike Photoshop, Camera Raw gives you a preview image. You can quickly see if you’ve made good choices before committing to a final merge which could take a lot of time.
- Merge to Panorama is more automated than Photomerge in Photoshop. You get fewer projections and just two options not found in Photoshop, Auto Crop and Boundary Warp.
Comparing Auto Crop and Boundary Warp
Auto Crop and Boundary Warp are different ways to resolve the empty space that can result when merging multiple images into a panorama. Auto Crop draws the largest crop rectangle that won’t leave empty areas. Boundary Warp stretches and distorts areas near edges to cover empty areas.

In this animation, the original image (first image) has empty areas that are resolved differently by Auto Crop (second image) and Boundary Warp (third image).
Start with Auto Crop, but if it crops out important content on any side, try Boundary Warp instead or a combination of the two options. Boundary Warp may visibly distort straight lines in a scene, such as architecture, so it usually works better with organic content such as a landscape.

Boundary Warp didn’t work well in this example, because it distorted the pillar in the bottom left corner.
The Panorama Command in Lightroom
If you prefer the Lightroom workflow, you can merge selected images in Lightroom by choosing Photo > Photo Merge > Panorama. The dialog box options and the DNG format for the merged panorama are the same as what you get using Camera Raw.

Why Not Just Make Panoramas In Camera?
Your smartphone or camera might already have a built-in panorama feature. Typically, this captures an entire scene in a single panorama as you rotate the camera horizontally or vertically. But an automatic in-camera panorama can suffer from exposure and alignment errors that are hard to repair later. They’re typically saved in JPEG format, which limits your ability to edit them.
When you shoot multiple overlapping images and merge them yourself, you have more control over exposure, focus, and color. If there are alignment problems among frames, you can try different ways to merge the images until it looks right.
Where to Go: The Big Picture
When you’ve got a set of photographic images to merge into a panorama, where do you start? Try merging first in Camera Raw or Lightroom to benefit from the smaller file size and image quality advantages of the DNG format.
Still not sure which way to go? These tips can help you choose:
- If you aren’t getting what you want from Camera Raw or Lightroom, try running the same set of images through Photomerge in Photoshop. The code behind those features is different, so some image sets merge better in Photoshop than in Camera Raw or Lightroom.
- If you want to use the Content Aware Fill Empty Areas option or the Collage and Reposition projections, use Photomerge in Photoshop. Those options aren’t available in Camera Raw or Lightroom.
- You can’t use Photoshop while it’s busy merging a panorama. But Camera Raw and Lightroom can process multiple merges in the background, so you can keep working on other images.
- In both Photoshop and Camera Raw/Lightroom, the panorama merge commands let you start from raw or non-raw images, and can build panoramas shot as multiple rows.
It may seem odd that Adobe offers panorama merge methods that aren’t the same. In the end, it’s a good thing, because you can choose the route that works best for the images you have.
This article was last modified on July 12, 2017
This article was first published on July 12, 2017
Commenting is easier and faster when you're logged in!

Recommended for you

dot-font: Fun with the Push Pin Legacy
dot-font was a collection of short articles written by editor and typographer Jo...

Free Lightroom 5 QuickStart Guide
For anyone looking to get a solid grasp on how to use Adobe Photoshop Lightroom,...

Photoshop Blur Gallery: Spin Blur
Learn a non-destructive, highly controllable way to apply selective blurs to ima...