


Focus Concerns
While half-pressing the button sets the exposure you want, it’s also going to set the focus. Since few digital cameras have manual focus, it’s understandable that this might be a concern. One thing to remember is that you want your background to have clarity, but it’s less important that the foreground object is in focus. The only responsibility of the subject is to provide a good amount of contrast from the background to isolate its shape. If you want more control over the focal range of your camera, play around with your camera’s focus modes such as counterweighted or spot metered. Not all cameras have them, so check your camera’s manual if you’re unsure.
Exposure Lock
Some cameras give you the ability to customize your exposure by locking in exposure readings. This allows you to override the automatic setting and shoot exclusively with your own desired exposure. This feature is usually buried in your camera’s menu, so again check out your manual if you’re unsure whether your digital camera has this feature. While it won’t make or break your silhouette, the exposure lock feature can make it easier to get the right shot.
Exposure Compensation
Almost every digital camera has some form of exposure compensation. This feature allows the user to increase or decrease the camera’s sensitivity to light. This can come in handy with silhouettes, especially if your camera is still giving you detail in your subject even after you’ve set the exposure for the bright background. By setting the exposure compensation for negative numbers, your camera underexposes the shot overall and minimizes the details in your subject, as illustrated in Figure 4.
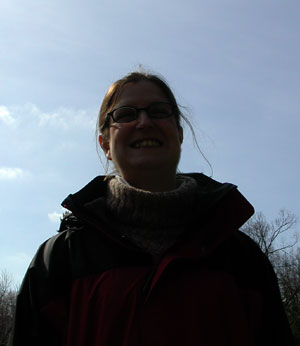
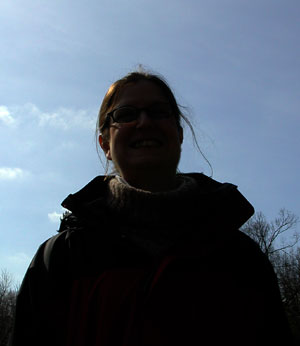
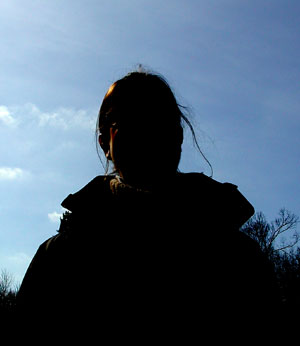
Figure 4: You can create better silhouettes by decreasing the exposure level on your camera.
Other Options
There are quite a few more options to tweak your camera to get a silhouette just right, but they depend of the capacity of your camera. Some cameras offer a specific picture mode that adjusts your camera to take a silhouette. Others offer manual control over your exposure system that can help get the right shot. When setting these manual controls, keep in mind that a good silhouette comes from a fast shutter speed, a slower aperture, negative exposure compensation, and a higher film speed. It’s hard to recommend exact settings for the wide range of scenes you’ll find yourself in when shooting silhouettes, but take advantage of every feature your camera has and find out which setting works best for you.
Silhouette Shooting Style
It’s digital, so shoot away! Take as many shots as you have memory to give you the widest range of shots to choose from. Experiment with different exposure settings — you can always check the EXIF data later to see what the settings were when you captured that perfect silhouette. Try changing your point of view or rearranging your subject to emphasize the most identifiable features. Remember that your LCD preview screen is your best friend in situations like these — no more waiting until your film gets processed to see your results. This digital camera standard feature is the best way to make sure you got the correct shot while you’re still at the scene. And, as always, it’s a good idea to use a tripod to minimize camera vibrations and ensure that your subject’s edges are distinct.
True to form
The use of silhouettes is a great technique for creating mood and emphasizing line. Hopefully, this article has shown you that shooting silhouettes doesn’t have to be difficult. By playing a few tricks on your camera, you can create stunning silhouettes of your own.

Creativepro.com readers can subscribe to Element K Journals at a discount. Click here to learn more.
This article was last modified on January 3, 2023
This article was first published on August 30, 2002
Commenting is easier and faster when you're logged in!

Recommended for you

dot-font: Fun with the Push Pin Legacy
dot-font was a collection of short articles written by editor and typographer Jo...

Adobe Introduces the Photoshop Photography Program
In a move that acknowledged the need for a cheaper, focused alternative to its e...
Creating Tilt-Shift Effects in Photoshop
The Tilt-Shift effect makes aerial views of landscapes look like model villages....