
It’s been much longer than I expected finishing this three-part tutorial on InDesign’s Data Merge feature, but it’s been a very busy period for me. You’ll find part 1 here, and part 2 here. When I left you, I had created a reminder card layout in InDesign CS2, and created text and graphic frame placeholders. I selected the data source and linked the data fields with the placeholder frames. Finally, I previewed the result.
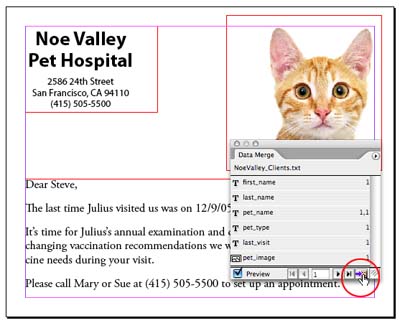
Now, it’s time to create the new data merge document. Click the Create Merged Document button (circled above), or choose Create Merged Document from the palette menu. This opens a three-tabbed-panel dialog box. The most important panel?Records?is where you select which records you want to include in your merged document. But equally important, you need to choose the number of records per document page. (This choice has tripped many people up.)
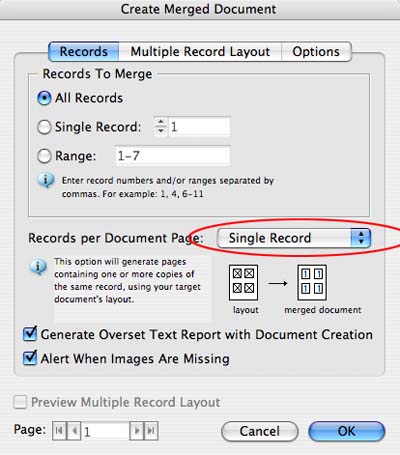
The layout we’re creating is a Single Record. That is, it creates exactly one physical page for each record in the merged document. (Remember, from our first posting, that a record is the complete set of fields that extend across the row of data. We’ll show you a Multiple Record layout next.) There are also options to generate a report if text gets overset in the process, or to generate an alert when images are missing.
You also want to click on the Options tab. Here you have choices for how to fit images in your graphic placeholder frames. (I prefer to presize my images to exact size ahead of time by running an action on the images in Photoshop.) You can also remove blank lines for empty fields or set a maximum number of records in a document. When you’re finished, click OK.
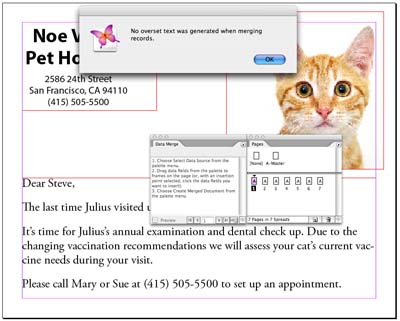
InDesign starts thinking about what to do. For a large data merge, this can take quite a while. Finally, it generates a new document containing the records you selected. As you can see in the illustration below, there was no overset text, and seven pages was generated in my simple example.
Multiple Record Layouts. Now let’s show you an example of a Multiple Record layout. This is an imaginary examination certificate which will be printed 4-up on a page.

I find it helpful to create guides to help me figure out how to position the 4-up layout. When you create the Multiple Record layout, you only place boilerplate and placeholders on the layout once. You’ll position the other records using the Create Merged Document dialog box. (You can also place data-field placeholders on a master page.) When you click the Preview, you’ll only see a preview of the first record. Click the Create Merged Document button to open the dialog box.
This time, in the Create Merged Document dialog, choose Multiple Records in the Records per Document Page popup menu. Now the Preview Multiple Record Layout becomes available at the bottom of the dialog box. Don’t worry if things aren’t lined up the way you want. Click on the Multiple Record Layout tab to fix that.
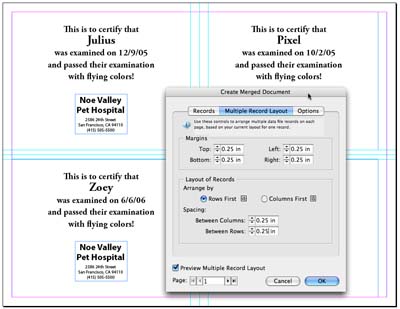
Here is where you position the other instances of records which will appear on the same page. You’ll need to tweak the controls in the Layout of Records section to position the other records. This is where having the guides on the page helps you to position the elements more precisely. When finished, click OK to generate your new merged document.
There are a lot of other fine points which could be added here, but this blog entry is long enough already. Continue to leave your comments here on your experiences using Data Merge. It’s not a perfect solution for all data needs, but it’s helpful for simpler layouts. And it’s free!
This article was last modified on December 18, 2021
This article was first published on March 18, 2007
Commenting is easier and faster when you're logged in!

Recommended for you

Meet the 2015 InDesign Team
InDesignSecrets members will have seen this month’s interview with product manag...

PDF/X-4 PDF Preset in InDesign CS3
When you start using InDesign CS3 (and the other CS3 applications) and export yo...
Troubleshooting Data Merge Errors
Working with the Data Merge feature of Adobe InDesign is something I do often. F...