
CSI: InDesign
A little forensic skill can save your bacon when you need to create a new version of an old project.
This article appears in Issue 12 of CreativePro Magazine.
Few things are more likely to dishearten even the cheeriest InDesign user than being asked to revise or redesign a big legacy project that was badly put together.
“We need this brought up to date,” the email says, or maybe “Can you redesign this?” with a subtext: Should be pretty simple, you just have to modify what’s already there.
If you don’t feel nervous, I bet it’s your first project like this. Seasoned designers will experience a frisson of cold dread.
If it’s a document or book you haven’t seen before, you have no idea who created it or how many people may have worked on it over the years. You don’t know how it was put together, and at first glance there’s no pattern you can get your mind around. As you work through these steps you will uncover its secrets.
Whatever your design skill level, avoid pain by following these guidelines.
Strategy for Success
Here is your procedure for turning a suspect and mysterious legacy project into something you can work with comfortably and efficiently:
- Secure. Make sure the document file itself is as free of internal errors as possible.
- Repair. Fix the obvious problems with styles, swatches, fonts, and linked graphics.
- Analyze. Study how the document was put together. Determine whether the styles complement the information and how the document’s structure can be simplified.
- Organize. Set up the document your way with style names, style groups, layers, and preferences, to fit your most productive workflow.
Secure: A Good Place to Start
The best first step with a legacy document is to immediately save a fresh version of your document as an InDesign Markup Language (IDML) file. Ignore, for now, all the warnings about missing fonts and links.
Why IDML? An InDesign document, particularly a long one that has been extensively edited, accumulates all kinds of mysterious internal data along its journey. This information bloats the file size and can cause weird behavior or random crashes. An IDML is a plain-text XML file that describes the document and its contents as it is, not how it came to be. It’s a blueprint that, when opened anew in InDesign, rebuilds the original document as a fresh INDD piece by piece. It doesn’t contain any crud.
Tip: If you open an InDesign document (INDD) and you see [Converted] next to the filename in the tab of the document, save it as an IDML—don’t hesitate. The bleached bones of unwary designers are testament to the importance of this step.
Close the original document without saving. Add “_Original” or something similar to the filename.
Now, open your IDML. Even if it has missing fonts, missing links, random spot colors, and other structural problems, you now have a fresh, stable InDesign document. Save it as a new INDD and back up the file.
If you can’t even get this far because InDesign crashes or can’t open the document at all, see the sidebar “When Disaster Strikes.”
It’s rare, but it happens: You open a file, and InDesign crashes or freezes. You can’t save as IDML if you can’t open the file in the first place. So, what can you do?
Beginning with its 2021 release, InDesign can recognize a corrupted document and will offer to try to fix it. The service uploads the document to the cloud, where Adobe’s software analyzes the file, fixes it if possible, and downloads it back to your computer. Steve Werner covered this feature in his review of InDesign CC 2021. More details are on this Adobe Help page.
This capability doesn’t always fix a problem document, however. Markzware, a longtime third-party developer, offers its DTP File Recovery Service, a paid document repair service, and it is often successful when the automated service fails.
You can also send your document as an attachment to id****@***be.com, and Adobe engineers will examine it (and potentially learn from it to improve future versions).
Repair: Call in the Cleanup Crew
Unless what you inherited was expertly and carefully built, it’s going to need some cleanup. If your file has been through several generations of designers, it will definitely need help.
Your first target is to clear out the obvious crud and reduce the scary number of errors that Preflight says are there.
You might be missing some fonts (or all of them, for that matter), and perhaps you’ll also see Adobe’s recent bonus warning about Type 1 fonts (Figure 1).
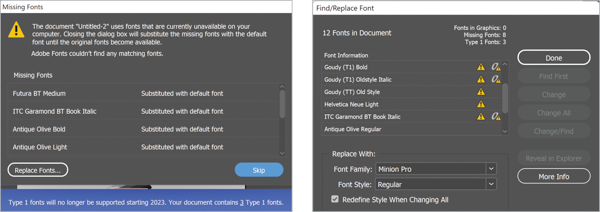
Figure 1. Missing fonts might be “all of them!” Note the warning about Type 1 fonts. It won’t go away until you close the document.
If your document contains any Type 1 fonts, you’ll see a blue warning alert, as shown in Figure 1. The number of affected fonts contains a link to the Find/Replace Fonts dialog box. There, in the list of document fonts, any that are Type 1 format will show the longtime lowercase-a icon for Postscript printer fonts. (See sidebar, “Replace Your Type 1 Postscript Fonts.”)
Type 1 Postscript fonts were introduced in 1984 and for years were the industry standard for professional graphic design. But over the years, they have become incompatible with modern design needs, from world language typesetting to support in web browsers. In 2021, Adobe announced plans to retire support for the format in InDesign and some other programs.
Even if the legacy project’s design calls for the typeface to remain, it is essential to replace the Type 1 fonts with OpenType versions so as not to pass on a problem to the next person who has to update this document. (And if you are following this guidance in 2023—when your Type 1 fonts become invisible to InDesign and will show up as missing even if activated as usual—you might well be that person.)
You might also find missing links, swatches that don’t correspond to the colors used in the document, and, far too often, style overrides galore.
At the bottom of the window, InDesign’s [Basic] preflight profile will alert you to the most important problems. Open the Preflight panel (Command+Option+Shift+F or Ctrl+Alt+Shift+F), click the On checkbox, and select [Basic] as the profile (Figure 2). Your mission is to reduce the number of errors to 0 and turn the red dot into a green one.
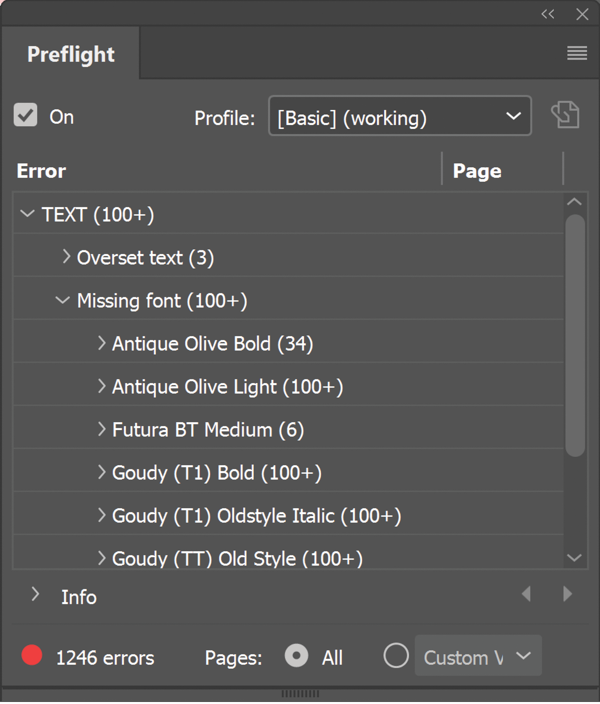
Figure 2. The Preflight panel measures how far you have to go to clean up someone else’s document.
Tackle styles first
To reduce the chaos, start by putting paragraph and character styles in alphabetical order using Sort by Name from the panel menu (Figure 3).
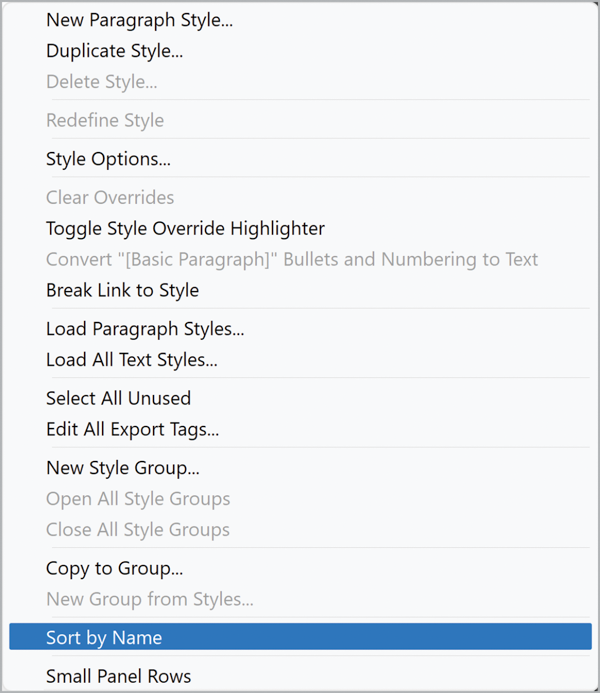
Figure 3. Sort by Name is a great first step to getting styles under control.
Why? It’s common to find several styles variously named Body, especially if a document has been through several iterations in the hands of different designers. Consolidating multiple styles for a single design element will mean less hunting later in a shorter panel of styles.
Tackle paragraph styles first. Use the panel menu to choose Select All Unused (Figure 4), then delete the selected styles in the list. Some will simply disappear.
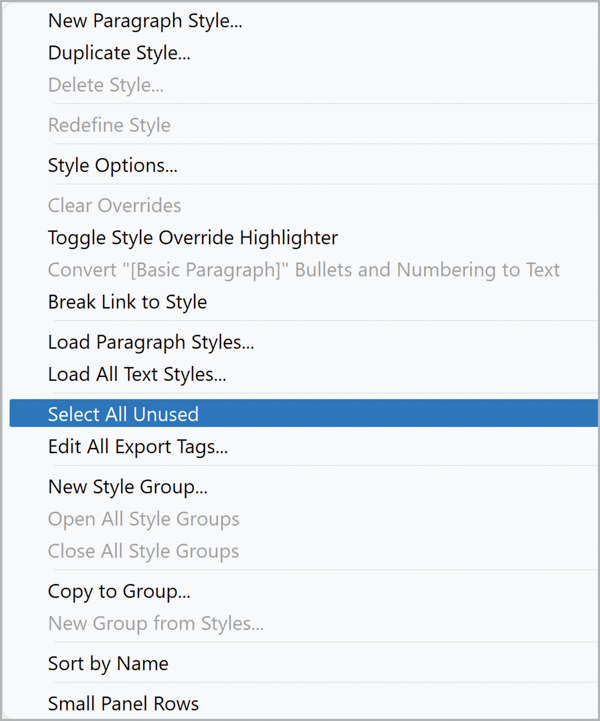
Figure 4. Select All Unused is your friend!
If a warning message pops up asking if you want to replace a selected style with another one (Figure 5), that means additional, in-use styles may be based on the one you’re trying to delete. If you get this alert, repeat Select All Unused and click the Cancel button. Repeat until there aren’t any more or until you start encountering styles you’ve already seen in this process.

Figure 5. If InDesign offers to replace a style with [Basic Paragraph], always click Cancel.
Run the same sequence of steps, if applicable, for character styles, table styles, cell styles, and object styles.
Tip: Resist the urge to jump in with both feet. Don’t go overboard and start renaming or improving anything at this point. All you want is to clear away the brush so you don’t have anything redundant to bother you going forward.
Once in a while, you will run across a document in which, after you Select All Unused in the Paragraph Styles panel, you find the trashcan icon is grayed out. Scroll to the top of the list. You’ll see that [Basic Paragraph] is one of the selected styles, and InDesign won’t let you can’t delete that default style.
Just deselect [Basic Paragraph], and the trashcan will work.
Missing fonts
If you are going to change the typefaces in your document, you have options.
You can do it the hard way, by changing the individual paragraph and character styles. Not only must you decipher which styles are based on which other styles—if the original designer set Based On styles—you will often have a great many styles to change individually.
This is just too much extra work unless the existing styles are few and well-organized, and it will still leave you with a bunch of style overrides to handle.
Or, you can do it the faster, simpler, and more comprehensive way: Use Find/Replace Font from the Type menu (Figure 6). The more styles there are in the document, the more time you will save.
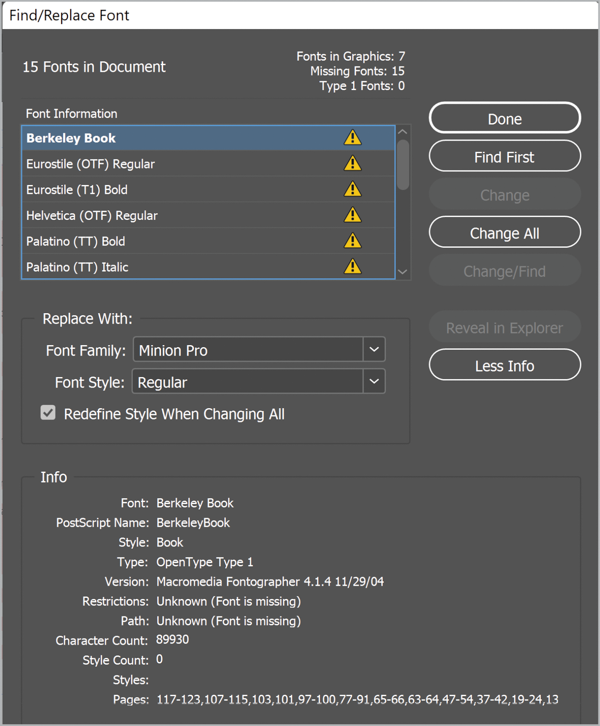
Figure 6. The Find/Replace Font dialog box with everything turned on.
Turn on Redefine Style When Changing All in the Find/Replace Font dialog box, and any character or paragraph styles using that font will update at the same time.
Click More Info in the dialog box to see additional details about each font, including whether a missing font is in a placed graphic (in which case, you won’t be able to update it from InDesign). You may not have to worry about it if it’s in a PDF with fonts embedded, for example, but if you can modify the PDF to use a different font or obtain the missing font, so much the better.
Before you start, be sure to unlock any locked layers so that InDesign can make changes to them.
Work your way through the list of all the missing fonts until you have replaced the ones you can. If you can’t replace all of them, any stragglers should show up in linked EPS, PSD, PDF, or INDD files only. The Find/Replace Fonts panel gives you the status (Figure 7).

Figure 7. Fonts in graphics
Standardize your swatches
The Swatches panel in a legacy document is sometimes a mess of not-quite-identical colors, RGB swatches mixed with CMYK, several varieties of black, and assorted spot colors.
As with styles, your best first step is to use the panel menu’s Select All Unused command. Any swatches that aren’t used in the document will be highlighted (Figure 8). Click the trashcan icon to remove them.
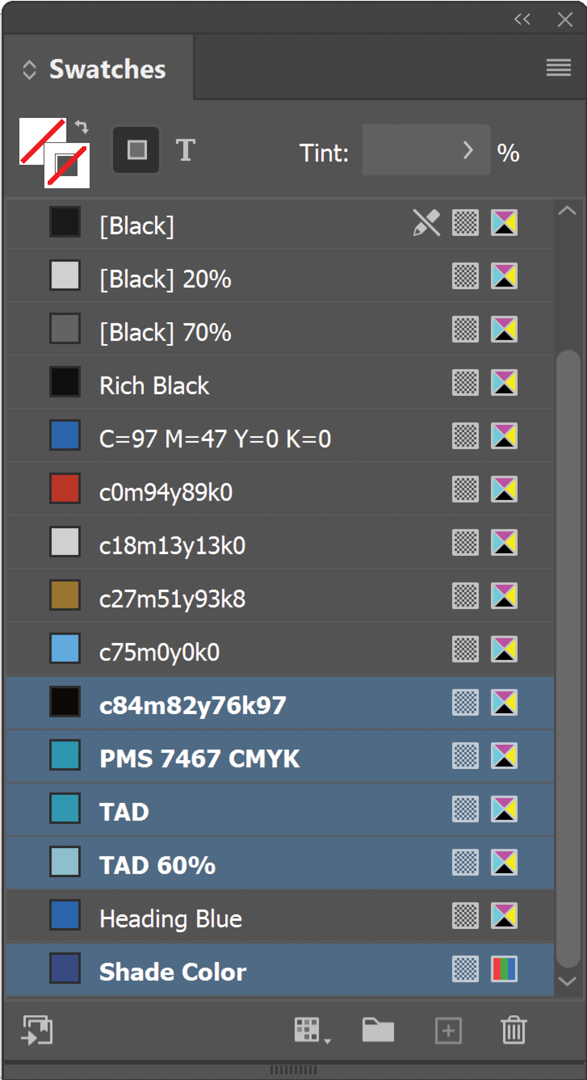
Figure 8. Use Select All Unused to prune an overgrown Swatches panel.
When you’re dealing with a legacy InDesign package, you might see InDesign refuse to recognize fonts that seem to be right there in the Document Fonts folder.
A recent bug—now fixed in an update—created problems with specific fonts.
A problem shows up in Windows when opening a packaged InDesign project that was created on a Mac and that used Mac system fonts. The font files seem to be there, at first glance, but have a file size of 0 bytes or are Mac-specific formats like DFONT.
A best practice is to replace these fonts in your document with an OpenType version of the same or a similar font. OpenType fonts are cross-platform, so you will know you aren’t leaving a potential problem for some future designer to have to deal with.
Missing links
Fixing all missing links can be as simple as picking any item in the Links panel that InDesign flags as missing, clicking the Relink button, and navigating to the new location for that item. Be sure to turn on Search For Missing Links In This Folder (Figure 9) so that any other missing links referenced in the document will be relinked automatically if the file also lurks in that folder.

Be sure Search For Missing Links In This Folder is always turned on.
Hiding in plain sight
Even when all of your document’s links are in the Links folder of a package, where InDesign should look for them automatically, they will commonly all show as missing in the Links panel.
This happens because the document is looking for the original absolute path to the linked file (e.g., C:\Users\MyName\Documents\MyPackage\Links in Windows, or /Users/MyName/Desktop/MyPackage/Link for macOS).
If you are opening the document on a machine that’s different from the one it was created on, which is likely, InDesign will fail to find these items even though they are sitting right there. Relink just as you would with any other type of missing linked item. If the project was packaged correctly, when you relink one file, all the other links should automatically update.
In some cases, you won’t have all the original illustrations or images, but it’s preferable to end this Repair stage with a green Preflight status. If there aren’t too many, go to each missing item in turn by right-clicking the item in the Links panel and choosing Go to Link (Figure 10). Note what that item is and its size, then create a dummy version in Illustrator or Photoshop as appropriate. Save it with the same name and in the place where InDesign expects to find it. Make it obvious that it’s a dummy by filling it with 100% magenta or cyan so that it will stand out on the page.
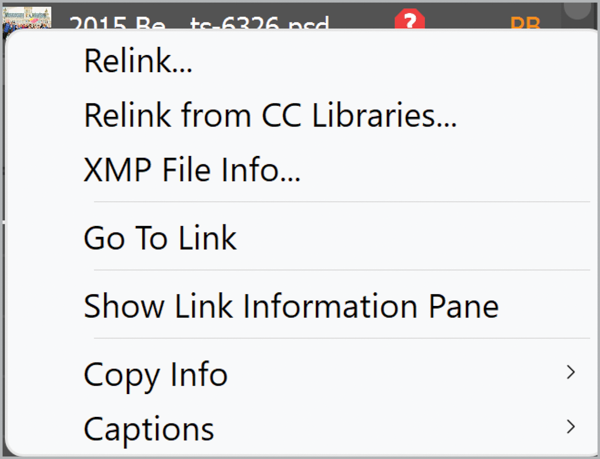
Figure 10. Go To Link works, even if the item itself is missing.
Some parents are redundant
Your Pages panel might contain legacy parent pages that are no longer in use anywhere in the live document. From the panel menu, choose Parent Pages > Select Unused Parents and delete them.
Packages are a good thing
At this point, you have a document with no flagrant technical errors. Preflight shows you the happy green dot, so the next thing to do is to create a fresh InDesign package (File > Package). That will corral packageable fonts and linked items into one place, making them much simpler to deal with.
Be sure to select the option to create an IDML file with the package and to copy all the linked graphics and fonts. Figure 11 shows the options to select in the Package Save dialog.

Figure 11. Use these Package options to create your working copy.
Save your current working document as a backup.
From here on you will use only the files in the new package. Use the IDML file in the package to create a fresh INDD, free of any crud that may have built up while you were doing all that style weeding and font changing, and you’re ready for the next stage.
Analyze the Document
Your purpose now is to familiarize yourself with the legacy you’ve been bequeathed. You’re about to peel off the next layer of mystery and confusion, and a small amount of time spent on this stage will return huge savings when you begin the actual updates or redesign. This stage overlaps a bit with the final one, so you’ll do some reorganizing as you go.
Layers
You may have a document where everything is on one layer (usually a bad thing), or where several layers share the load. Take a few minutes to look through the document and its parent pages to see if you can infer the original designer’s rationale. That understanding will inform your decisions about what will need to change.
Style hierarchy
If previous designers who worked on your document were halfway competent, they created paragraph styles based on other styles, creating one or more style hierarchies. Unfortunately, InDesign doesn’t give you any way to see this structure other than by opening each style for editing.
Of all the steps in deciphering a complex document, this is the one where a script is almost a necessity, and In-Tools has you covered with Show Paragraph Based-on. Just run this life saver of a script on any open document, and a panel will display the paragraph styles (Figure 12). Click the disclosure triangles to reveal hierarchies of styles based on that particular style.
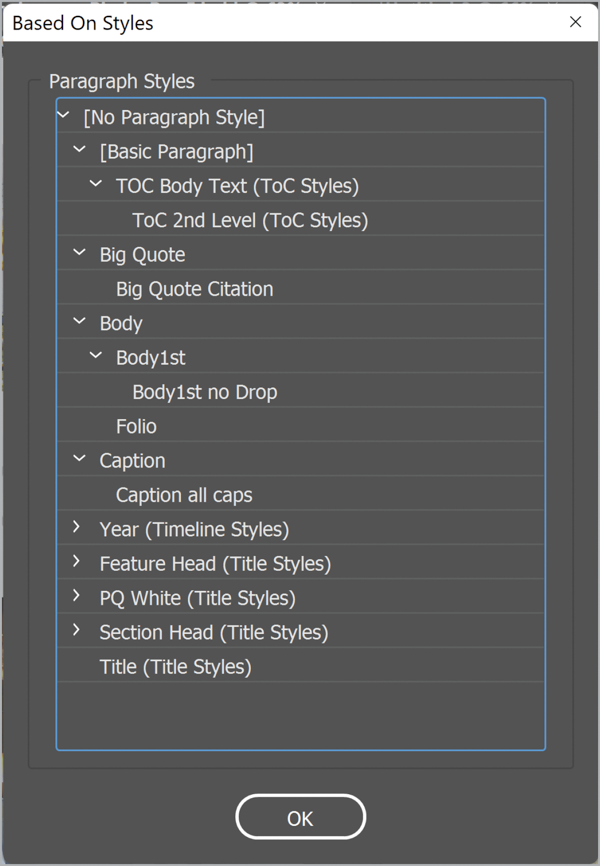
Figure 12. The Show Paragraph Based-on script is the best way to discover the style hierarchy.
Local formatting
The bane of diligent designers is local overrides, and in a legacy document there may be many. There are even documents out there in which the text formatting is all local formatting, with nary a named style in sight.
A good first step is to turn on the Style Overrides Highlighter in either the Paragraph or Character Styles panel. It’s the [a+] icon near the panel’s top-right corner (Figure 13).
Figure 13. That odd [a+] icon near the top right turns on the style override indicator.
You can also clean up overrides quite easily if you handle character styles before you tackle paragraph styles. That way, you won’t accidentally eliminate applied italics or bold, for example, by applying a new paragraph style to locally formatted text.
One by one, use the Styles feature in the Find/Replace dialog box to look for applied italic overrides and replace them with an italic character style. Then do the same with applied bold overrides and other locally formatted text.
Depending on what you find, you may want to reach for a script that can analyze the differences in local formatting applied to the text, then create and apply a set of automatically named styles that you can later rename and refine. Two examples: Id-Extras’ Auto Character Styles (paid), or DTP Tools’ PowerStyles plug-in (subscription).
There are also free scripts, but they aren’t always up to date. (Those I was able to test would not run in InDesign 2022. They might help if you are using an earlier release, though.)
Find/Replace Styles
At this point you’re likely to have at least some obscurely named paragraph styles that you don’t understand. They might even have shown up as unused but wouldn’t go away without demanding you replace them with something. (Which you didn’t do, right?)
Open the Find/Change dialog box and turn on the first five icons under Search. This will allow InDesign to look in hidden and locked layers, parent pages, locked stories, footnotes—everywhere (Figure 14). If the style was ever used in the document, no matter where it is hiding, you’ll find it. Rename it, if you prefer, to something that makes sense to you.
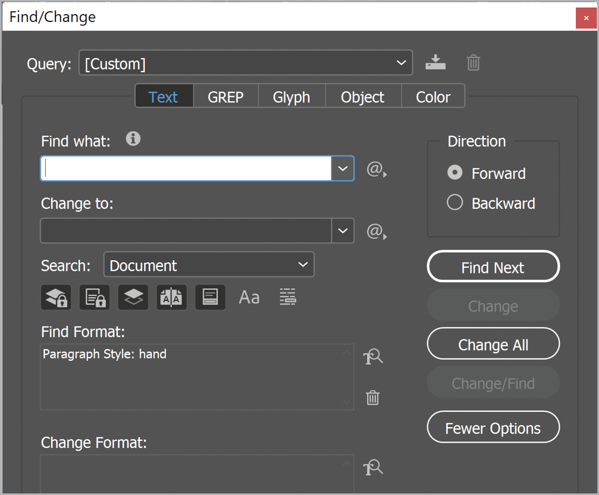
Figure 14. Find/Change Styles is a fast way to discover what an obscure style actually is.
Repeat this step until you know what all the paragraph and character style names refer to.
Two essential style scripts
A hugely useful script by Dave Saunders that can help with analyzing the styles in a document is described in this post. It creates a styled list of styles: a list of the names of paragraph styles in the document, each displayed in its respective style.
The script generates the list in a single, probably overset, text frame on the pasteboard to the left of the first page in your document. Cut the frame, create a new document, and paste. If some styles have a character color of [Paper], give the document a light gray background so that you can see everything (Figure 15).
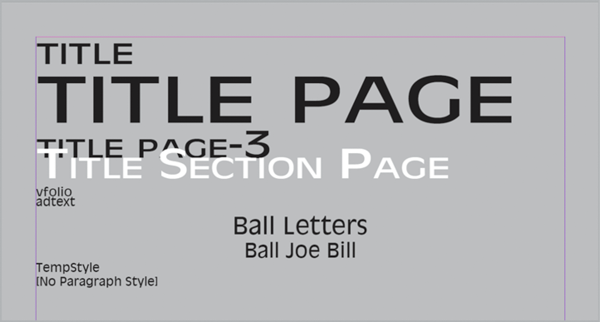
Figure 15. The Styled List of Styles script is your quick reference to all the paragraph styles in the document.
List Paragraph and Character Styles is a script by Kasyan Servetsky that analyzes a document and produces a file listing all its paragraph and character styles. You can open the delimited file as a spreadsheet in Excel or a similar program (Figure 16).
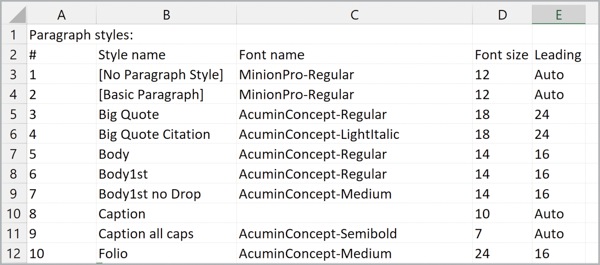
Figure 16. For reference, you can create a spreadsheet listing all paragraph and character styles.
Tip: You might find it useful to print the output of both these scripts.
Other styles
Browse through any object, table, or cell styles in the document to get familiar with how they are used. You might be tempted to start renaming things. Although there’s no harm in doing that now, it really should be part of the final Organize step. Rename any styles that don’t fit your way of working. You’ll thank yourself later.
Unnamed colors
It’s not uncommon for a document to contain unnamed colors that were never added to the Swatches panel. These unnamed colors can make consistent color almost impossible to achieve and, like local overrides, they can be a real pain.
To sort your color swatches out in earlier versions of InDesign, it could be almost impossible without a script, but since the 2021 release the Find/Change dialog box has a new tab: Color. Herding colors is now much easier.
The Color tab comes with a bonus: Its selector list includes used colors that never made it into the Swatches panel (Figure 17).

Figure 17. The Color tab in Find/Change also shows colors that were never added to the Swatches panel.
You will likely find several very similar colors—so similar that a previous designer probably intended them to be identical. The four light grays in the example document almost certainly should be one color defined by a swatch. That swatch will allow you to update the color everywhere it is used with a single edit, knowing you haven’t missed anything.
Discover where an unnamed color has been applied by selecting it in the Find menu and choosing Find Next (Figure 18). In this case, the color applied to the stroke of the circle, the horizontal lines, and the vertical lines are all slightly different, and all are unnamed. Once you know where and how these near-identical colors are used, choose one of these as the color and make it a swatch if it isn’t already one. Then delete the other variations, choosing the option to replace the color with your chosen swatch.
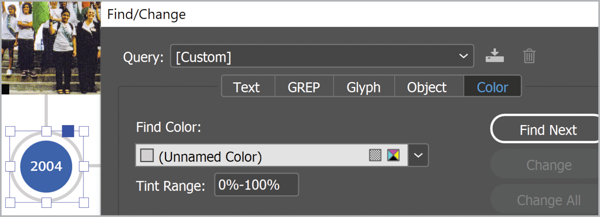
Figure 18. Use Find Color to discover where and how a swatch or a random color is being used.
While you’re at it, give the swatch a useful name (Gray Strokes, for example) that identifies what it does. This will help speed your work on the document far more than you might expect. (See my article “The Roots of Efficiency” in CreativePro Magazine, Issue #4 for more ways to work faster.)
Note: If you find that the choice (Unnamed Color) persists in the Find Color field menu even after all its instances seem to have been replaced, turn on the Include Parent Pages, Include Locked Layers and Locked Objects, Include Hidden Layers, and Include Locked Stories icons in Find/Change and try again. It might also be applied to a locked object or an object on a locked layer.
What’s that color for?
You’re usually still faced with figuring out where all the remaining swatches are used. Few designers take the time to name their swatches in a way that indicates what they are for, so you probably have a set of CMYK and/or RGB numbers and little else.
Use Find/Change to get a feel for how and where the document swatches are used, and rename them accordingly.
Parents and their children
Take some time to see how the parent pages are set up. You might find parent pages that apply to only a single page in the document, or you might identify obvious ways to use elements on a parent page to simplify editing later.
Organize: Make It Your Own
The last stage in the process is to make the document into something familiar and easy to work with—one that behaves like a document you would have set up yourself.
- Give paragraph and character styles meaningful names, familiar keyboard shortcuts, and group them.
- Do the same for object styles and any table or cell styles.
- Name swatches so it’s instantly clear what they do.
- Set up layers, if the document needs them, with meaningful names like Text, Graphics, Die Line, and so on.
Multiple documents
If you have multiple documents with the same styles, whether they are in an actual book or not, there’s a fast way to bring the rest of them into line using InDesign’s Book feature. Create a new Book, if necessary; add all the related documents to it; and make the one you just sorted out the Style Source (Figure 19). Hat tip to Elena Reznikova for pointing this out.

If these documents are not actually part of a book, choose Book Page Numbering Options and turn off Automatically Update Page & Section Numbers (Figure 20) so that InDesign won’t give them consecutive page numbers.
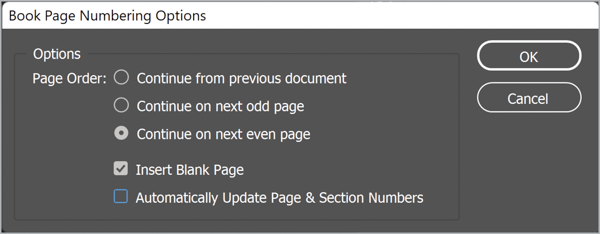
With nothing selected (this is important!) in the Book panel, as shown in the figure, choose Synchronize Book from the panel menu.
And You’re Done!
These are just a few of the most important techniques that make handling legacy documents less painful. I use all of these steps every time I get someone else’s design to update or refresh. If this four-step process helps to make your life easier one day, I’ll have done my job.
Good hunting!
This article from CreativePro Magazine is for members only. To continue reading, please log in above, or sign up for a membership today! Thanks for supporting CreativePro!
Commenting is easier and faster when you're logged in!

Recommended for you

New Contest! The Case of the Jaggy Image
Solve this InDesign mystery for a chance at winning a great prize.
The Mystery of the Phantom Fill and Stroke Contest Answer and Winner
Solve this InDesign mystery for a chance at winning a great prize.
New Contest! The Case of the Imperfect Paste
Solve this InDesign mystery for a chance at winning a great prize.