
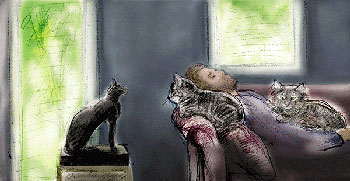
Patching Up Gaps and Holes. After equalizing the color and value of the image and eliminating blurred and double-images, I had another major problem to contend with. Although I had tried very hard to maintain top-to-bottom registration as I photographed the studio wall, I had bobbed up and down just enough to create some gaps in the image. The easiest solution would have been to simply crop the image to the area that was intact. However, that would have meant losing a few paintings that I wanted to keep in the composition. In some instances I could have re-shot the scene, but this would have been more time-consuming than just faking it in those missing areas. Depending on what the image looked like in a problem area, I used different techniques to fill the gaps, including moving copies of portions of the image down or up, stretching regions to fill gaps, and using the Clone Stamp tool to copy portions from another section of the image.
In a few instances, I decided to stretch a copy of a portion of the image to fill the gap in it. I’d first select the area that I wanted to stretch. Sometimes I’d need to hide some layers before I copied the area. Most of the time, the area that I wanted to expand existed on multiple layers, so I couldn’t simply use the Copy command. To copy a selection that covers multiple layers, make sure that you have a visible layer active, choose Edit> Copy Merged (Command+Shift+C for Mac, Ctrl+Shift+C for Windows), and then select Paste to place a copy of the merged area into its own layer. Once the copy exists on its own layer, you can choose Edit> Transform (Command+T for Mac, Ctrl+T for Windows).
I started by stretching copies to fill the gaps (see figure 18). In the case of the orange area, I only needed to stretch it down, while in other instances I needed to enlarge the copy in a number of dimensions. When I was satisfied, I clicked OK.
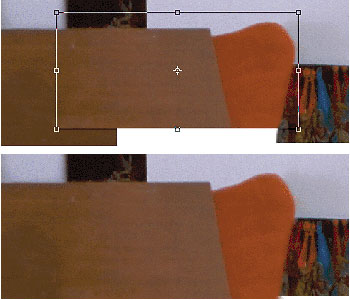 Figure 18: Stretching the transformation down to fill the gap (I needed to enlarge the copy slightly taller from the top as well), and the copy after the transformation was applied.
Throughout the reparation of this image, I used a variety of different patching methods, including the Clone Stamp tool, which I used to clone part of an image or a texture from one area to another. Before cloning, I’d always start by creating a new layer above the existing one (by clicking the New Layer icon). With this new layer active, I’d then use the Clone Stamp to clone into the new layer, using the Use All Layers option.
Before you can clone from one area to another with the Clone Stamp tool, you have to define the area that you are cloning. Hold the Option key (Mac) or Alt key (Windows) and click to define the area you want to clone and then move your cursor to the area from where you would like to re-create the original and start drawing. For more precision in locating where the clone starts or begins, press the Caps Lock key, which will change your cursor into a crosshair, the center of the crosshair being your exact location. When you want to copy a larger area to another location (like I did to clone the shadow from under one of my paintings to under another painting) use the Aligned option; as you draw you’ll continue to align the clone to the original until you tell it otherwise.
In areas where you want to clone texture (such as patching in an area of the wall), disable the Aligned option so that each time you begin to draw you’ll re-reference the original starting point. Use the Aligned option to redraw something specific, such the right ceiling beam to replace the left one. Whenever you use the Clone Stamp tool, I highly recommend that you work in a blank new layer, above the rest of your image so that you don’t affect the actual image itself.
Note: To draw lines with any tool (including the Clone Stamp tool), click where you want the line to begin, hold down the Shift key, and click to connect your first mark with a line.
Sometimes the simplest solution is best. In patching the area around my studio cart, I first selected an area, chose Edit> Copy Merged, and pasted it into its own layer. I first tried to stretch the area above to cover the blank space below, but when I was unhappy with the stretched painting, I deleted that layer and started over. Instead I pasted another copy on top into its own layer and simply moved it down to cover the blank space. To blend the copy with the version below, I created a Layer Mask for the copy and used painting tools to soften the transition between the layers (see figure 19).
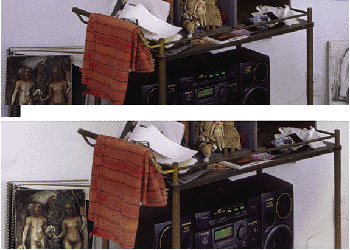 Figure 19: Before and after patching the area around my studio cart.
More Exploration Suggestions
Experiment with different ways to change the color or value of an area of your image using Adjustment Layers (Levels, Curves, Hue/Saturation, and so on) and then try different ways to isolate the area, such as the following:
- Select an area, copy and paste (using Copy Merged if necessary), and create an Adjustment Layer that is grouped with the copy by holding Option (Mac) or Alt (Windows) when you create the Adjustment Layer.
- Select an area and create an Adjustment Layer for that selection using its Layer Mask.
- Select an area, Invert the selection (Select> Inverse), and create an Adjustment Layer for that selection using its Layer Mask.
- Select an area, create an Adjustment Layer for that selection using its Layer Mask, and then invert the Layer Mask (Command+I for Mac, Ctrl+I for Windows).
The next few times you need to clean up an image, try to use these different methods:
- Duplicate a layer, apply a filter, hold Option (Mac) or Alt (Windows) when you create a Layer Mask, and then paint in the filtered area using white in your Layer Mask.
- Make an Adjustment Layer and lighten or darken the image, then reverse the Adjustment Layer Mask, and paint into the Mask with white to reveal the adjustment.
- In a new, blank layer above your image, use the Clone Stamp tool to clone good areas of your image over problem ones. To make corrections, re-clone, erase, or attach a Layer Mask to this clone layer to paint out areas you choose.
- Place layers above an image so that you can touch up lights and darks. To touch up lights, set the Layer Blending mode to Screen or Normal. To touch up darks, set the Layer Blending mode to Multiply or Normal. Try different blending modes on each of the touch-up layers.
- Try patching holes in an image by stretching, moving, and cloning areas from elsewhere in the image into new layers above the original.
From Creative Thinking in Photoshop, ISBN 0735711224; Chapter 2, Copyright 2002. Reproduced by permission of New Riders Pubishing
This article was last modified on January 3, 2023
This article was first published on December 13, 2002
Commenting is easier and faster when you're logged in!

Recommended for you
Turning Grayscale to Color in Photoshop
When it comes to creating multitone images, it’s common to think of using the Du...

CreativePro Tip of the Week: Viewing Illustrator Artwork as Outlines
This CreativePro tip for viewing Illustrator artwork as outlines was sent to Tip...

Hands-On Review of the Microsoft Surface Studio
Recently Microsoft announced their latest pieces of hardware for the Surface pro...