
Unifying Color and Patching Together Missing Pieces
I covered the basics of compositing this single image from seven digitized photos in Chapter 1 (see figure 10). As it turns out, the reality of repairing what went wrong in the process was by far the most time-consuming part of project.
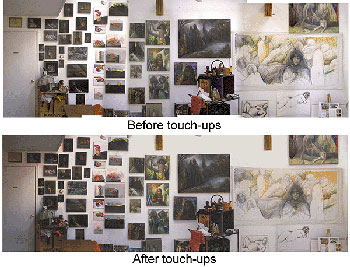 Figure 10: The rough composite of the studio after I’d created basic vertical gradient Layer Masks but before other touch-ups, and the final studio after touch-ups.
Using a 35mm camera on a tripod and a 50mm lens, I intended to take a sequence of shots that kept the same framing top to bottom. As I moved from left to right, I wanted to overlap each picture with the previous shot and get a shot of each column of paintings centered in the frame. Additionally, I wanted to take two versions of each shot, one with natural light only and with daylight-light bulbs boosting the light.
I stood with my back up against the opposite wall and framed the first shot. I measured the distance from my rear tripod leg to the wall and made note as to what was in the top and bottom, left and right of my frame. I took a shot, crossed the room to turn on the daylight bulbs (to boost the natural light), and took the second shot. I’d then reset the lights, move over the tripod, and take the next shot. Needless to say, this was an imperfect way to proceed. When I got my PhotoCD back from the lab along with the mounted slides, I found a variety of problems. First, although I had intended each framing of a shot to be exposed with daylight alone and with the boost of lights, I had unintentionally missed a few shots. As a result, some of the shots were taken with just daylight, others with just the boosting light, so I couldn’t just choose one consistent lighting style to use. The next problem was that I’d forgotten to center one column of paintings in frame (starting with the green apples at the top). Though I did at least have these paintings at the edges of the shots to the left and right of the missed column of pictures, the missing shot would make it a bit more difficult to line up the transition from one shot to the next. Lastly, and not surprisingly, the horizontal framing of the sequence bobbed up and down just enough to create gaps in the framing of the overall composite. I’ll cover how I solved each of these issues separately, along with some other issues that popped up along the way.
Unifying the Color Balance of Separate Shots. After compositing the images together, the Photoshop file contained seven separate layers. The bottom layer was the leftmost shot, with each consecutive shot in the layer above. Each layer, except the original Background layer, had a Layer Mask attached to it, which helped to form the basic transitions between one shot and the shot below it. Each Layer Mask contained a black-to-white vertical Linear Gradient that revealed (black) the image below and then gradually transitioned to reveal (white) the attached layer (see figure 11). (For more details on this process, please see Chapter 1.)
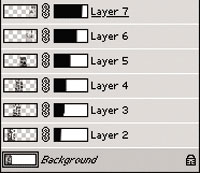 Figure 11: The Layers palette with each of the shots on its own layer. Attached to each layer is a Layer Mask containing a vertical Linear Gradient that creates the transition from that layer to the layer below.
If you simply create a new Adjustment Layer, that adjustment will affect all layers that are positioned below it. However, you also can create Adjustment Layers that are attached to and affect only the specific layer directly below it. To create an Adjustment Layer that is automatically attached to the currently active layer, hold down the Option key (Mac) or Alt key (Windows) while you choose a New Adjustment Layer from the Layers palette (such as Levels, Curves, and so on). In the dialog box, check the Group With Previous Layer option and click OK. When you enable this, the Adjustment Layer will affect only the layer that was currently active when you created the layer. Then you can make adjustments that will apply to only the layer below it and click OK when you’re satisfied. You’ll notice that in the Layers palette, an arrow that points down indicates that an Adjustment Layer is grouped with the layer below (see figure 12).
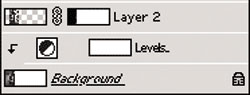 Figure 12: In the Layers palette, the Background layer is shown first with an Adjustment Layer grouped to it.
For this studio composite, to blend in color and value with the layer below it, each layer needed its own Adjustment Layer. Starting from the Background layer, I created a Levels Adjustment Layer, holding down Option to group it with that layer and made the Levels adjustment to that layer. Then I moved to the next layer and created a new Adjustment layer for it (see figure 13). Sometimes I’d toggle the Layer Mask off (Shift+click on the Layer Mask icon) to better see the effects of the adjustment.
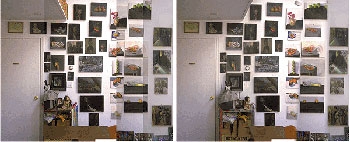 Figure 13: A section of the studio composite is shown first with the Layer Masks hidden, then active, and finally after I’d applied the Adjustment Layers to each layer.
Layers 5–7 required a similar adjustment to the one that I had created for Layer 4. Instead of creating new Adjustment Layers for each of these layers, I duplicated the Adjustment Layer for Layer 4 (by dragging the icon over the New Layer icon in the Layers palette). I then dragged the duplicate into position above the next layer that needed that adjustment. To manually group this moved layer with its new Adjustment Layer, in the Layers palette, hold Option (for Mac) or Alt (for Windows) and click the line between the two layers (see figure 14). You can detach an Adjustment Layer from the layer it’s been grouped with by holding Option (Mac) or Alt (Windows) and clicking again on the line in the Layers palette that separates an Adjustment Layer from the layer below.
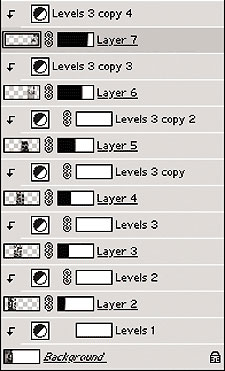 Figure 14: The Layers palette for the studio shown after I created the Adjustment Layers. For Layers 5–7 I duplicated the Adjustment for Layer 4 (by dragging it over the New Layer icon), moved it into position, and then manually grouped it with the layer below by clicking the line between them in the Layers palette while holding down Option(Alt).
As always, you can create Adjustment Layers that apply to all layers below the adjustment (and not just the layer directly below it). To lighten up the very bottom section of the entire image, I first activated the topmost layer in the Layers palette. Next, I used the Rectangular Marquee tool to select a strip along the bottom of the entire composition. Then I created a New Adjustment Layer and chose Levels so I could then lighten the selected area by moving the center slider to the left and clicked OK. Into this Layer Mask for the new Adjustment Layer, I then used the Linear Gradient tool to replace the temporary rectangular mask with a black-to-white horizontal gradient, smoothing the transition from this lightened adjustment to the rest of the image (see figure 15).
Note: You can connect any two layers by clicking the line between the layers while holding down Option(Alt), but connecting layers can create different results, such as Clipping Groups (depending on what type of layers you are connecting).
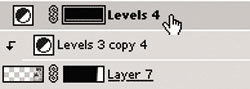 Figure 15: The Layers palette showing the horizontal strip lightening up the bottom of the entire image.
Refining Transitions in the Layer Masks. It would be great if Linear Gradient masks created smooth transitions from one image to another, but the reality of this is that for most projects, such transitions need to be manually modified. The vertical Linear Gradients did a perfectly fine job creating transitions for most of the shots of flat paintings against a flat wall. However, there were blurred and double images where the images weren’t in perfect alignment from one shot to the next. This was most evident where the gradients couldn’t be placed in areas between objects, such as in the column of paintings missing the straight-on shot and with the three-dimensional objects such as the carts. To eliminate the blurred and double images, I needed to manually clean up the transitions in the Layer Masks. With so many layers, to determine which layers were creating double images, I would hide all layers except the Background (click the Eye icon to hide or show a layer) and then click the Eye to show the next layer. If that layer were a culprit, I’d target its Layer Mask (by clicking its thumbnail).
The blurred and double images were occurring in areas where the Layer Mask was semi-transparent, while the current layer and the layer below were not in perfect registration (see figure 16). To fix the blurring, I had to replace the transparency in those areas with opaque areas of white (to reveal the current layer) or black (to reveal the image below). I used the painting tools to paint with opaque black and white, figuring out as I painted which layer worked better in the current area (see figure 17). (Pressing the X key swaps the Foreground and Background colors.) While I worked, I’d periodically view the mask alone to see if it needed cleaning up (Shift+click on the Layer Mask icon) as well as viewed the mask as an overlay (the key toggles the Overlay mode on and off).
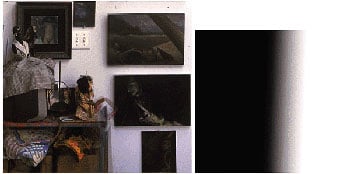 Figure 16: A detail of the studio showing a double image, and the original Linear Gradient mask for that area.
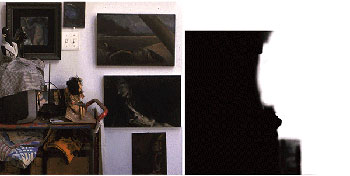 Figure 17: The same detail with the mask cleaned up, and the cleaned-up mask shown alone.
This article was last modified on January 3, 2023
This article was first published on December 13, 2002
Commenting is easier and faster when you're logged in!

Recommended for you

Damn You, Art School
It takes more than a good education to succeed in a any field. It takes real-wor...

Creating Custom Shadows in Photoshop
Learn how to create shadows that add a whole new layer of meaning to a photo.

Google Slashes Prices on the Nik Collection
Last fall, Google announced that it had acquired Nik Software, makers of the pop...