

If you have a badly exposed photograph lying around — and who doesn’t? — then this project is for you. It doesn’t require any drawing talent, just a sense of adventure. Don’t don’t expect to learn about color correcting here. This Photoshop project challenges you to open yourself up to experimentation and improvisation. You are welcome to use the Photoshop files that I provide for you to download (Right-click or control-click to download the base image), and find the final successful layers here). You can also download the four main files for this story by clicking the link in the box to the left.
However, I strongly encourage you to use your own images — which will undoubtedly inspire you to push yourself creatively just a little bit further. You’ll likely to create a ton of junk that may seem useless, but if you keep yourself open to the process, you’ll build creative strategies, and perhaps discover some happy accidents. In the end you will be able to create at least one colorful and fun variation of something you would normally have tossed out.
Let Many Layers Bloom
The suggested techniques in this project bypass many of the more powerful features of Photoshop (such as Layer Masks and Adjustment Layers) and can even be created using an older version of Photoshop or Photoshop Elements 2.0. So although we’re certain that no one reading creativepro.com would admit in mixed company to having “only” Photoshop Elements, it does mean that you can tell your Aunt Edna she might want to check out this column if she’s looking to expand her creative potential.
One of the most exciting aspects of working with digital tools is that you have the luxury of taking greater artistic risks than in traditional media because you can easily return to an earlier phase. In addition to saving incremental versions and using Undo, Photoshop can help you work creatively and safely in many other ways. Amongst the best things you can do in Photoshop to aid in your ability to reconstruct what you do is to work using a lot of layers. When do you make a new layer? A good rule of thumb is: Create a new layer whenever you start a new creative thought, or you want to preserve something you just did.
Learning to Improvise
The image that I started with is of a great singer with a great band, Ingrid Lucia and the Flying Neutrinos. None of the shots were usable, and the one I liked the best in terms of composition was so badly exposed that it was impossible for me to actually transform this shot into a good one using standard color-correction (see Figure 1).
 Figure 1: The starting version of “Ingrid Lucia at the Rock ‘n Bowl, New Orleans.”
But before I gave up entirely on the best of the worst photos I embarked on a series of creative improvisations that eventually led in an unplanned way to the final image (see Figure 2).
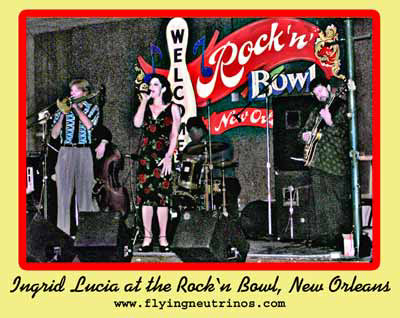 Figure 2: The final image that evolved from pure improvisations in mostly the Layers palette.
In this two-part article, I’ll be giving you the steps that I used to get from this start to the ending image, but feel free to depart from what I did at any time if you feel inspired to do so. Unless otherwise indicated, all instructions are from working within the Layers palette. So let’s get started.
1. Duplicating the image layer and changing the Blending mode.
There are many reasons why you may want to duplicate your image layer, not the least of which is to preserve it so you can easily return to your original image. When I’m not sure what to do next I often duplicate the image layer, and then experiment with changing the blending mode. To duplicate your image layer (the Background layer), drag it over the New Layer icon.
Next, experiment with changing the blending mode of the layer Background copy. Use the Normal pop-up menu in the Layers palette (see Figure 3).
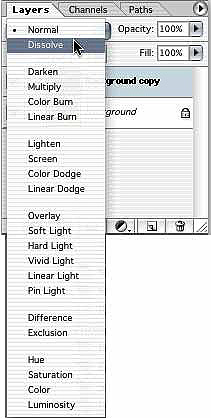 Figure 3: Changing the Blending Mode.
Go through the choices of blending modes methodically, because blending modes affect each pair of layers completely differently. If you find something you like, stop.
To replicate the Ingrid Lucia image as shown, choose the Linear Dodge blending mode.
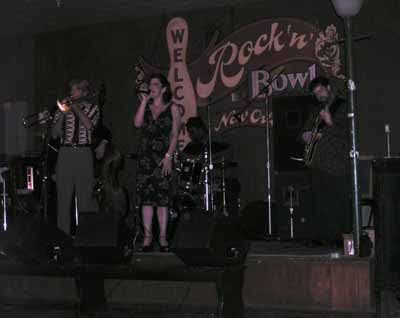 Figure 4: Experiment with changing the Blending Mode to your duplicate layer. Do this methodically because each pair of layers will respond differently to the same blending mode. When you find something you like, stop. To replicate the Ingrid Lucia image as shown, choose Linear Dodge.
2. Duplicating the Background copy layer a few more times.
In the land of experimentation, if you like what you see, but it’s too subtle, do it again. See what happens when you duplicate this last layer (mine was the Linear Dodge layer). What happens if you continue to experiment with changing blending modes?
To replicate what I’ve done with the Ingrid Lucia image, duplicate the Linear Dodge layer twice more.
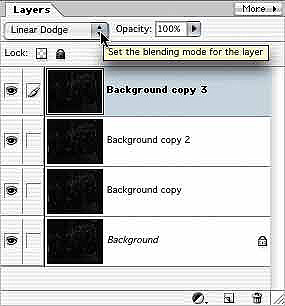 Figure 5: If something is too subtle, try duplicating it… and again!
3. Dealing with the mistakes.
With digital tools, it’s great to see what happens if you push beyond something that’s OK. If you end up going beyond what worked, and you have more layers than you want, try to Undo. If you can’t Undo or easily recover using the History palette, then use the Layers palette to hide the unwanted layer (click on the Eye), or Trash the unwanted layer by dragging the layer to the trash.
4. Painting color into areas of a New Layer without using masks…
In order to move through ideas, you want to be able to try out lots of things quickly. At this point in the creative process, I wanted to try coloring a bright, saturated red into the “Rock ‘n Bowl” sign without adding color to the lighter letters. Since I still wasn’t sure that this image was ultimately usable, I wanted to find a way to do this without taking the time to paint carefully around the letters, or to create an intricate mask.
If you’ve been using your own image so far, at this point it might be helpful for you to use the image provided (right-click or control-click to download the image). Once you understand the concepts and issues, you can go back to your own image and try coloring a section of it.
Whenever you add color to an image, so that you’ll be able to color without damaging what’s there already, start by creating a new blank layer (click the New Layer icon in the Layer palette).
Next open the Swatches palette (Window menu) and click on a color to set it as your Foreground color (in Photoshop Elements it’s called the Color Swatches palette). To choose the same bright red color used in the Ingrid Lucia image, click on the first, bright red swatch.
Choose the Paintbrush tool with a medium brush size. To adjust the size of the brush, use the bracket keys [ ] keys) (the [-key will make the brush smaller, the ]-key will enlarge your brush). Now paint loosely into your new layer, over the area of the “Rock ‘n Bowl” sign — at this point, right over the letters is fine (see Figure 6) .
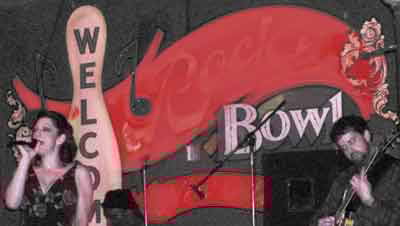 Figure 6: Painting a bright red loosely (even sloppily) into a blank new layer.
Notice that in the Ingrid Lucia image the bright red is darker than the letters, yet lighter than the sign’s background. Set the blending mode of your coloring layer to Lighten. With this particular image, using Lighten blending mode, the red appears only where it is lighter than the red (see Figure 7). Continue to paint with the red until you get the effect you like.
 Figure 7: Switching the blending mode to Lighten allows the red (which is lighter than the background, and darker than the letters) into the background of the “Rock ‘n Bowl” sign and not the letters.
NOTE: When you are working on your images, depending on the area that you want to color and the color you want to apply, you may need to choose a different blending mode. Try the Darken or Color blending modes and see what that does. You won’t always be able to use a blending mode to achieve the effect you want– with some images and some colors, you might not be able find a blending mode that will work easily.
5. Renaming your layer names.
To help you replicate your discoveries later on, as you work try to rename your layers to reflect what you’ve done to them. To rename a layer, double-click the layer name (for some versions of Photoshop you’ll have to hold the Option/Alt key when you double-click) and then type your new layer name. In the case of your coloring layer, make sure to put Lighten in the layer name (see Figure 8).
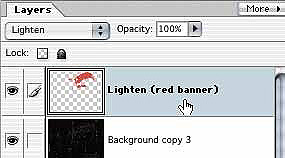 Figure 8: Although it’s hard to remember to do, try to get into the habit of keeping track of your layers by renaming the layers meaningfully as you work. To rename a layer, double-click the layer name (in some versions of Photoshop you have to hold Option/ Alt when you double-click), and then type in the new layer name.
This article was last modified on January 3, 2023
This article was first published on September 9, 2003
Commenting is easier and faster when you're logged in!

Recommended for you

Create an Amazing Escher-Like Face in Photoshop
The technique of “unwinding” a face was first explored by the Dutch...
Photojojo University
Photojojo, the site that brought you such goodies as the camera lens coffee mug...

Using InDesign, Illustrator, and Photoshop Together: Moving Vectors
Vectors (aka paths) are very powerful items. Unlike pixel art that can look lous...