

This article appears in Issue 97 of InDesign Magazine.
For centuries, painters drew the viewer’s eye to a subject by using a softened image edge called a vignette. Today you can add vignettes to images in Adobe Photoshop. But creating image vignettes directly in InDesign can often be faster, easier to edit, and more efficient to manage across long documents.
Improving on Photoshop Vignettes
Because InDesign isn’t an image editor, it’s standard practice to perform image processing in Photoshop—including cropping and applying effects—before bringing an image into an InDesign layout. But the story is a little different when it comes to image vignettes. InDesign provides several built-in features that let you apply a vignette to an image that’s already placed in InDesign. Creating an image vignette in InDesign is not only convenient, it offers several additional advantages over creating vignettes in Photoshop.
Here’s an example. Suppose you’re putting together a brochure for a hotel that has built its name and brand around herons, and the client would like to see vignetted images of herons in their brochure. You could build the vignetted image in Photoshop and add it to an InDesign layout. However, creating vignettes this way can slow you down when changes need to be made later. While InDesign makes it easy to open a graphic from a layout into Photoshop, making repeated round trips between InDesign and Photoshop can become tiresome. And in the case of vignettes, it isn’t even necessary, because you can apply a vignette to an image directly in InDesign.
How to Create a Vignette in InDesign
Here’s how to apply a simple vignette in InDesign:
1. With the Selection tool, click the content grabber (the “donut”) in the middle of a graphics frame (Figure 1) to select the image in the frame.
class=”size-full wp-image-94389″ src=”https://creativepro.com/wp-content/uploads/2017/05/Image-Vignettes-Fig-01.png” alt=”” width=”485″ height=”456″ /> Figure 1: The Selection tool about to click the graphic frame’s content grabber.
2. In the Effects panel (Window > Effects), set the blending mode of the graphic to Multiply (Figure 2). You won’t see anything change yet.
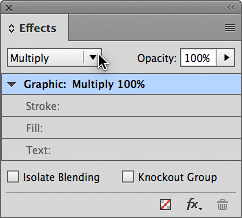
Figure 2: Make sure you apply the Multiply blending mode with Graphic selected in the Effects panel, not for the containing frame (Object, not shown).
3. Press the Esc key to select the graphics frame containing the selected image.
4. In the Control Panel or the Swatches panel, apply a fill of Black to the graphics frame (Figure 3).
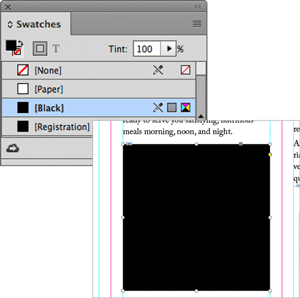
Figure 3: The frame goes black, but don’t panic…
5. In the Effects panel, double-click Fill to open the Effects dialog box (Figure 4).
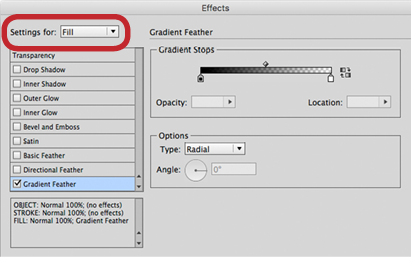
Figure 4: Apply the Gradient Feather effect when Fill is selected in the top left corner of the Effects dialog box.
6. Select the Preview option so that you can immediately see the effects of your adjustments.
7. Click Gradient Feather to select it; this should also enable it (its check mark becomes selected).
8. For Type, choose Radial.
9. Click the Reverse Gradient button to the right of the gradient bar (Figure 5).
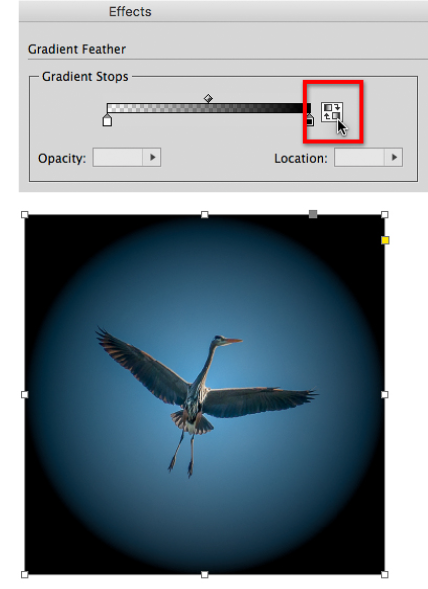
Figure 5: Click the Reverse Gradient button to put the dark end of the radial gradient on the outside.
10. Click to select the white gradient stop at the left end of the gradient bar. Set its Opacity to 0% and Location to 50% (Figure 6). The Location value sets the size of the non-darkened center of the vignette.
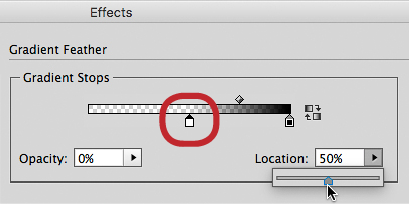
Figure 6: The left gradient stop sets the center of the vignette.
11. Select the black gradient stop at the right end of the gradient bar. Set its Opacity to 15% and Location to 100% (Figure 7). For a darker vignette, use a higher Opacity value.

Figure 7: The right gradient stop sets the edge of the vignette.
12. Make adjustments as needed. The diamond between the endpoints controls the midpoint of the vignette gradient. Note that clicking the gradient bar adds a new stop; if you add one by accident, drag it off the gradient bar.
13. Click OK to apply the changes. The image blends with the gradient (Figure 8).
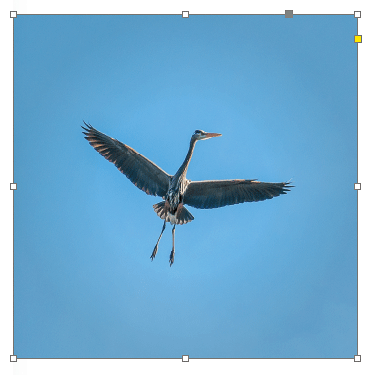
Figure 8: And that’s all there is to it.
Want a light vignette instead? No problem. You can use the same steps; just change a few details. In step 2, set the blending mode of the image to Screen. In step 4, fill the frame with the Paper color (or white). In step 11, you’ll probably want to set Opacity higher than 15% to make the vignette easier to see.
Other Feathered Friends
Gradient Feather isn’t the only way to apply a vignette in InDesign. Some of the other Effects dialog box options can be useful for specific situations. One of them is Directional Feather, which lets you specify a different amount for each side of a frame. This is great for creating soft edges on just one or two sides of a graphic (Figure 9), or anytime you want to gradually fade an image into the background.
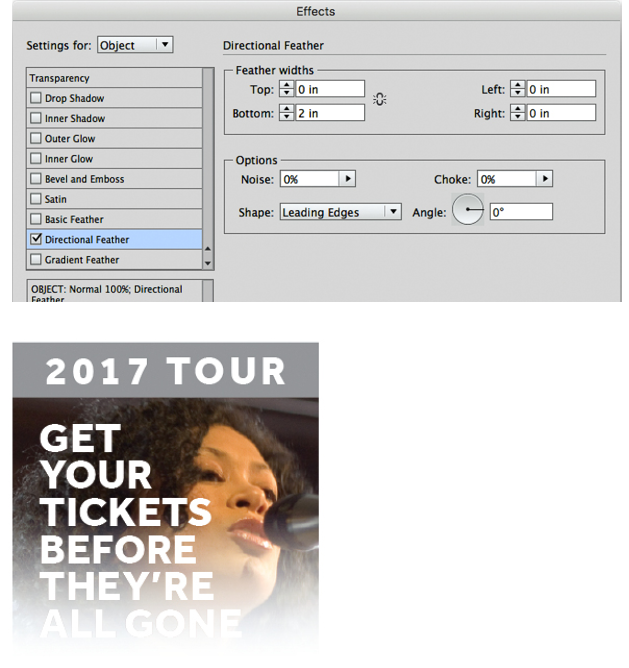
Figure 9: The image and the type are both solid. The fade effect is achieved by applying a Directional Feather to the bottom edge of the image frame.
One limitation of the Gradient Feather method is that its Radial option is always a perfect circle. The Inner Glow effect follows the actual outline of the frame, and has additional options that give you more control over how the vignette interacts with the image, including blending modes. Try different combinations of the Mode and color options (Figure 10).
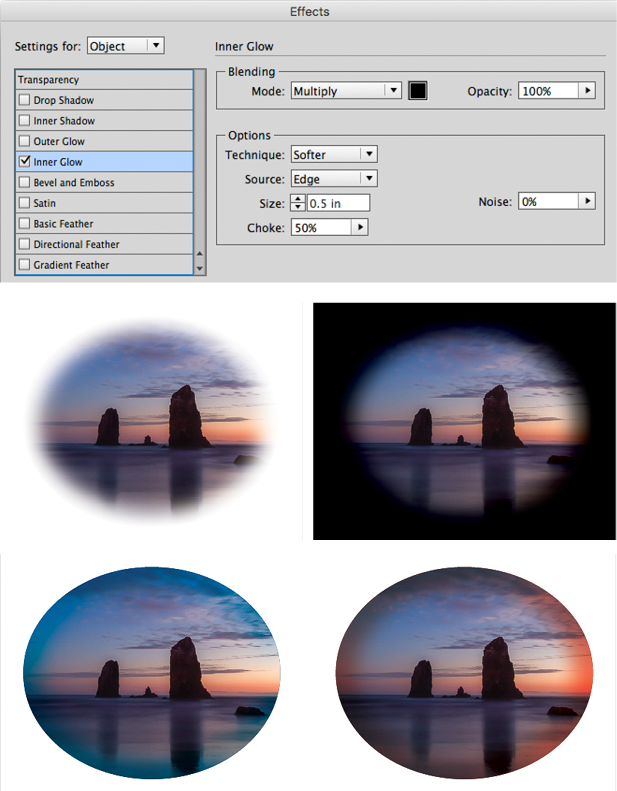
Figure 10: Inner Glow applied with white, black, blue, and orange. The black version is over a black background, and the colors are combined with the Color Burn blending mode.
Outer Glow is one of the InDesign effects that blends outward from the frame edge, so you have to manually set it up to blend with your background. To blend a dark vignette with a dark background, apply a dark color to your effect, and combine it with the Multiply blending mode. To blend a light vignette with a light background, apply a light color to your effect, and combine it with the Screen blending mode.
The Gradient Feather effect lets you customize the feather transition. The default linear gradient lets you set the exact angle of the gradient. With the radial gradient, you can add a sort of lens flare or halo effect by adding several gradient stops that use different opacity values, although that starts to get away from being a pure vignette (Figure 11).
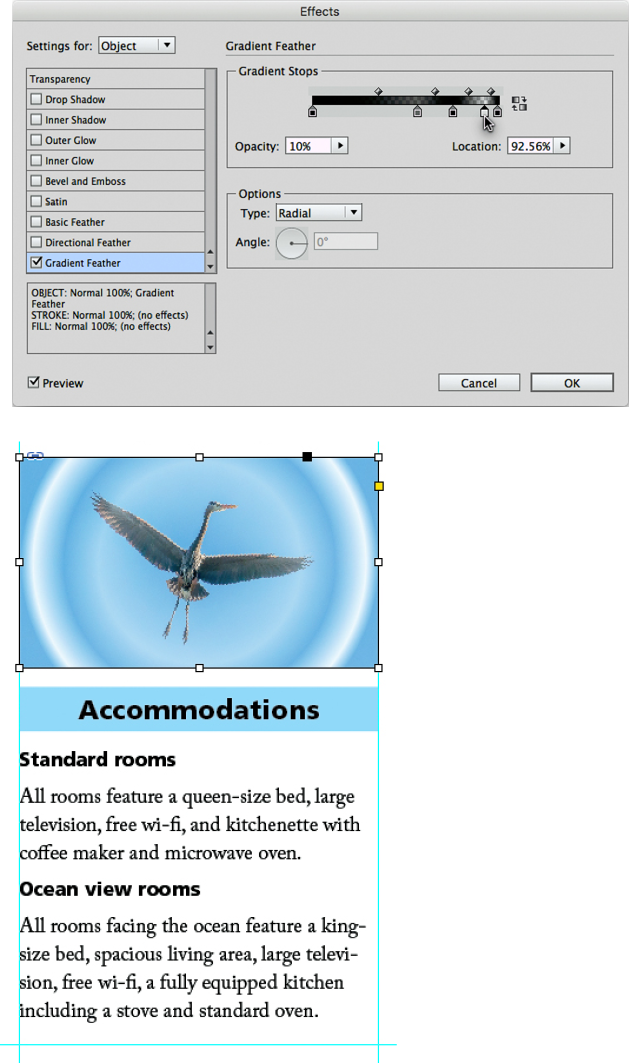
Figure 11: Taking small liberties with the definition of a “vignette.”
When is Photoshop Better for Vignettes?
There may be times when you want to create a vignette effect that can’t be done using the InDesign techniques in this article. For example, you may want the vignette’s feathered border to have a varying width beyond what Directional Feather can achieve, or to create an off-center vignette. You can also use tools such as the Lens Blur feature in Photoshop to enhance a vignette with radial blur or tilt-shift effects. In addition to manual methods of darkening and lightening image areas such as applying radial gradients or blurred mask edges, Photoshop and Camera Raw (and Lightroom) offer two dedicated ways to create vignettes: options in their Lens Corrections controls, and options provided as effects. The Lens Correction vignette controls offer a small and subtle range of adjustment because they’re intended only to compensate for darkening toward the edges of camera lenses, and in Camera Raw and Lightroom they apply to the entire uncropped image so that they achieve uniform luminance across the frame. The vignette effects have a wider range of options because they’re meant as creative tools, and in Camera Raw and Lightroom they apply to the area left visible by their Crop tool. If you explore these features and prefer them to the options available in InDesign, that’s a reason to apply vignettes to images before importing them into InDesign.
Additional Vignette Tips
A few more pointers can help you get the most out of the vignettes you create in InDesign.
If a vignette was already applied to an image as a separate layer in a Photoshop document, you might not have to go back to Photoshop to remove it. Staying in InDesign, select the graphic on the layout, choose Object > Object Layer Options, and hide the Photoshop vignette layer (Figure 12). Now you can apply a more flexible InDesign vignette.
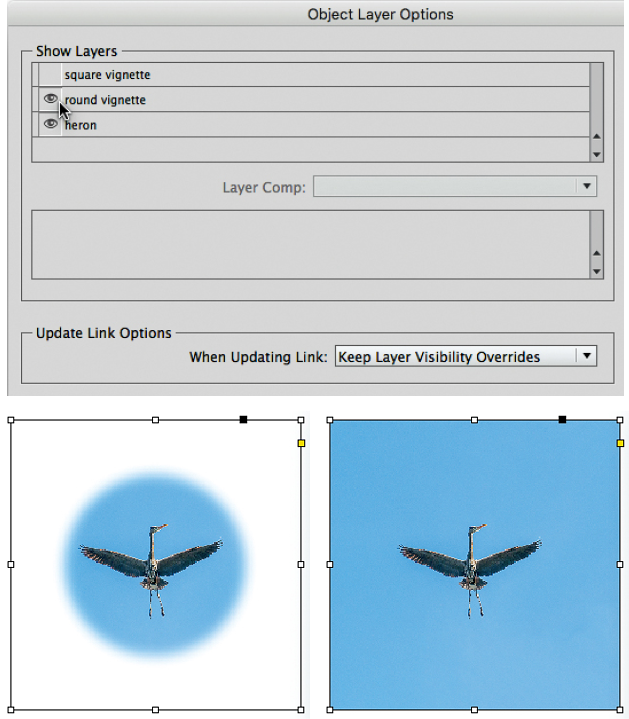
Figure 12: This Photoshop document was originally placed with a “round vignette” layer enabled, which can be disabled in InDesign in the Object Layer Options dialog box so an InDesign vignette can be applied.
If the gradient in a vignette displays banding on proofs of printed output, try adding a little Noise (use 5% to start) to effects that were applied in the Effects dialog box. A little noise makes it more natural, but add too much and you’ll get a “grunge” effect.
Remember that a vignette doesn’t have to be rectangular. You can apply these effects to any graphics frame you can draw in InDesign, such as ellipses, shapes you create with the Polygon tool, and freeform paths you draw with the Pen or Pencil tools (Figure 13).

Figure 13: As “standard” effects, vignettes can be applied to any shape of graphics frame that you might want.
If a vignette technique isn’t working as expected, see if you edited the correct graphics frame attributes (Figure 14).
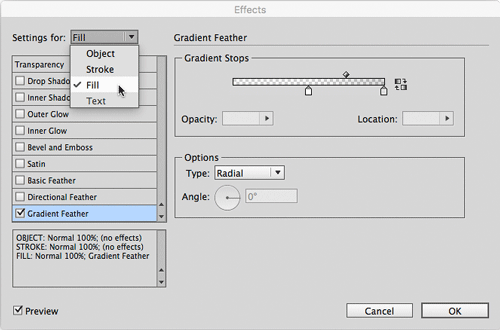
Figure 14: If a vignette isn’t appearing as it should, make sure you edited the correct attributes of the graphics frame, usually Object or Fill.
For example, the first technique in this article works only if the Gradient Feather is applied to the Fill attribute, not the Object attribute. They won’t work as expected if you apply them at the fill or stroke level.
If you plan to apply a vignette to many objects in an InDesign document, keep them consistent by defining an object style for the effect in the Object Styles panel (Window > Styles > Object Styles) (Figure 15).
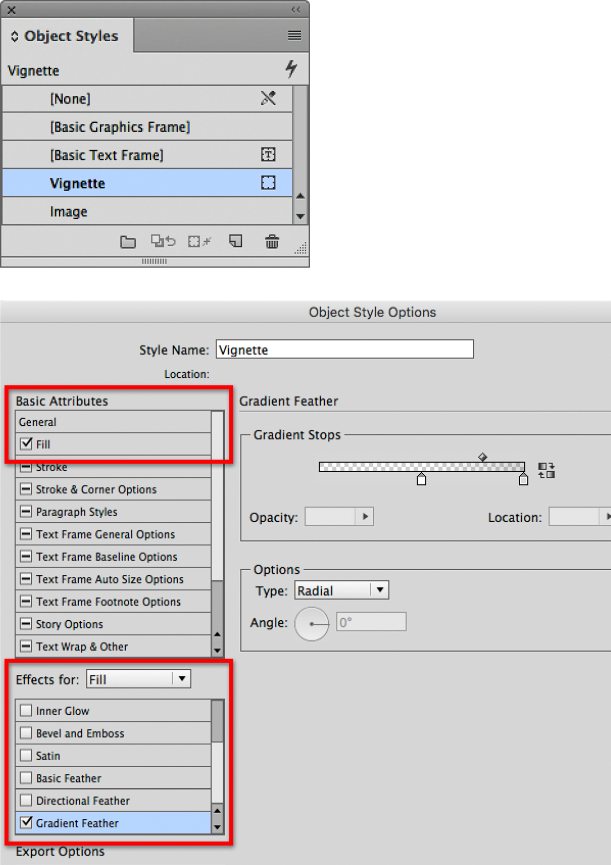
Figure 15: An object style named “Vignette” is defined by the object-level effects in the Object Style Options dialog box.
If you haven’t used object styles before, give them a try! They can streamline graphics production in much the same way that paragraph and character styles do for text. An object style can store all of the edits needed to create the vignette, so you can reduce the 13 steps at the beginning of this article to just one simple click on the object style name. Who wouldn’t want to save that kind of time? And, if you need to edit every instance of a vignette in a document and they were all applied using the same object style, simply edit that object style, and all instances of that vignette will be changed.
The fact that an InDesign vignette is applied to a graphics frame, instead of to the image in the frame, leads to another of this technique’s great advantages. If you replace the image in a graphics frame, the vignette still applies. This means you can apply a vignette to an empty graphics frame or a graphics frame containing a placeholder image, and when you place any other image into that frame, its vignette will appear over the new image. Note that the vignette may not be visible until you place an image into the graphics frame.
The feathered effects in InDesign make it possible to create many vignette effects without leaving the application. If image vignettes are an important part of the design of a long document, apply and manage them most efficiently by thinking ahead about how to integrate them with your document’s graphics frames, templates, and object styles.
Commenting is easier and faster when you're logged in!

Recommended for you

Be Creative with Bullets
Ilene Strizver shows how to spice up your next list with custom bullets.
Regarding Transparency
The essential guide to getting the best results with blending, opacity, and effe...