
This article appears in Issue 98 of InDesign Magazine.
We all think of InDesign as the go-to tool of choice when it comes to print layouts. But InDesign has another persona that, while less well known, is becoming just as important and, arguably, a lot more fun.
It turns out that InDesign has long had some pretty powerful tools for creating interactive documents, including the ability to create animations… yes, things that move. The problem has been that many of these interactive features, including animations, don’t currently work very well in PDFs. But with InDesign’s ability to export fixed-layout ePubs and especially to publish documents on the web using Publish Online, animations in InDesign make it your go-to tool for making engaging interactive online documents.
InDesign animations are easy to create, and they don’t require your learning any new programs. Your print documents are just a step away from coming alive online.
Getting Started
The primary controls you’ll use to create animations are found in the Animation panel. There’s also a Timing panel that lets you control the order in which animations will play. And, as you get into more advanced animations, you’ll quickly learn that the Layers panel plays an important part in organizing and selecting the components that make up complex animations.
You’ll find the Animation panel under the Window > Interactive submenu, or by setting the Digital Publishing workspace. The easiest way to get started is to experiment with the presets in the Animation panel.
Select an object on your page, such as a line, text, or graphic frame, and apply one of the animation presets. To remove an animation, select the object, and click the Trash icon at the bottom of the panel.
Note that animations can only be applied to an object, so you can’t, for
example, highlight just part of the text within a frame and then animate it; you can apply an animation only to the entire text frame.
Explore the Possibilities!
Most InDesign users don’t even realize that InDesign can be used to create animations, and would be amazed at what’s possible. If you haven’t seen InDesign animation in action, check out this sample, which includes animated type, logos, and ads. And yes, all the effects were created in InDesign. Enjoy! 
Animation presets
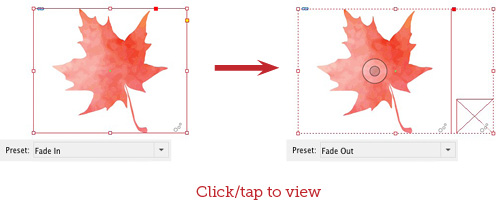
Once you select an object, choose a preset from the Animation panel (Figure 1).

The Animation panel (left) contains a submenu of several animation effect presets (right).
A small butterfly displays at the top of the panel, previewing the motion or effect the animation will apply. The object will also be marked with a small animation adornment.
To preview the animation, use the EPUB Interactivity Preview panel, also found under the Window > Interactive submenu. Don’t hesitate to resize the panel and make it larger so you can really see what’s going on.
The presets are named in a way that describes their effect. For example, Fade In will cause an object to change from 0% opacity to 100% opacity. Grow will cause an object to scale up to 250% of its current size. Move Left will cause an object to move from its current position to the left.
As you choose a preset, you can see settings change in the lower part of the panel. Be sure the Properties section is open so you can see all of the available controls.
Many of the presets are simply shortcuts that you could set manually in the panel. Other presets, including all those in the bottom part of the menu, like Bounce and Dance, change properties that you cannot manually set in the panel.
The Animation Encyclopedia
Another useful tool to help you begin learning how animation controls work is a built-in script called the Animation Encyclopedia. The script builds a six-page document that demonstrates all the effects of the controls in the Animation panel, along with some custom animation techniques.
Choose Window > Utilities > Scripts, and under Application Samples look for either the AppleScript or Javascript version of “AnimationEncyclopedia” (Figure 2).

The Animation Encyclopedia script creates a document with examples of many of the basic animation controls.
Double-click or choose Run from the panel menu, to create the sample document. Be sure to preview each page in the EPUB Interactivity panel and see how different settings produce different results.
The Animation Encyclopedia is a good learning tool, and the presets provide a nice shortcut for applying certain effects quickly. But don’t stick with the presets for too long or you’ll box yourself in. Understanding how to manually modify the controls in the panel is key to creating more advanced and sophisticated animations.
Basic Animation Panel Controls
The Animation panel is your dashboard for setting and modifying various animation controls. To get beyond the presets, it’s important to understand the five attributes you can modify to achieve a greater variety of animation effects:
- Moving (creating a motion path)
- Controlling speed
- Rotating an object
- Scaling an object
- Changing opacity
Each of these attributes can be applied individually to animate an object, or you can combine them to produce more sophisticated effects. We’re going to take a look at each of these settings in detail so you can learn how to master and control animations most effectively.
Moving an object: Working with motion paths
One of the most basic ways to animate an object is to make it move. Some of the presets do this for you, such as Move Left, Move Right, and Fly In from Top, Bottom, Left, or Right. When you choose any of these presets, you’ll notice a green path next to the animated object. This path is called a motion path. Motion paths set the direction of movement for animated objects.
Every motion path has a circle at one end, marking the starting point of the path, and an arrowhead, indicating direction, at the other end (Figure 3).

The beginning of the motion path is marked by the circle (left); the direction and end of the path are marked by the arrowhead (right).
Motion paths are powerful and flexible, too, because they can be modified like any other InDesign path. This means you can select the endpoint and change the length of the motion path, affecting the distance an object moves (Figure 4).

To change the length of a motion path, select it and drag, just as you would any InDesign path.
You can also add or move selection points on the path, just as you can with any other InDesign path.
In fact, any InDesign path can be converted to a motion path. You can draw your own path and convert it to a motion path. Draw a path, and then select it, along with the object you want to move. Convert to a motion path by choosing Convert to Motion Path from the Animation panel menu or by clicking the Convert to Motion Path icon at the bottom of the panel (Figure 5).

Convert any InDesign path to a motion path by clicking the icon at the bottom of the panel.
The path start point will be in the center of the animated object, and its direction will be in the direction the path was drawn. You can reverse the direction of the motion by selecting the path and choosing Object > Paths > Reverse Paths. Don’t worry about the stroke settings for the path as you draw it; as the path is converted, its stroke will be set to None.
Controlling speed
It would be nice if we could set a moving object to move so many pixels per second, but we can’t. The primary control for setting the speed of any animation is adjusting its Duration. The shorter the duration, the faster the animation; the longer the duration, the slower the animation. The default for most animation presets is 1 second (Figure 6).

Changing the Duration of an animation affects the speed of the animation.
Another control for speed is the Speed setting in the Animation panel. This label is a little confusing because this setting controls easing. Easing is a traditional animation technique in which an object accelerates or slows down to look more realistic as it moves. Ease In starts the motion slowly and then gains speed. Ease Out slows an object down before coming to a stop. Ease In And Out starts the motion slowly, then speeds up, and then slows down again before coming to a stop (Figure 7).

The Speed submenu lets you set easing for an animation, causing an animation to speed up and then slow down, or vice versa.
While you can apply easing to different effects, it’s easiest to see on a motion path. A motion path, even a straight path, has a series of points along it. These points are part of the easing path, and are not editable. The closer together the points, the slower the motion; the further apart, the faster the motion. If you hold your mouse just right, you can see a tool tip for the easing path (Figure 8).

Points on an easing path set to “Ease Out” show the points at the end of the path (green arrow) closer together, indicating the motion will slow down.
Object rotation
The Rotate Preset lets you rotate objects 90° or 180°, clockwise (CW) or counter-clockwise (CCW). But the Properties part of the panel allows you to rotate objects in any degree.
The rotation control is pretty straightforward. You can choose from a menu of preset degrees of rotation; positive values rotate clockwise and negative values rotate counter-clockwise (Figure 9).

You can choose from the menu or input any rotation value from -1 to 72,000; the origin point proxy (highlighted) lets you change the rotation center point.
You can also input any value, from 1° to 72,000°, CW or CCW.
You may wonder why you’d want to rotate something more than 360°. Well, it’s an easy way to get an object to spin quickly in a short amount of time. For example, set an object to rotate 3600° for 1 second and it will spin around 10 times very quickly.
Another important control for object rotation is the origin point proxy. This allows you to change the center point of an object’s rotation.
Scaling objects
You might not think of scaling as animation, but think about how an object looks when it grows or shrinks. It basically scales up or down. In fact, there are several animation presets that use scaling, including Grow, Shrink, and Move and Scale.
As with rotation, you’ll usually want to control scaling values in the Properties section of the panel (Figure 10).

You can scale objects both horizontally and vertically; click the link icon (highlighted) to unlink and scale independently.
Width (horizontal) and Height (vertical) scaling are linked by default to scale together, but you can unlink them by clicking the chain-link icon in order to scale them independently.
When used with the origin point proxy, which can be used to change the point from which an object will scale, you can use scaling animations to achieve all kinds of interesting effects. You can see examples in the section “Putting it All Together” below.
Changing opacity
Opacity change is another important element of successful animation. There are presets that change just the opacity of an object: Appear, Disappear, Fade In, and Fade Out. Appear and Disappear go from 0% to 100% opacity (and vice versa) almost immediately, whereas Fade In and Fade Out go from 0% to 100% opacity (and vice versa) gradually over the duration of time the animation is set to play.
Other presets incorporate opacity change with other motions. For example, the Fly in from Left, Right, Bottom, and Top all change opacity as an object moves on to the page.
Other Animation Panel Controls
Certain other important settings greatly affect the outcome of your animations. Let’s take a look at the following settings and how they affect your animations:
- Event(s)
- Animate To/From
- Hide Until/After Animating
- Animation Proxy
- Setting the event
The Event(s) submenu (Figure 11) lets you set what action will trigger an animation.

The Event(s) submenu lets you set what triggers an animation to play.
The default, and the setting you’ll likely use most often is On Page Load. With this setting, your animation will play as soon as a page is loaded or turned to onscreen.
On Page Click will trigger an animation as soon as a user clicks on the page. One way this can be useful is when creating presentations shown via fixed-layout ePub or Publish Online. You can build a list of bullet points that fade in, and then click on the page to bring in the next bullet.
On Click (Self) is applied to an object and will cause the object to animate when it’s clicked on. For this to be useful, it has to be clear to the user that the object needs to be clicked on, so it’s more for special-case use and is not used very often.
On Roll Over (Self) is similar to On Click (Self), but is triggered when a user’s mouse rolls over an object. Keep in mind that since a tablet does not have a mouse, there’s no such thing as a rollover event on a tablet. I personally never use this trigger event for that reason.
Animations can also be triggered by a button. There are a couple of ways to set this up. Strangely, you cannot simply select an object and choose On Button Event, even if you already have a button on the page.
Instead, to use the Animation panel, follow these steps:
1. Click on the object with an animation applied to it.
2. Click the button icon next to the Event(s) menu (Figure 12).

Click the button icon next to the Event(s) menu; then click on the object you want to use as a button to trigger the animation.
3. Click on the object you want to make into a button to trigger the animation. It doesn’t need to already be a button object, as this step converts it to a button. Whether it’s an existing button or a new one, the Buttons and Forms panel will open, so you can make further adjustments.
4. Select the animated object again, and deselect On Page Load on the Event(s) menu in the Animation panel, which does not deselect automatically. On Button Event will remain selected.
You can also set a button to trigger an animation using the Buttons and Forms menu:
1. Click on the object you want to use as the button trigger.
2. Open the Buttons and Forms panel, and convert the object to a button by clicking the icon at the bottom of the panel.
3. Under the Actions menu, choose Animation. The names of all available animations on the page will be listed underneath.
4. Choose the animation object you want to trigger with the button, and set it to Play, Pause, Reverse, or another action from the list (Figure 13).

Usually you’ll want a button to Play an animation, but you can also set it to other actions, including Stop, Pause, or Reverse.
5. Select the animated object, and deselect On Page Load on the Event(s) menu in the Animation panel. On Button Event will remain selected.
Using buttons to trigger animations is a great way to create a truly interactive experience. Remember, any object, whether it’s an image or type, can be a button. This is a great way to build instructional material or games and puzzles.
Animate To/From
Another important setting in the Animation panel is the Animate submenu, the first item under the Properties section of the panel. The settings here let you control whether the object you select to animate represents the beginning of the animation or the final result of the animation (Figure 14).

The Animate menu lets you control whether the animated object on the page is the beginning of the animation or the end result of the animation.
Most of the time, you’ll stick with the default setting, From Current Appearance. This says “start with this object as it is on the page now, and then animate it” (e.g., move left from this current position). This is the setting that most presets use. When you choose a preset, such as Move Left, you want the object to start from its current, static appearance and location on the page and move to the left when it animates.
For other types of animation, To Current Appearance works best. Use this setting when you want something to end up looking the way it does after animating—for example, if you want an object, particularly a type object, to scale up to a certain size. Select the object, set the horizontal and vertical scaling to 0% in the Animation panel, and then choose To Current Appearance from the Animate menu. The object will appear to “grow” and end up the same size as on the static page. This setting can help give you more control of the final result of the animation.
The To Current Location setting is most useful when working with motion paths, as it will determine the end location of an animation. The Fly in From Left, Right, Top, and Bottom presets use this setting. You’ll see that each of these presets creates a motion path and that the selected object ends up in the same location it appears on the static page.
Applying Multiple Animations to an Object
It’s easy to apply multiple animation effects to an object that play at the same time. For example, you can apply a motion path and a scaling percentage to an object. The object will move and scale as it moves. But what if you want to apply sequential animation to the same object? For example, let’s say you want an object to move, stop, and then scale. Or let’s say you want an object to fade in, and then fade out.
Click to see an example of multiple animation effects applied to one object.
Hide Until/After Animating
Sometimes you don’t want an object to be visible until it animates. In other cases, you may want an object to animate and then disappear. This is where the Visibility settings Hide Until Animated and Hide After Animating come in (Figure 15).

Visibility settings allow you to hide an object until it animates or after it animates.
For example, think of an animation where raindrops fall from a cloud, or water-drops spray from a hose. You want the drops to appear and start moving. You don’t want to see them clustered in their start position. In that case, you’d set the drops to move, but you’d check Hide Until Animated (Figure 16).

The water drops animate to splash against the car, and are set to both Hide Until Animated and Hide After Animating.
You typically don’t need to hide an animation that involves a change in opacity. For example, if an object is set to Fade In, by definition (change from 0% to 100% opacity), the object will not be visible initially, since it will start at 0% opacity. The same is true of the Appear/Disappear presets.
Working with the animation proxy
When you are working with animation settings, especially those that use a motion path, it can be hard to predict exactly where an object might end up. Fortunately, there is an animation proxy that can give you a good preview of an object’s location when it animates.
To use the proxy, simply select the animated object, and click the icon at the bottom of the panel. The proxy is represented by a gray box the size of the animated object (Figure 17).

Use the animation proxy to preview where movement of an animation will end.
For animations set to To Current Appearance or To Current Location, the proxy shows the starting point of the animation. The proxy does not display for animations that don’t use a motion path, such as Fade In, Grow, or Shrink.
The Timing Panel
The Timing panel works hand in hand with the Animation panel to give you control over the sequencing of your animations. Use the Timing panel to set the order in which animations play, to play multiple animated objects at the same time, and to start one animation before another animation ends.
Objects are added to the Timing panel in the order you animate them on the page, regardless of their order in the Layers panel (Figure 18).

Objects are added to the Timing panel in the order they are animated. To change the order in which the animations play, move an object up or down in the panel.
As you animate objects, they are added to the Timing panel. By default, the first object listed will animate; then, when that animation is complete, the next animation will begin.
Objects are named in the Timing panel by the label used in the Layers panel. Changing the name of an object in the Layers panel will change the name in the Timing panel. You can double-click on a name in the Timing panel to select the object on the page, but selecting an object on the page does not highlight it in the Timing panel.
The Timing panel is easy to use. To change the order in which animations play, move an object up or down the list. If you want a pause between objects animating, select the item in the list, and enter a value into the Delay field.
The Event menu at the top of the panel lets you list the sequence of animations based on the trigger set for each animation. For example, you may have some animations set to play On Page Load and others that are triggered by a button. Animations set with different Event(s) will not display in the panel at the same time. You’ll have to change the Event in the Timing panel to see a list of animated objects associated with each one.
Linking in the Timing panel
The Link icon in the Timing panel is used to make two or more animated objects play at the same time. To link objects, hold down the Shift or Command/Ctrl key and select the objects in the list, and then click the Link icon (Figure 19).

To play two or more animations simultaneously, select them in the Timing panel (left), and click the Link icon. A bracket indicates they are linked (right).
Once objects are linked, you can also set them to Play a specific number of times or set them to Loop continuously. These are similar to the Play and Loop controls in the Animation panel set for individual objects. Individual Play and Loop object settings will be honored, regardless of the settings in the Timing panel.
Controlling animation start times
Another important function of linking in the Timing panel is to start animating one object before another object stops. For example, let’s say you have an image fading in slowly, and as it’s fading in—but before it’s reached 100% opacity—you want some text to move onto the page. Or you have a series of bars in a bar chart where you want each bar to start to animate before the previous bar’s animation is complete.
Normally, one bar would not animate until the previous bar is complete. To change the start time of the objects, link them in the Timing panel, and then select the next object(s), and set a Delay time that is less than the Duration set for the animation (Figure 20).

To set an animation to start before another is complete, link all objects in the Timing panel and set a delay on each object.
Even though they are linked, the start of each subsequent object’s animation will be delayed, causing each to start before the previous object’s animation ends.
Putting It All Together
Now that we’ve covered some of the basics, it’s time to have some fun. Let’s take a look at how to create some common effects. Learning how these simple effects are put together can help you start visualizing techniques for the animations you might want to use in your next project.
Creating lines that draw

Creating an animation that makes a line appear to draw itself is pretty easy. And it’s here that we get into some of the “trickery” used to create animation magic.
To animate a straight line that appears like it’s being drawn, select the line, and then change these settings in the Animation panel (Figure 21):

Modify Scale settings to make a line animate so that it appears like it’s being drawn.
1. To animate a horizontal line, change the Scale values to 0% W (width) and 100% H (height). Reverse the settings for a vertical line.
2. Click on the Animate menu and choose To Current Appearance.
3. Change the orientation point proxy. If you want a horizontal line to “draw” to the right, select the left center proxy; to make a vertical line “draw” down, select the top center proxy, etc.
4. Use the EPUB Interactivity panel to preview the animation. Adjust the speed by changing the Duration time.
This effect can be used to animate many shapes so they look like they are being drawn or growing. It makes it easy to animate bar charts and even line graphs.
Creating a slide show

Slide shows are a common effect, and they are easy to achieve using animation. Simply stack images and set them to fade in or fade out, depending on the order in which you select them. To create a slide show that plays on its own when a page is loaded, follow these steps:
1. Place the images on your page, and align them so they are stacked.
2. Select each image, starting with the one on the top, and apply the Fade Out preset. Do not select the bottommost image. Use the Layers panel to make it easier to select each image in order while holding down the Shift key. You can then apply the animation to them all at once; just be sure to select them in the right order (Figure 22).

Use the Layers panel to select all images, except the one on bottom, then apply the Fade Out preset and modify the duration as needed.
The images will fade out one by one, revealing the image underneath. The last image is not selected because you’ll usually want it to stay on the page when the slide show ends.
3. Alternatively, select the images starting with the bottom image, and choose the Fade In preset. Do not select the topmost image, as it will be the last image in the slide show.
4. With default settings, the next image will come in immediately following the previous one. You’ll usually want the image to sit there for a moment so it can be enjoyed. Don’t adjust the Duration in the Animation panel; that will just increase the time the opacity change takes. Instead, select the images in the Timing panel, and set a 1- or 2-second Delay, depending on how long you want the image to be visible before the next image appears (Figure 23).
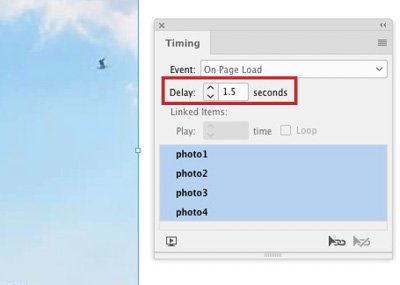
Set a Delay in the Timing panel so the images sit on the page for a moment and can be viewed before the next one starts to appear.
5. Use the EPUB Interactivity panel to preview the animation and adjust as needed.
If your images or other objects are not the same size, you’ll need to create a background for each so that it hides the images underneath. Set the frame fill color to paper, or match the background color used on your page.
The Typewriter effect

Typewriters may only be found in antique shops these days, but having type appear onscreen letter by letter, as though it’s being typed, is a common effect. Here’s how to do it:
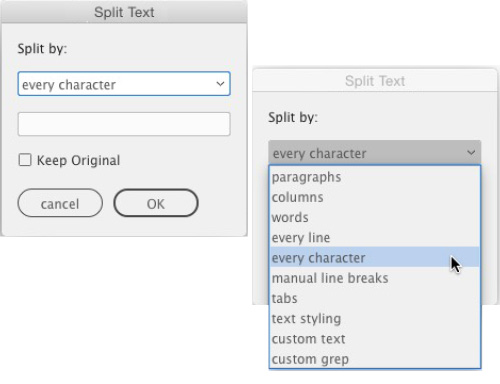
1. Separate each letter in the text phrase that you wish to animate. Use Ajar Production’s Split Text extension (see sidebar).
2. Select all the letters, each of which is now in its own frame, and choose the Appear preset. Check the Timing panel to make sure the letters will appear in the correct order.
3. The letters will appear one by one, but they are really slow with the Appear preset default settings. With all the letters selected, decrease the Duration to the lowest setting possible, .125 seconds (Figure 24).

Modify the Appear preset to make the individual letters come in more quickly.
4. With the duration set at its lowest setting, the letters will come in so fast they will all appear at once. Make each letter wait its turn by selecting Hide Until Animated.
5. The preset has an opacity change, so use the Opacity menu to set it to None.
6. Use the EPUB Interactivity panel to preview the animation and adjust as needed.
This technique provides a good example of how a preset can be used as a starting point for an animation, and then easily modified to achieve the desired effect.
The Split Text Extension
Since animation can be applied only to an object, you’ll often have to split your text into individual frames to animate any part of it. Whether you need to separate individual letters, for something like a typewriter effect, or paragraphs used to make animated bullet points, the process can be extremely tedious to do manually. Instead, download the free Split Text extension from Ajar Productions. It will make the process completely painless!
Limitless Possibilities
We’ve covered just a few of the things you can create with InDesign animations. Once you understand how to use the Animation and Timing panels, you can begin to create more complex animations.
As part of the learning process, challenge yourself to try to figure out how you might use InDesign to achieve various simple effects you see on video, TV, or movies. There will be many animations that can’t be done in InDesign, but you’ll soon be surprised how much can be accomplished by working with the tools skillfully and applying a touch of imagination!
Commenting is easier and faster when you're logged in!

Recommended for you

Helping Photoshop and InDesign Play Nice
Chad Chelius and David Blatner offer advice on how to make these two software si...
5 Ways to Get Pie Charts into InDesign
In an analytical world, pie charts can help to serve up your data in a tasty way...
How to Animate Vector Artwork from Illustrator in After Effects
Learn how easy it is to animate the vectors of an Illustrator logo using After E...