

This is the first in a series of techniques used to create presentations with InDesign.
Most people expect to create presentations in PowerPoint or Keynote, but there are lots of people who prefer to use InDesign. Unfortunately, prior to CS5 presentations have been largely static due. For example, if you wanted to create a list of items appearing one after another, you had to fake it by creating multiple pages with each page adding another item from the list. While this method worked, it was painful to create and edit. With CS5 InDesign has added a slew of new interactive features that allow us to create presentations easier.
Layout
Normally when you are laying out a document inside InDesign, it is recommended that you create as few text frames as possible. When it comes to presentations, this is not necessarily the case. Each element should be inside its own text frame to allow interactivity to happen to each frame. Since I need each list item to appear at a different time, I need to have them separated.

Animate the list
When you are giving a presentation you may want to have as few clicks as possible. If this were the case, you would want to have an automatic list. This means that when you navigate to that particular page, the list will appear without interaction.
Open the animation panel (window > interactive > animation) and select the frames that contain list items and apply an animation. I used the fade in preset, but if you choose a different animation you may need to apply the attribute “hide until animated”. This will ensure that you don’t see the other list items until they begin their animation.

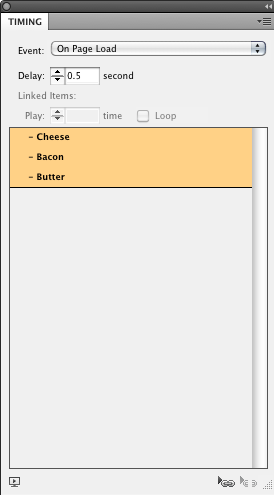
Set the timing
Open the timing panel (window > interactive > timing). Here you can drag each of the animated items around and put them in the order that you want them to animate on page load. I don’t want them to animate immediately after each other so I am going to set a delay between each item. Select all of the items in the panel and set the delay to .5 sec.
 \
\
Previewing the Animation
Now that the animation is complete, you can test the animation directly inside InDesign by using the preview panel. Press cmd/ctrl + shift + return/enter to open the panel and preview the animation.

Click the image above to see the animation.
This article was last modified on December 17, 2022
This article was first published on October 1, 2010
Commenting is easier and faster when you're logged in!

Recommended for you

Adjusting Word Spacing From the Keyboard
As much as I love the Paragraph Composer in InDesign, its omnipotent control ove...

Poll Results: When was the last time you exported to SWF?
The results of our poll asking if you still use Flash (SWF) and a new poll on wh...
TypeTalk: The Ins and Outs of Bullets
Default bullet points aren't your only option. Follow these tips to customize yo...