

When you’ve got a shape on your PowerPoint slide but it’s not quite right, there’s no need to start from scratch – you can edit that thing!
First, here are a few basic points to understand about PowerPoint shapes:
- A shape (or path) can be closed or open
- A closed shape has no start point or endpoint, an open shape has a beginning and end.
- All shapes are made up of at least two anchor points that are connected by lines.
- Lines can be curved or straight – this is determined by the type of anchor point they are connected to
- Anchor points can be corners, straight or smooth:
- A corner point – where two straight lines join at an angle. The point creates a corner.
- A smooth point – where the two handles are in a straight line and the line segments join in a smooth curve. The handles are equidistant from the anchor point.
- Straight point – where the two handles are in a straight line and the line line segments join in a smooth curve. Then handles do not need to be equidistant from the anchor point.
- To change the way a shape looks, you can move or edit the anchor points which, in turn will change the angles of the lines. As you’ll see later in this article, you can also work directly with the line segments as well.
How to get started editing PowerPoint shapes
Select the shape first, then make sure you’re on the Shape Format Ribbon, click the dropdown arrow next to Edit Shape and select Edit Points. You can also access this command by right-clicking the shape and choosing Edit Points. The shortcut key combination is Alt+J+D, E, E but I would never recommend that – if you really want a keyboard shortcut, define an easier one yourself.

Figure 1 You can select Edit Points from the Shape Format Ribbon or by right-clicking the shape.
The first image in Figure 2 below shows an equilateral triangle in its natural state. Once you’ve accessed the Edit Points command, the three corner points that make up the selected shape are displayed as small black squares and the lines are colored red (second pic). When you hover over a point, your cursor changes into a four-headed arrow. You can use this to click and drag anchor points to reposition the points (pic 3), resulting in a different shape (final triangle).

Figure 2 An equilateral triangle shown freshly drawn, after selecting Edit Points and then dragging the top point to the right. The final image is the resulting edited triangle.
Modifying Shapes with the Bezier handles
When you select an anchor point, two blue lines will appear with white squares at the ends. These are known as Bezier handles and they control how the line behaves as it travels through the anchor point. You can drag on these handles to edit the way the path looks.
The shape’s line segment will follow the direction of the handle. As you move the handle up or down, the line segment will move up and down as well. If you pull the handle further away from the anchor point, the curve of the segment will flatten out. It’s tricky to describe, but it makes sense when you try it. You’ll probably need to experiment with it a bit to get more comfortable but the good news is that you can see a dashed line that previews the change you’re making to your shape.
In Figure 3 below, I’ve inserted an icon from the Insert > Icons dialog box and choosing a leaf icon. You can right-click any icon and select Convert to Shape to make the shape editable. Once the shape is editable, right-click and select Edit Points to see the points that make up the shape. Drag the anchor points themselves to change their location or drag their handles to modify the shape (Figure 4).

Figure 3 The point on the end of the leaf can be dragged to make the leaf longer.

Figure 4 Drag the handles of individual anchor points to change the way the line travels through the point.
There are different types of points and their handles behave in different ways. See Changing the Point Type below for more detailed information.
While you’re in Edit Points mode, as well as moving anchor points, you can also add some extra points or delete unnecessary ones; open or close a shape or change the type of the anchor points and therefore the way the path travels through them (more on that later).
Adding and Deleting Points
Sometimes, you need to add a little extra something to a shape. You can add extra points that allow you to manipulate a shape into something a little more detailed than what you started with. Similarly, if your shape has become a little too complex, removing some points will make it simpler and any curves will be smoother.
The easiest way to add a point is to right-click in the position where you want it to be added and select Add Point. You can also hold Ctrl/Cmd and click at the required position. (Just clicking on the line will work too, but it’s a bit fiddly – you need to click and then drag a little bit for it to register). Once the new point has been added, you’ll usually need to drag it to its new location and possibly edit its type (Figure 5).

Figure 5 Take a square and add a point on its side. Now drag that point to a new location and you’ve created a new shape.
To delete a point, right-click on it and select Delete Point, or Ctrl/Cmd and click on the point you wish to delete (Figure 6). I find this particularly useful when I’ve hand drawn a shape with the curve, freeform or scribble tools and I’ve ended up with more anchor points than I need. Removing some extras will make your lines smoother.

Figure 6 To create a flat bottom on a 6-pointed star delete the bottom-most point. To be more precise, delete the other two points that are now sitting along the bottom segment.
Opening and Closing Paths
If you’ve got an open shape that needs to be closed or a closed shape that you’d prefer to be open, Edit Points is the way to go again. In Figure 7 below I’ve opened up a star shape with the Open Path command.
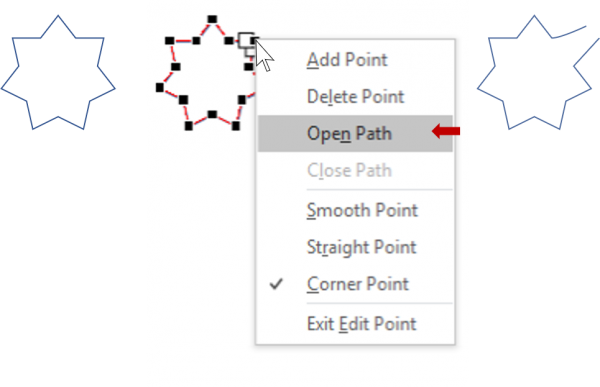
Figure 7 Right-click an anchor point and choose Open Path.
Figure 8 shows a hand-drawn pillow shape that I created using the Curve Tool, but I didn’t get to finish it properly and left it as an open shape (with a start and finish point). To correct this, right-click on the of the endpoints and select Close Path. You’ll see that I’ve closed the two endpoints but my shape ended up with two anchor points in the top left corner. Right-click one and choose Delete Point to remove the unwanted anchor point.

Figure 8 Right-click an endpoint and select Close Path. Delete any excess points as necessary.
Changing the Point type
When you’re in Edit Points mode, right-click any point to see what type of point it is. A checkmark will appear next to the current type. Select the type of point you require. In Figure 9 below, I’ve taken a hexagon (which has 5 corner points) and changed the top corner point to a smooth point. The result is a shape that looks more like a cupcake.

Figure 9 Change a corner point to a smooth point to change the shape.
Corner Points
The Bezier handles on a corner point work independently of each other. If you drag one of the handles, the other one stays unmoved.

Figure 10 Drag a Bezier handle on a corner point and the line will respond, but the opposite handle will not react.
Smooth Points
The Bezier handles on a smooth point work directly opposite of each other. If you drag one handle up, the opposite one goes down. It works just like a see-saw (or teeter-totter, depending on where you live and when you were a kid). Similarly, if you drag one handle away from the point, the opposite handle will move away to stay equidistant from the anchor point. The smooth point is always centered between the Bezier handles (Figure 11).

Figure 11 Drag a Bezier handle on a smooth point and the opposite handle will respond in the opposite direction.
Straight Points
The Bezier handles on a straight point work to keep a straight line, but do not change distance from the anchor point. Like a smooth point, if you drag one handle up, the opposite handle goes down but, unlike a smooth point, if you drag one handle closer or further away from a straight point, the opposite handle will not move. The result is that anchor does not remain centred between the Bezier handles (figure 12).

Figure 12 When you drag a straight point’s Bezier handle at an angle, the opposite handle will move in the opposite direction (like a teeter-totter) but when you drag the handle closer to (or further from) the Smooth anchor point, the opposite handle won’t budge.
Changing Point Types on the Fly
When you’ve got a point that needs to be converted to a different type as well as being adjusted, you can use the following booster keys to achieve both at the same time.
- Corner point – hold Alt/Option, then click and drag a handle
- Smooth point – hold Shift, then click and drag a handle
- Straight point – hold Ctrl/Cmd, then click and drag a handle
If you’re using one of the above techniques but change your mind, press ESC to undo before you lift your finger from the mouse button.
Working with Segments
It’s not just the anchor points that can be moved around and altered – you can also work directly with the line segments of your shapes. If you hover over a line segment, your mouse pointer turns into a plus symbol with a square. Left-click and you’ll add an extra anchor point. Right-click on a segment and you’ll also get the ability to delete the segment (which will therefore open the path) or convert a segment from curved to straight.
Need to create a half of a heart shape? Insert the heart, edit its points, then right-click on one side of the heart shape. Select Straight Segment to convert that curved side into a straight line and presto! (figure 13) or if you need that segment gone altogether, Delete Segment is the way to go (figure 14)
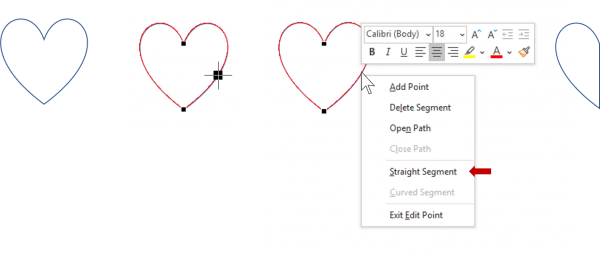
Figure 13 Straighten one side of a heart shape by converting the curved segment to straight.
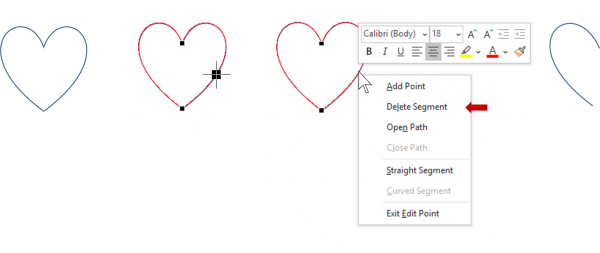
Figure 14 Remove one side of a heart shape by deleting the segment altogether.
I’ve heard it said that there are not enough shape tools to choose from under the Insert > Shape command, but when you know how to edit those shapes, you really can create any shape you need in PowerPoint.
This article was last modified on January 30, 2021
This article was first published on May 9, 2020
Commenting is easier and faster when you're logged in!

Recommended for you

CreativePro Video: Using Morph Transitions in Powerpoint
In this week’s CreativePro video, Richard Goring demos how to create a magnifyin...

Quick Wins: Presentation Design Skills
Use these five resources to boost your presentation design and production skills

How to Easily Update Excel Charts Placed in InDesign
Nolan Haims shows how to modify an Excel chart and have it update in InDesign… a...