

Creating a fantasy scifi image such as this one takes a while, but it involves a number of techniques that should prove useful in all your Photoshop work. Here’s how to turn a standard photograph into something spectacular.
1. The starting image
Find a profile that suits your purpose, or download this one for free here. It’s easier if the subject has no hair, but the technique will work just as well with almost anyone.

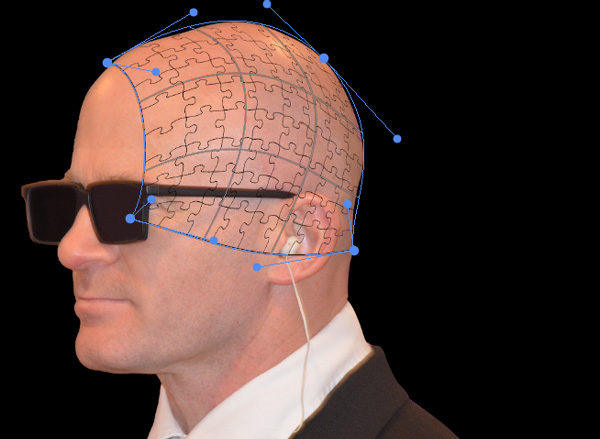
2. Add and distort a jigsaw
Cut out the image, and duplicate the person layer, so you can use it later. Add a graphic of a jigsaw puzzle. You can download this one from here. Choose Layer > Smart Objects > Convert to Smart Object, which will allow you to edit the shape more easily later. Then use Free Transform, click the Warp button on the Options bar, and drag the handles so that the jigsaw appears to wrap around the back of the head.
3. Select and cut the pieces
Use the Magic Wand to select a couple of jigsaw pieces on the jigsaw layer. Then switch to the person layer and use Layer > New > Layer via Cut to make a new layer from those pieces, while removing them from the original. Move them out of the way.

4. Extrude the pieces
On the new pieces layer, Select All and hold Alt/Option as you use the cursor keys to nudge the jigsaw pieces up and right – you’ll need to nudge them between four and eight times, depending on the resolution of your image. Use Select > Inverse so that only the extruded areas are selected, and use the Curves dialog to darken them. This gives the pieces a three-dimensional quality.

5. Rinse and repeat
Switch back to the jigsaw layer, select a few more pieces, and repeat steps 3-4 until all the pieces are cut out to different layers (you can cut three or four pieces at a time if you like). Move and rotate them so it looks like they’re spilling off the back of the head. You can now hide the jigsaw itself.

6. Add depth to the head
Duplicate the version of the cutout head layer with the jigsaw pieces removed. Move it behind the original and scale it down a little, while moving it slightly away from the original. Use Curves to darken it, and you’ll give the cutout a sense of thickness.

7. Add the back of the head
Duplicate the original head layer, and darken it. Use the distorted jigsaw to select a few pieces and delete these from this layer.

8. Give the pieces some movement
Select all the jigsaw pieces, and use Layer > Group Layers. Then duplicate this group and use Layer > Merge Group so you make a single layer from all the pieces. Use Filter > Blur Gallery > Path Blur, and drag the path so it starts near the head and finishes at the back of the flying pieces. Select the point nearest the head and set the End Point Speed to zero; then select the far point, and raise the End Point Speed to it looks like the pieces are accelerating away from the head.

9. Add a lens flare
Or you can choose an explosion, or a bunch of flowers, or whatever you want inside the head. You can download this lens flare for free (with a bunch of others) here. Change the Layer Mode to Screen so all the black disappears, and use Free Transform to scale and rotate it until it’s at the angle and size you want.

10. Mask the flare
So that the flare appears to be inside the head, use Layer > Layer Mask > Reveal All, then load the jigsaw cutout head as a selection by holding Command/Ctrl and clicking on its thumbnail in the Layers Panel. Paint in black on the lens flare mask to hide it in this area. Then load up the flying pieces layer in the same way, and paint out a few pieces on the lens flare mask so it appears to be firing between them.

11. Add some color
Make a new layer above the cutout head layer, and set its mode to Hard Light, using the head layer as a Clipping Mask. Paint some color on here to add drama. I used pink on the left, and blue on the right.

12. Make it more stark
To give the image extra definition, set the foreground and background colors to black and white (use the keyboard shortcut D). Then select the topmost layer, and choose Layer > New Adjustment Layer > Gradient Map. This mutes the colors, and produces a more gritty, urban look.

This article was last modified on December 31, 2018
This article was first published on December 31, 2018
Commenting is easier and faster when you're logged in!

Recommended for you

The Photographer’s Guide to Copyright
PhotoShelter offers several free, informative guides for photographers on a wide...
Create Beautiful Contact Sheets Easily With DiapoSheet
If you need to build a contact sheet of images you have lots of options. You can...

Creating Surrealism in Photoshop
Ever since Salvador Dali mounted a lobster on a telephone in 1936, the public ha...