

Why should we limit the fun in Adobe Photoshop to the digital world? You can combine old-school art with digital darkroom techniques to create Photoshop brushes for painting and masking. By painting on actual paper first, you’ll create original Photoshop brushes that look more authentic than purely digital art. Then you’ll vary size, angle, and hue of the brushes in Photoshop, and use them for painting and for masking parts of existing artwork.
Step 1
Assemble watercolors, brushes, paper — they don’t have to be high quality — and a bowl of water for rinsing. Now paint away. The color doesn’t matter, since you’ll be converting these to digital brushes that can be any color, but I painted in three colors for the fun of it.

If you don’t want to do this, download three brushes I created for you and skip to step 6:
Download Photoshop brushes here.
Step 2
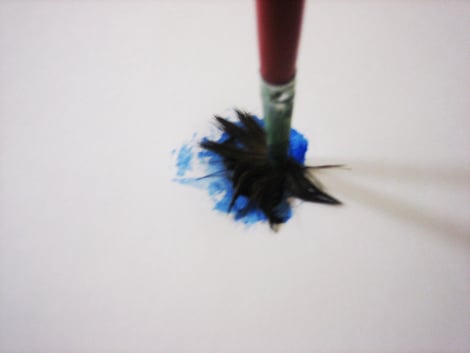
Shapes with rough edges make for great masking brushes in Photoshop. Roughen edges by pressing the brush straight down onto the paper, as I did here:
Step 3
Sweeping shapes, like these, can resemble natural brush strokes or blades of grass.

Step 4
I also painted basic shapes (seen on the left in green) and used a skinnier brush to paint thin shapes, seen in some of the examples on the right in red.

Step 5
Let your paint doodles dry, then scan them into Photoshop and save them as high-resolution PSD files. The brushes need to be large files because when the file is low-resolution, the brush may pixilate at very large sizes.
Step 6
Using the Marquee Selection tool, draw a selection around one of the shapes and go to Edit > Define Brush Preset.
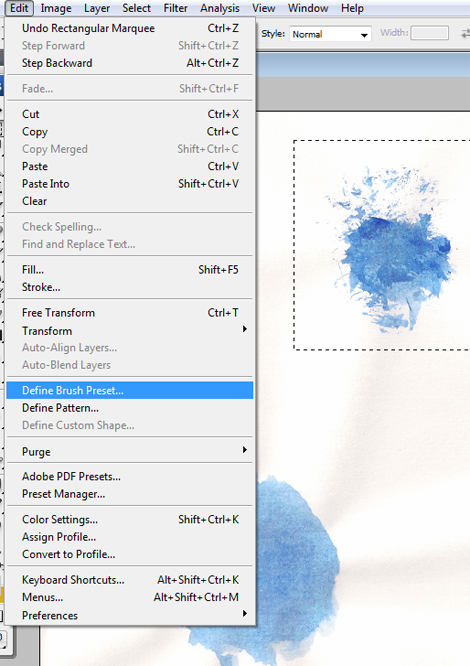
Do this for your scanned drawings one at a time, saving them with unique names you’ll recognize later.

Step 7
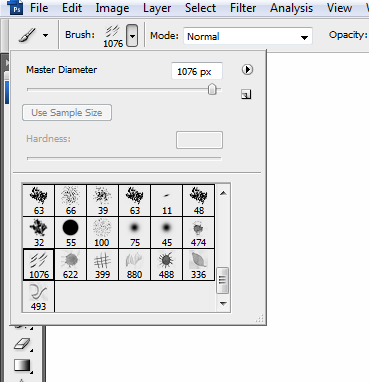
Next, go to File > New to open a new file. Give yourself a lot of space to work with — for example, 1,500 pixels wide and 1,500 pixels high. Then select the Brush tool on the Toolbar and click the down arrow on the upper left-hand corner to access the brushes. Scroll to the bottom and the recently created brushes should be there.
Step 8
Try out your brushes. To adjust brush size, press the left and right brackets on the keyboard. Go to Window > Brushes to adjust the brush settings for more effects. For example, with the grass-like brush below, I adjusted the Shape Dynamics slightly to vary size and then adjusted Scattering. I also adjusted the Color Dynamics to jitter between the foreground green color and background dark yellow color.

Step 9
Besides clicking-and-dragging with the brush options adjusted for variation, you can also select one of your original brushes and click just once. The result will look like the original scan. Notice the realistic look of the texture?

Step 10
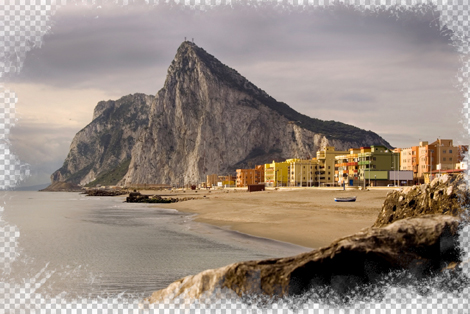
Besides painting in a color, you can also use brushes to mask out parts of an image. To experiment with this, open an image, preferably a landscape shot such as the one below, which I downloaded from iStockPhoto when it was a free image of the week.

(C)Stephen Morris
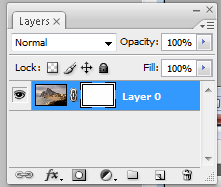
Next, double-click the Background layer in Photoshop’s Layers panel and click OK to name it Layer 0 or whatever you choose. This will make it a regular layer that can have a transparent background or another layer behind it. Click the Add Layer Mask on the bottom of the Layers panel to create a white box next to the image in the Layers panel.
Step 11
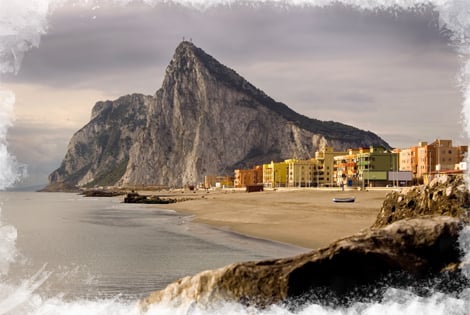
Making sure the white box mask is selected in the Layers panel, choose a brush and change the Foreground color to black in the Toolbar. Click on the edges of the image. For the example below, I used two or three different brushes, but mostly one with a rough edge.
I also adjusted the Angle Jitter and the Size Jitter in the Brushes panel, so that the edge changed angle and size around the border to be as realistic as possible. The image is masked out on the edges, so it’s transparent.
Step 12
To add an opaqur background, click the Create New Layer icon on the bottom of the Layers panel, then click-and-drag it below the original image layer. Add a color by choosing one as the Foreground color and pressing Option-Delete (PC: Alt-Backspace) to fill this layer. I set this bottom layer to white for a subtle background.
The possibilities are endless. So pull out your traditional-media brushes and start painting!
This article was last modified on January 6, 2023
This article was first published on July 26, 2010
Commenting is easier and faster when you're logged in!

Recommended for you

Photoshop How-To: A Rainy Day with Bert Monroy
This story is taken from “Photoshop Studio with Bert Monroy.” Bert M...

How to Make a Terminator Robot Effect in Photoshop
Arnold Schwarzenegger’s iconic robotic endoskeleton was a defining feature...
Seeing Patterns
An object lesson in how to analyze patterns and recreate them in your favorite a...