

Those artisanal logos are all the rage, aren’t they? You know the ones: the hand-crafted looking font (I’m looking at you, Brothers) and a vintage-y looking shield or badge. So now you’ve decided you need one, too…but you can’t find the right piece of vector art with the perfectly symmetrical shield. Maybe, however, you’ve found a perfectly good raster image of one. Maybe you’ve even found one out in the real world and want to emulate it.

The perfect specimen
No problem. Just fire up Illustrator and draw one! “But…but…but,” I can already here you protesting. “I don’t use Illustrator. I’m afraid of the Pen tool!” Have no fear, timid designer. I was once where you are, my friend, but then I learned this one stupid trick: Cheat. That’s right! Use a photo or other image to trace on top of. Just like when you were 7 and your parents were impressed with your impossibly-detailed drawing of Spider-Man—tracing paper!—you’ll impress even yourself by using a template to create on top of.
Set Up the Template
Once you find—or take—the photo to use as a guide, you’ll need to get it into Illustrator. Place the image as you normally would (File > Place), but choose Template from the bottom of the Place dialog box. The image is placed on a new, locked layer called “Template [file name].” If you need to re-size the template image, do that by unlocking the layer, but re-lock it when you’re done.
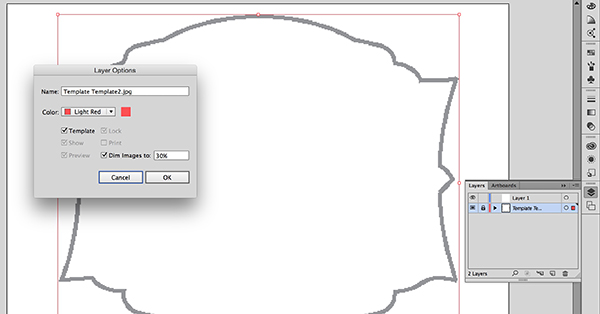
I find that the default opacity setting of 50% is often too dark for me to work with, so I change that. Double-click on the layer (not its name, shoot for the icon in the Layers panel) to launch the Layer Options dialog box. Change the Dim Images setting to some other value (I like about 20% most of the time). Notice that you can check and uncheck the Template option. This is handy if you already have an image on a layer that you decide would make a good template layer.
Draw, Flip, Repeat
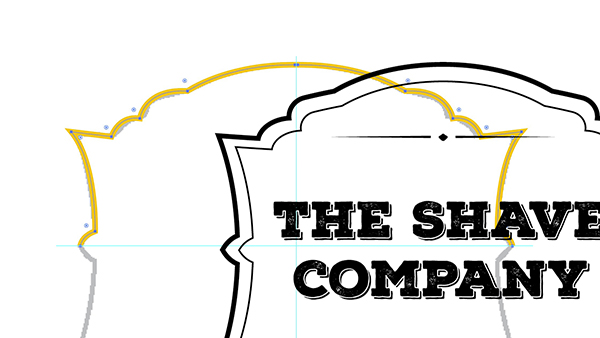
I once wrote an article called “How To Avoid Using Illustrator’s Pen Tool,” aimed at the Pen tool averse. While there’s still no need to be an expert because we are using the safety net of our template, we will have to use the Pen tool for this one. On a non-template layer, begin tracing over the design with the Pen tool. If you’re not that adept at using the Pen tool, using the cheater’s method lets you experiment, without having to be a free-form wizard. If the finished shape could be created by combining shapes, you might want to employ the Shape Builder tool (reference my previously-mentioned article). Again, having that template makes it easy to see the finished piece as a series of lines and shapes, as opposed to having to possess a lot of drawing talent. I speak from experience (or lack thereof).
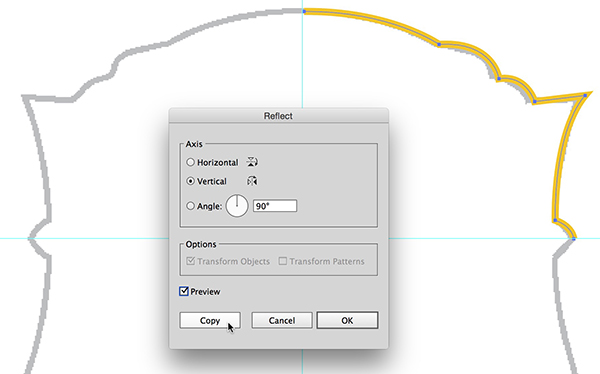
Ideally, the shape we are creating is symmetrical and can be broken in equal halves, or—even better—equal quadrants. Let’s assume our badge is made of the latter, and we will only need to draw one quadrant. Draw out guides delineating the horizontal and vertical centers. Use the Pen tool to create the outline of one of the quadrants, then select the quadrant shape with the Selection tool. Next, choose the Reflect tool by clicking once on it. Hold down Option/Alt while clicking on the edge of the shape’s bounding box that will serve as the axis of the new shape. So, if you have drawn the upper-left quadrant and want to create the upper-right one, you would click on the right edge of the bounding box. Choose the Vertical Axis in the Reflect dialog box, then be sure to click Copy, instead of OK.
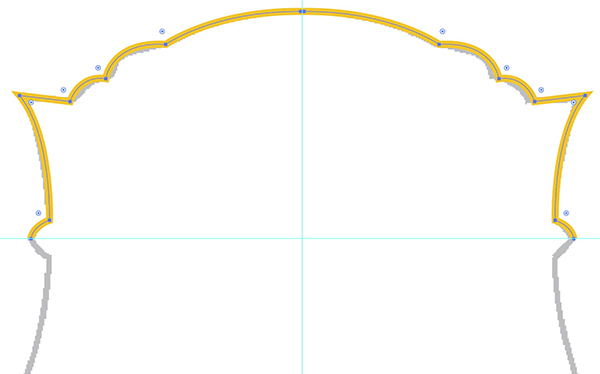
Select both of the objects and then choose Object > Path > Join. Keep in mind that your original shape has to be an open shape to be joined to a new shape. Now we need to repeat this process for the lower portion of our shape. Select the newly-joined shape, use the Reflect tool to copy a horizontal reflection, join the new path to the existing one.
NOTE: I prefer to make sure the portions of the shapes that will be joined are straight, as even a slight curve can look odd when paired with its reflection. Hold down the Shift key when drawing the connector segments to ensure this.
If you want the top and bottom to be mirrored shapes, but the sides to be extended further, you can always flip the shape, then use the arrow keys to push them farther apart. Then use the Pen tool to click on and end point of one path and draw whatever lines you want, finishing up by clicking on an end point of the new path. The shapes will be automatically joined.

I’ll leave the picking of the latest, greatest, overused typeface and careful placement of a random household object icon to you. You’re on your way to artisanal design glory!
This article was last modified on October 26, 2016
This article was first published on October 26, 2016
Commenting is easier and faster when you're logged in!

Recommended for you

Getting into Illustrator: Drawing Basic Shapes
For some folks, Adobe Illustrator is a notoriously hard app to master. As always...

CreativePro Conference Speaker Spotlight: Sharon Steuer, the Zen Artist
Welcome to our new series of posts called Speaker Spotlight, designed to highlig...

Classic Concert Posters Reimagined
With the tools in your design toolbox, and some inspiration from iconic artists,...