

Excerpted from The Adobe Illustrator CS5 Wow! Book by Sharon Steuer. Copyright © 2011. Used with permission of Pearson Education, Inc. and Peachpit Press.
To receive a 35% discount on this book plus free shipping in the continental U.S., go to the Peachpit Press Online Store and enter the discount code CS5WOW during the checkout process.
Greg Geisler is an Austin, Texas-based artist, designer, illustrator, and animator. He has more than 30 years’ experience in art and design and is a huge fan of Adobe Illustrator. He recently shared some of his tips and techniques at Adobe MAX 2010.
Adobe Illustrator’s myriad Bristle Brushes (new to version CS5.5) presented Greg Geisler with an infinite variety of brushes to create his expressive painterly portrait, “Blue Mirror.”

Commissioned by Adobe Systems, you can find this file, and a PDF ReadMe file explaining more about how he made it, on the Wow! DVD and in the Sample Art folder installed with Illustrator.
1. Placing the initial sketch, and customizing Bristle Brush Options. Geisler placed his distorted Photoshop sketch (PSD) as a Template layer.

The template; a distorted Photoshop sketch.
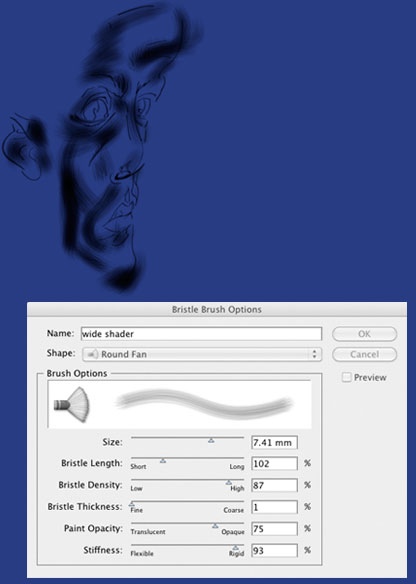
He opened the Bristle Brush Library (Window > Brushes Libraries > Bristle Brush Library) and clicked on the 1-pt Round Bristle Brush, which automatically loaded the brush into the Brushes panel. Geisler next duplicated that brush in the Brushes panel (by dragging its icon to the New Brush icon) and then double-clicked on the brush in the Brushes panel so he could change several settings in Bristle Brush Options. He made changes to Bristle Thickness, adjusted Paint Opacity and increased the Stiffness, and then named it and clicked OK. On a layer above the template, he used this new brush to create the base sketch for the entire illustration. Geisler kept the Brushes panel and the Bristle Brush Library open throughout the drawing session, so he could continue to duplicate and customize brushes as his drawing progressed. For this layer, he created three different variations of the 1-pt Liner brush.

The initial Bristle Brush sketch made with three variations of a Round Point Bristle Brush; the Bristle Brush Options
2. Adding highlights, midtones, and shadows. To make one of the many layers of highlights, such as the strokes in orange, Geisler customized copies of the 3-mm Flat Fan Brush in the Bristle Brushes Library, adjusting Bristle Thickness, Bristle Length, and Paint Opacity. He also drew highlights with a Round Bristle Brush customized with Pointy variations. Geisler continued to draw in separate layers, focusing in particular on midtones, shadows, highlights, or color for each layer, using variations of the Flat Fan and Round Bristle Brushes.
Adding shadows with a wide, fairly opaque Bristle Brush.
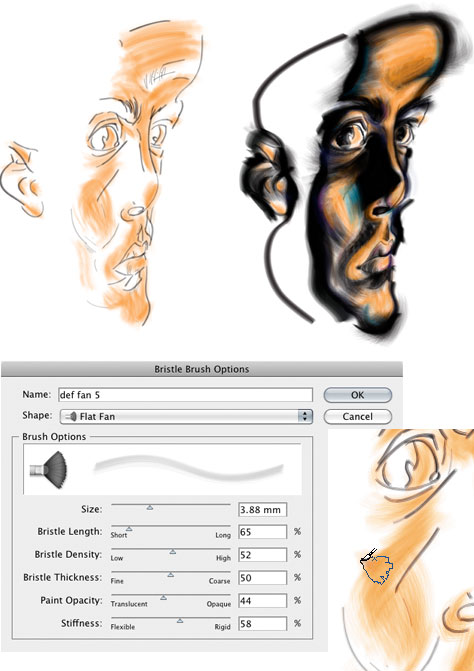
Adding highlights with a Wide Fan Brush, adding shadows; the Bristle Brush icon that appears when using a pressure sensitive pen.
3. Working efficiently and further modifying brush characteristics. Geisler’s process is very organic in that he continually defines new brushes, and creates new layers, as he draws. He rarely deletes a stroke, preferring to layer new Bristle Brush strokes upon others, choosing a more opaque brush to cover the underlying strokes. As he’s drawing, he presses the [ key to decrease the brush size, and the ] key, to increase the bristle size. To vary the opacity, he presses the keys from 1, which is completely transparent, through 0, which is completely opaque. To add texture, as in the blue background shown below, Geisler modifies the settings to increase the brush stiffness toward Rigid, increase the brush density toward Thick, and then decrease the bristle length.

Part of the Brushes panel (right), and a later stage of the illustration with blue texture.
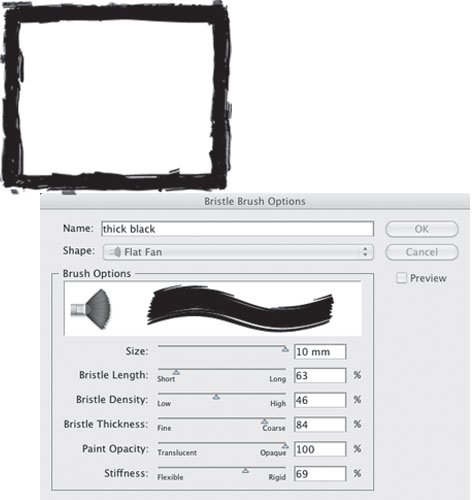
4. Finishing touches. Geisler created an irregular edged black frame that surrounded the portrait, on a layer between the blue texture and the face. He customized a wide Flat Fan brush to 100% Opacity (100% opaque Bristle Brushes lose their character within the stroke, but maintain a ragged edge), and then expanded the brushstrokes (Object > Expand) and clicked Unite in the Pathfinder panel, melding the brushstrokes into one frame object. He then used the Pencil tool to draw a few closed paths, delineating the area between the rectangular frame and the head. Marquee-selecting these paths and the frame, he filled them with black, and again clicked Unite in the Pathfinder panel.
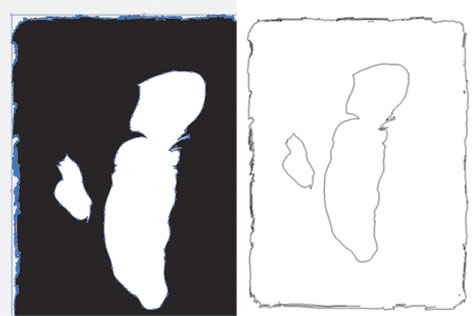
Black frame made with expanded Bristle Brush strokes and filled paths shown in Preview mode (detail at left), and Outline mode (right).
GALLERY
Greg Geisler created the graphic self-portrait below using a customized Calligraphic Brush.
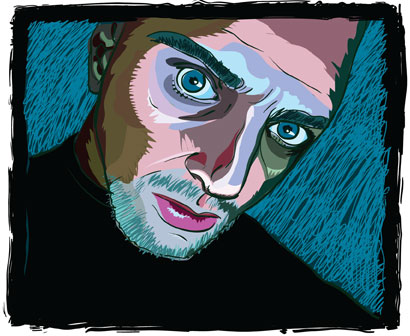
In the Brushes panel, Geisler double-clicked the default 3-pt round Calligraphic Brush, and for the Diameter settings, he changed Fixed to Pressure, and set the Variation to 3 pt. Using a Wacom tablet and pressure-sensitive pen, he drew the facial outline, varying the stroke width as he changed his touch (see image below).

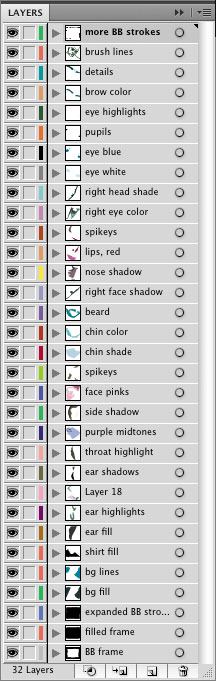
To block out planes of color within the face (such as the chin, beard, and cheek), he used the Pencil tool to draw color-filled irregular paths on separate layers. Each layer contained one of the many defining areas of color (Layers panel shown below) for highlights, shadows, or texture.
To create the frame (shown below), Geisler used the same Bristle Brush, and a technique similar to the one developed in the earlier part of this article. For finishing touches, Geisler drew the bright blue squiggly lines with the Pencil tool.
This article was last modified on January 6, 2023
This article was first published on April 27, 2011
Commenting is easier and faster when you're logged in!

Recommended for you

The Digital Art Studio: Patching Text without the Fonts
How do you fix a typo when you don’t have the correct font? After my beloved stu...

How to Prepare Raster Images for Use with Illustrator Brushes
In the process of testing Illustrator features released last June in the Creativ...

The Digital Art Studio: 5 Favorite Illustrator CC Features
If you’ve ever experienced a power outage, you’ve also likely found yourself ref...