

One of the great new features of InDesign CC 2015 is a new type of table cell called a “Graphic Cell.” To use this, just select any table cell and choose Table > Convert Cell to Graphic Cell. This command adds a graphic frame to the cell that is “stuck” to all four sides of the table cell. When you make the column or row wider or taller, the size of the graphic frame grows with it.
The typical use case for a graphic cell is to easily place images in table cells. But here’s another use. I was helping a customer create a document that contained dozens of tables like this one:

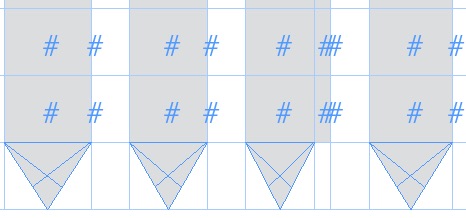
Note the down-pointing arrows near the bottom of the table. They needed an easy way to create these arrows so that as rows and columns were added and deleted, and as column widths changed, the arrows would still be perfectly aligned. Here’s how we did it.
1. Create a blank row for the “arrowheads”
2. Select a cell, and choose Table > Convert Cell to Graphic Cell

3. Press the Esc key to select the graphic frame inside the table cell

4. Choose Object > Convert Shape > Triangle

5. Choose Object > Transform > Flip Vertical

6. Fill the triangle as desired

7. Select the cell (not the graphic frame), and paste the cell in other locations as needed (pressing the Esc key cycles you between selecting the frame and selecting the cell)

8. You will need to flip each of the copies vertically again
9. Note that if you merge a cell with a cell to the right, the graphic frame occupies the new merged cell

10. As you change collumn widths and row heights, the graphic frames scale

This approach opens up all kinds of creative possibilities for the “ends” of table rows and columns. In the example below, the ends of the shaded rows are graphic cells containing rectangles with 2 rounded corners.

This article was last modified on July 8, 2021
This article was first published on July 27, 2015
Commenting is easier and faster when you're logged in!

Recommended for you

Solving Problems With Complex Table Formatting
I recently had to design a calendar in InDesign using complex table formatting w...
Multi-colored Strokes in an InDesign Table
Learn how to apply not one but two strokes to the same cell inside of an InDesig...
Using Adobe Stock with InDesign
Back in June, Adobe launched a new service for Creative Cloud users, Adobe Stock...