


This article appears in Issue 138 of InDesign Magazine.
InDesign has always included a small sample of scripts to give users a taste of the benefits of automation. And now Adobe has created the InDesign Community Script Project, which is intended to demystify scripting and connect more everyday users with the scripting community. This means it’s now easier than ever for you to find awesome free scripts that make working in InDesign more productive and fun! Let’s take a look at the community scripts and where you can find them.
A New Addition to the Scripts Panel
With InDesign’s Scripts panel open (Window > Utilities > Scripts), you can see an Application folder with the sample scripts that come with InDesign, plus a Community folder and a User folder. While the Application and User folders are mainstays of the panel, the Community folder is a newcomer, appearing first in InDesign 15.0.2 (February 2020). As the name suggests, community scripts are those created by members of the InDesign community—rather than Adobe—and a small number now come installed with InDesign (Figure 1).

Figure 1. The new Community folder in InDesign’s Scripts panel
The starter set of community scripts includes the following:
Break Text Thread
Written by Ariel Walden of Id-Extras, this script allows you to sever the threads between text frames while leaving the appearance of your layout unchanged. It allows you to break text threads before or after a selected text frame, between all frames in a story, or before text frames containing a specified paragraph style (Figure 2).
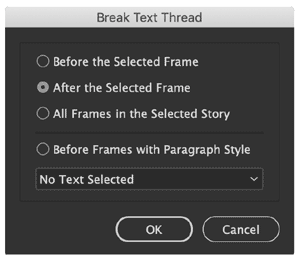
Figure 2. With this script you can easily break text threads while making sure the text stays
put.
Clear Style Overrides
This script by Gregor Fellenz is your one-stop shopping solution for removing style overrides. You can choose to remove overrides from specific paragraph, character, table, or object styles, or blow away all overrides at once (Figure 3).

Figure 3. You have options aplenty for removing overrides.
Insert Typographer Quote
This is actually a set of eight scripts by Stefan Rakete for inserting French, Swiss, German, or English typographer’s quotes (single or double) around selected text (Figure 4). Once you see how easy it is to insert quote marks this way (especially if you use keyboard shortcuts to run the scripts, see “Shortcuts for Scripts” below), you may never type another quote mark.

Figure 4. Eight scripts are better than one when it comes to inserting quotes in various languages.
Snap Margins To Text Frame
Another one by Ariel Walden, this script takes all the fiddly work out of adjusting page margins. Simply select a text frame on a right-hand page and run the script. Margins on all document and master pages will be changed to fit the text frame perfectly.
Unicode Injector
From the fertile imagination of Kris Coppieters, this script works in a unique way to insert special characters. You first make a copy of the script file, then look up the Unicode value for a character you often need to insert in your text. Rename the copy of the script file with the Unicode value plus a description. For example, to make a script for inserting the multiplication symbol, you could name it “U+00D7 multiplication sign.jsx.” (In other words, to edit what the script does, you simply change its name. Clever!) To insert the character, just put your cursor in a text frame and run the script. This is another one that you should assign a keyboard shortcut to.
Shortcuts for Scripts
For maximum speed and ease, use keyboard shortcuts to run the scripts you use most often. Here’s how:
- Choose Edit > Keyboard Shortcuts.
- Create a new shortcut set by clicking the New Set button in the dialog box or choosing a custom set you’ve already created.
- Choose Scripts from the Product Area menu.
- Click on a script in the list to select it.
- Put your cursor in the New Shortcut field.
- Type the shortcut you want to use, and click Assign.
- Click OK to close the dialog box.

Finding More Scripts
The set of community scripts Adobe placed in the panel is really just an appetizer for the ever-growing buffet that you can find in the InDesign script repository on the GitHub website (Figure 5).
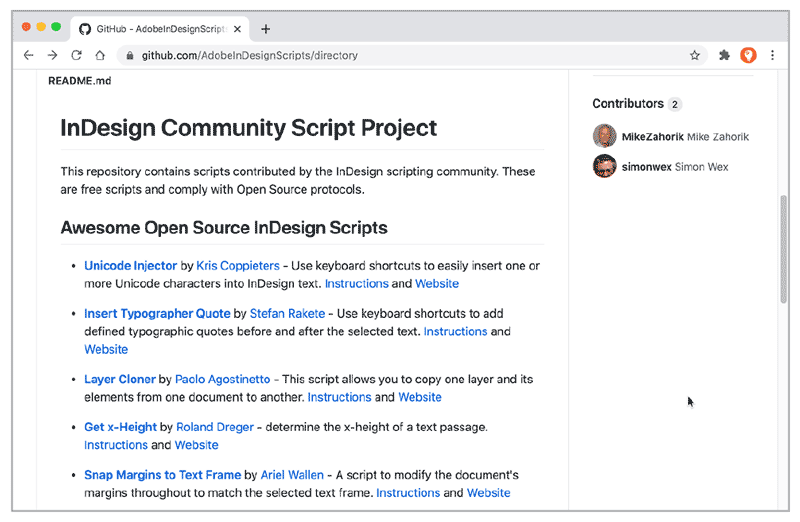
Figure 5. The InDesign script repository on GitHub
Adobe promises that more scripts will be added over time, but let’s take a look at some of the scripts that are available right now, as well as how to use them. On the GitHub InDesign Scripts directory page, you can scroll down to see the scripts and a bit of info about the InDesign Community Script Project. GitHub was created for developers, not “the rest of us,” and can be very confusing when you start using it. We’ll step you through just what you need to know.
After looking through the list, suppose you find a script that you want to install, Layer Cloner by Paolo Agostinetto, for instance. This script allows you to copy one layer and all its elements from one document to another—pretty handy!
On the GitHub directory page, click the name of the script to open the individual script’s page. Here you’ll typically find a ReadMe, a license, and the script file (which probably ends with the extension .jsx). You may be tempted to right-click the script file to download it, but don’t—that won’t work. Instead, click the green Code button on the page and choose Download Zip (Figure 6).

Figure 6. Downloading a script from the repository on GitHub
After the script package downloads, you must unzip it (you should be able to just double-click the file in your download folder). The script file is the JSX file (in some cases you may find multiple JSX files). There is usually a license file and a ReadMe file in there, too. The ReadMe file contains helpful information about what the script does; you can open it in any text editor. The license file is encoded, so you can ignore it. If you want to read the license, click it in the GitHub site. (We believe all the scripts are licensed under the MIT License, which you can read about here.)
Once you’ve downloaded and unzipped the script, you need to move it into the correct folder on your hard drive so the script appears in the Community folder in the Scripts panel. To do so, go back to InDesign and right-click the Community folder the Scripts panel. Choose Reveal In Finder/Explorer. A window will open and show the default community scripts in a folder (Figure 7). Inside that folder is another folder called Scripts Panel.

Figure 7. Revealing the Community folder
Drag the script file(s) you unzipped from the GitHub repository into the Scripts Panel folder. Your computer may ask you to authenticate as an administrator to do this. By the way, you can copy the whole folder into the Scripts Panel folder, or just the JSX scripts.
With the scripts in place, you can now go back to InDesign where you’ll find them listed in the Community folder, ready to use (Figure 8).

Figure 8. Drag the script to the Scripts Panel folder to install it.
(Note that you can also put scripts into the User folder, inside the Scripts panel, using the same technique. This is helpful if you don’t have the admin password to your computer. Also scripts in the User folder may be more likely to survive on your hard drive the next time you upgrade InDesign.)
Running a Script
To get back to our example, let’s put the Layer Cloner script to use. First, make sure you have a document open that contains design content you want to copy. Next, open a second document with the same number of pages, and make sure that no layers have the same name between the documents. Run the script: A dialog box opens where you can choose which layer to copy (one at a time) and which open document to copy it to. Click OK, and watch the magic happen (Figure 9).

Figure 9. The Layer Cloner script in action
Spotlight on Scripts
There are a number of other amazing scripts on GitHub that you can choose from. Let’s take a look at a few of them.
Size Thing to Page and Size Page to Thing by Olav Kvern As you might imagine from the name, the Size Thing to Page script resizes the object you have selected to the size of the current page (Figure 10). Be aware, however, that it is very specific. If you select a graphic frame, for example, the script resizes the frame but not the image inside the frame. The Size Page to Thing script does the opposite. It resizes the page to the size of the currently selected content.

Figure 10. Sizing an image to the page size
Copy Paste Coordinates by Kris Coppieters
This is actually a trio of scripts that function together. You can start by selecting a single-page item and running the CopyCoordinates.jsx script to copy its coordinates. This script copies the current reference point settings in the Properties panel or Control panel as well. Next, select another page item and apply the same coordinates by running the PasteCoordinates.jsx script, which pastes the coordinates you just copied onto the second item. The third script, called PasteSameReference?PointCoordinates.jsx, is similar to PasteCoordinates.jsx, but it ignores the current reference point settings when pasting.
Get x-Height by Roland Dreger This script gives you the x-height for selected text. This can be extremely useful when you need to create type at a specific physical size to comply with regulations. By law in the EU, for example, the minimum x-height of the text on food packaging is determined by the packaging’s overall surface area. This script makes the process of getting the correct value much faster and easier.
Contributing Your Own Scripts
As we mentioned earlier, Adobe is planning to grow the collection of community scripts. If you’re a scripter and want to share your own creations, email Adobe at sc*****@***be.com with details about the script you would like to submit. For more details, see the GitHub section on contributing scripts.
Learning to Script in InDesign
Now that you’re using scripts in InDesign, are you tempted to try your hand at customizing them or even writing your own? Here are a few ways to learn to script in InDesign:
- Read Mike’s article about how to fix scripts, which is a great way to start.
- Read Peter Kahrel’s book JavaScript for InDesign (available as a PDF or in print from Amazon) to help you get up to speed fast. You can read a helpful introductory excerpt from the book here.
- Watch Keith Gilbert’s video course, InDesign: Scripting Made Easy, which takes you through the steps you need to know.
- Read Jongware’s article, which is a good “start here” resource.
Coding Coda
Scripts can no doubt save you time and effort and even make mundane tasks easy. With this new source for scripts from the scripting community, you now have even more power in your corner.
Commenting is easier and faster when you're logged in!

Recommended for you

A Solution for Packaging Files With Missing Plug-ins
Recently, I worked on a project where I had to package over 100 I...

Unflubbify Your Writing Book Excerpt
Use these quick tips to improve your spelling, punctuation, and grammar.

InReview: Table Tools for InDesign
A useful set of scripts for anyone who regularly works with complex tables.