
Scripting is one of the most powerful features in InDesign. It can save lots of time: almost anything you can do with the user interface, you can do with scripts, and there are even a few things you can do in scripting that you cannot do from within the user interface. Scripting is also a good way to do accurate placing and to repeat the same action dozens, hundreds, or thousands of times. And of course, it’s fun to make InDesign do things the programmers didn’t think of.
The technical background
There are two parts to a script: the language you write your script in, and the interface to InDesign. The language we’re going to focus on is JavaScript. Or, technically, something called ExtendScript, which is a flavor of Javascript that Adobe Creative Suite applications use.
The interface (how the script talks to InDesign) itself is made up of three parts: objects, properties, and methods.
Objects are the bricks that form the foundation of your document. Your document, for example, is one stone. It lies on top of the application itself (also an object). “Above” the document, you can find things like master pages, pages, and stories. Pages, in turn, contain text frames, which hold some of the stories’ text — etc., up to individual characters. It’s important that you understand the hierarchy of objects, and that you’re clear about what object you’re “talking” to when you are scripting.
Properties are what gives the bricks shape, color, and weight. Each object has different properties. For example, a document has a size and can have any number of pages; a piece of text has color, font, and size; and a color, in turn, has a color model (RGB, CMYK, or Lab) and a value for each of the components in this model.
Methods are actions you can apply on your bricks. Common actions for InDesign are add (such as adding a page to a document), remove (the opposite), and specific InDesign actions such as exportFile, findText, and convertBulletsAndNumberingToText — to name just a few.
InDesign talks to the scripts it’s communicating with through this interface, exposing its objects, properties, and methods to the general public. This is called the Document Object Model or ‘DOM’ for short. The DOM returns values to the calling program, accepts new values, and performs operations on request.

Adobe made sure InDesign’s DOM can interface with a lot of programming languages, so users have the choice for themselves — you can use Visual Basic, Applescript, or JavaScript, and even more exotic languages such as C# or Python. However, there are good reasons to stick to JavaScript: it is a fairly easy language (as things go), it is well documented, you can use any plain text editor to write it with, and, most important, you can run the same script on both Windows and Mac OS X.
Starting with a Simple Script
Let’s take apart a short and sweet one-line script Dave Saunders wrote some years ago (and which was highlighted in a recent blog post):
try {app.layoutWindows[0].zoomPercentage = 140 } catch (e) {};
This sets the zoom of your screen to a certain percentage, and you can set it to any value you find convenient.
To be fair, Dave was showing off a bit when he wrote this script, because in JavaScript there is no such thing as a ‘one-line script’. This was actually a six-line script compacted into one line. Here’s the full, properly indented version:
 1       try {

2              app.layoutWindows[0].zoomPercentage = 140;

3       } catch (e)

4       {

5              // Nothing to do here

6       };
For longer scripts, it’s wise to put every logical command on a line of its own, properly indent everything inside grouping curly braces, and add the odd comment or two, because it helps in understanding what happens where and in what order. A curly brace at the wrong place can make all the difference between success and failure; the indenting helps you identify the larger structures.
The core command of this little script is line #2 — this is the command that does all the work. We can read this from left to right, as it first focuses on what object we’re talking about, and then what to do.
First, the “app” part is easy: it instructs the script that it’s going to access some part of the parent application, which is InDesign. The dot after “app” tells javascript that you’re done with that “stone” and are going to specify the next object in the hierarchy, or a property of that object.
What is this “layout window”? InDesign has two kinds of windows: the usual document work view window and the Story Editor’s window; and you can have several of each open at the same time, even all of them viewing the same document. InDesign maintains an active list of all of the opened windows, and always makes sure the very first window (the one numbered “0” because in programming-speak zero is first, not one) is the one that is currently active in the interface.
(By the way, InDesign also has an object called “app.activeWindow”, which always points directly to the active window. But this can be either a story editor or a layout window, and we only want the latter one because that’s the one that can zoom.)
If you inspect the properties of this Layout Window object (I’ll discuss how soon), you can find all of the items one would expect: what page or spread is currently visible, which view or preview mode is active, what layer is selected, and – yes! – what the active zoom level is. All of these properties are unique to each layout window; you can open several windows and set each one to a different page and view mode.
The rest of the script (the part before and after line 2) is a “try – catch” command. That is a JavaScript-specific construction that allows the commands in the top braced section to fail gracefully if something goes wrong. For example, in this case, it’s possible there are no layout windows (because there is no open document), and, rather than giving a nasty bleep and showing an error dialog, this gives the script a chance to continue. The bottom braced section does nothing because in this case there is no point in continuing any further. Those two slashes mean the rest of the line is just a comment (you could type anything you want after those slashes). For larger scripts, you might want to alert the user that something is wrong before giving up. Or, if you know in advance what possibly could go wrong you can even have the script try to correct the error and continue as usual. But that’s advanced scripting.
How to Find What You Need?
InDesign’s scripting model is vast. It’s a credit to the dedication of its programmers, because InDesign’s scripting interface supports almost everything you can do in the interface, and it has by far the best scripting support of all of the software in the entire CS Suite. That comes with a drawback: InDesign CS5 boasts 1,086 classes (objects), with a total of 7,310 methods, and a staggering 16,151 properties. So it’s kind of hard to find what specific object, property, or method you need to achieve your goal.
If you are using Adobe’s own ExtendScript Toolkit Editor, you can find an Object Model Viewer under the Help menu. Alas, it requires quite some work to find your way around it. First, you need to select your version of InDesign in the Browser dropdown list before you can use it; then you can enter “zoom” in the Search field, and you get this:
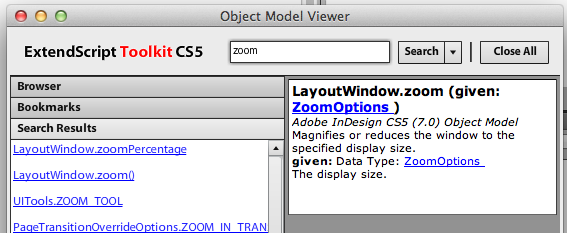
I clicked “LayoutWindows.zoom()” because I had an inkling of what I was looking for a method named “zoom”, but it appears it’s the wrong one, because if you select “ZoomOptions” in the data card, you get this:
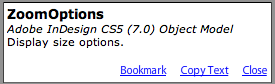
which somehow does not tell you what you wanted to know. Only if you look up “ZoomOptions” (somewhere else!), you will find that these options are those of the View menu: Actual Size, Fit Page, Fit Spread, Show Pasteboard, and Zoom In and Out. Frustrating! We actually need the entry above it: the property named “LayoutWindow.zoomPercentage”:

What is this “LayoutWindow” thing? Enter it in the Search field and you can see it’s part of the Application or a Document, and in this case we can use the Application entry under its usual name “app”.
Apart from being quite clumsy to work with, an obvious drawback of this help system is you have to use the ESTK to write your scripts with, where I prefer a plain text editor (TextPad on my PC, TextWrangler on my Mac; but you can use Notepad or TextEdit “in plain text mode” as well).
Fortunately you don’t have to use ESTK — all of this information is actually stored in a file deep inside InDesign’s data folders, and it’s possible to rewrite it to a more convenient format. So I’ve done that for you! Originally, I used XSLT to reformat the original XML into HTML; soon after that, another scripter named ABC Green showed me how to compile it into a single, convenient Windows Help file.
This file is fully hyperlinked, lists how objects are used in functions, and provides graphic representations of the relations between them:
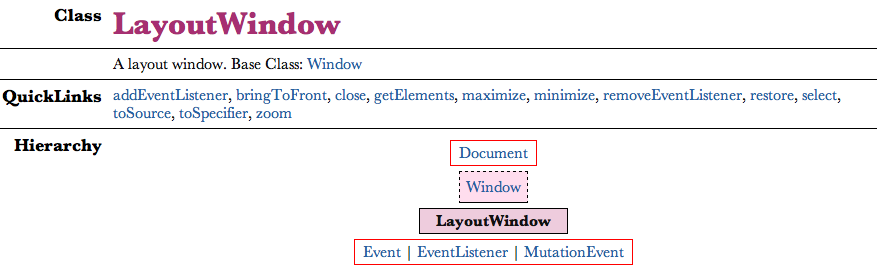
Sometimes you have to see these relations before they make sense; in this case you can see a Layout Window is sort of a Window, which itself is a part of a Document.
You can view this CHM file natively on any Windows system, or with the help of a viewer app on the Mac (I recommend using Robin Lu’s iChm). Download the file for your version of InDesign from my site (https://www.jongware.com/idjshelp.html), or browse them online at MIT (https://jongware.mit.edu, bandwidth graciously provided by John Hawkinson).
Finding More Information
Obviously, this small primer just scratches the surface of scripting and how to do it. You’ll find more articles on the subject here at indesignsecrets.com as time goes by. Also, in the meantime, check out these resources:
- Adobe’s own scripting information and examples are here and consist of a primer guide, a tutorial, and an in-depth guide.
- For more information on JavaScript itself, you can use any other online source such as W3Schools.com, providing you disregard any references to web browser functions, as most of these web sites are targeted to using JavaScript in HTML pages.
- Peter Kahrel wrote a guide to scripting: Scripting InDesign with JavaScript. A good guide in German is InDesign automatizieren by Gregor Fellenz.
- There are other resources available, too, such as this book by Grant Gamble
.
Do you have other suggestions for learning javascript for InDesign? Tell us about them!
This article was last modified on December 21, 2021
This article was first published on December 9, 2011
Commenting is easier and faster when you're logged in!

Recommended for you

Now available: JavaScript for InDesign, 2nd Edition
Learn how to harness the power of scripting in InDesign. And take advantage of a...
Improving Scripts
Scripts can give you nearly magical powers in InDesign, but that doesn’t mean yo...
