Building an Org Chart or Flowchart in InDesign, Part 1
You can make a great-looking flowchart in InDesign if you know what features to use

On the one hand, InDesign is not the best tool in the world for making flow charts and org charts and that sort of thing. On the other hand, other apps are not the best at making professional-looking (“pretty”) layouts. Sometimes “pretty” is more imporant, and we turn to InDesign.
But how best to make an org chart in InDesign? In this first of several articles, I’m going to describe a few of my favorite charting tips. Let’s start with making some shapes.
Making Diamonds
InDesign is great at making rectangles and ovals. If that’s all you need in your flow chart, then you’re set. But lots of folks want diamonds and other shapes.
If you can’t draw a proper diamond with the Pen tool, you’re not alone. Fortunately, there are easier ways. Here’s one:
First draw a square frame (hold down the Shift key to keep it square). Rotate it 45 degrees in the Control panel’s rotation field.

Draw a small text frame over it (make sure the text frame is completely surrounded by the diamond), and (optionally) put some text in it.
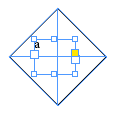
Now select the rotated square and the text frame and choose Object > Pathfinder > Add. The result is a diamond-shaped text frame in which the text is still horizontal. Give the frame a stroke and/or fill.
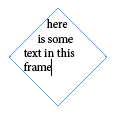
?If you want the diamond more squat, just change the H field in the Control panel, or drag the top or bottom handle.

That might seem like a lot of work, but of course, you only need to do it once and then you can duplicate it whenever you need another.
(You may notice that the text is centered in the image above. Horizontal centering is easy, but vertical centering has long been a bugaboo. In CS5, it’s simple: Just open Object > Text Frame Options and choose Center from the Vertical Justification pop-up menu. If you’re using CS4 or earlier, you can fake it by adding a blank paragraph before the text, then adjusting the size and leading of the two paragraphs — one blank and one with text — until the text is centered vertically.)
?Making Shapes with Convert Shape and Pathfinder
You can make many other shapes in InDesign by starting with a rectangular frame and then choosing from the Object > Convert Shape menu:

That can be particularly helpful for making triangles. (Of course, see here for how to make a perfect triangle in InDesign.)
If you want a fancier shape, you might consider creating it with a combination of the Corner Options, Pen tools, the Pathfinder panel (or menu), or the Direct Selection tool. For example, here are some wacky shapes you might use:
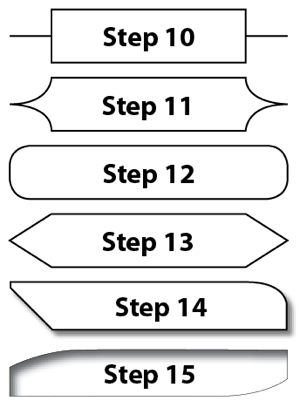 These were made (top to bottom) by: rectangle with corner options set to Inset (with radius bigger than half the shorter side); corner options set to Inverse Rounded; corner options set to Rounded; corner options set to Bevel; a combination of corner options and bezier points along with a drop shadow; a rectangle with two bezier points added with the Pen tool, then adjusted with the Direct Selection tool, and with an Inner Shadow.
Of course, remember that just because you can make really weird shapes doesn’t mean you have to.
In the next part I’ll explore how to align all these objects and start to tie them together with lines.
This article was last modified on December 20, 2021
This article was first published on September 7, 2010
Commenting is easier and faster when you're logged in!
Recommended for you

How to Copy Shape Formatting in Photoshop
The easy way to reuse fill and stroke formatting applied to a shape layers in Ph...
How to Use Illustrator’s Star Tool
Learn how to make stars and starbursts using Illustrator's appropriately named S...

Using Paragraph Shading to Create Corners in a Table
You can use this clever combination of paragraph styles and cell styles to creat...


