
Building a Template for Tabbed Documents in InDesign
Master the tricky task of making custom tab dividers for books and binders

This article appears in Issue 16 of CreativePro Magazine.
My work is niche: I create captain’s manuals for custom yachts, which are delivered in binders with tab dividers marking many sections of complex technical material (Figure 1). Whatever niche your InDesign work fills, you might have a similar need to deliver custom tab sets occasionally—or regularly. In this article, I’ll show you how I do it by building a template that leverages some of InDesign’s most powerful long-document features. I’ll also discuss the sometimes-harsh realities of getting tabs printed, so you’ll know everything involved in this kind of project.

Figure 1. Tab dividers mark multiple sections of complex technical material.
Setting Expectations
From the start, you should understand that making tabs is unlike any other print job. Setting up a document for printing double-sided tabs on die-cut paper requires a special workflow. So special, in fact, that some designers decide it’s not worth the trouble—even with the help of templates found online. In my experience, most of these downloadable templates are decent, but they have significant shortcomings. They’re designed for use with a print service provider, and they don’t take into account the fact that an actual human being needs to efficiently proof the tabs before printing. Likewise, most online templates aren’t necessarily built for use with long documents, double-sided tabs, in-house tab printing, or easy updating. And none of them offer the flexibility and reliability that I need for a large tab set with ever-changing tab text.
That’s why I designed a template that deals with all those considerations—and more.
After learning all the details, you might find that making these tabs yourself is not the best use of your time. That’s okay! We’ll look at some other options for getting the job done. And, in any case, many of the tools and techniques mentioned in this article can be of great use in other long-document projects, regardless of whether they have tabs or not. So let’s dive in.
A Fan-tab-ulous Bonus
Whether you want to fast-forward to the end or follow along with the process of making the tab template, you can download the InDesign file here.
Building the Ultimate Tab Template
To set up the template in InDesign, we’ll use text variables and parent pages together with some of InDesign’s other features to visualize your work at a glance in the Pages panel and make this template work for you.
Before we do anything in InDesign, however, we need to define a little tab jargon. In printing speak, a 5-bank or 1/5 (or fifth) cut is a series of five tabs running vertically along the edge of a book or binder. So, a phrase like 18 tabs on a 5-bank means 18 separate dividers, which cycle through five tab positions three times, plus the final three dividers for a fourth time. Got that? Okay, on to building the template.
First, create an InDesign document that is the size of the tab stock you’ll be using. Say you’re making tabs for an 8.5 in. × 11 in. book, and the tabs extend 0.5 in. past the pages. That means your document will need to be 9 in. × 11 in., with facing pages. Set the orientation to Landscape, even though the document you’re creating the dividers for will be portrait orientation, for reasons that will become clear shortly.
The next task is to set up parent pages for each tab position. Start with the first of the five banks. Rename your default parent page spread 1st Bank, and use that parent to create your first two document pages: page 1 (a right-hand page, for the front of the tab) and page 2 (a left-hand page, for the back of the tab).
Now, you need to set the vertical positions for the tabs. InDesign does not have a setting for rows on a page as it does for columns. But there is a workaround. By setting up five columns (Layout > Margins and Columns)and then rotating the onscreen view 90° you can both set your tab positions precisely and preview them without getting a pain in the neck (Figure 2).

Figure 2. Setting up your file as landscape will let you use the Margins and Columns settings to split your page into five rows, one for each tab bank.
First, on the parent spread, resize the Primary Text Frame so it fits the width of the first column and is the desired height of the tab at the top of the column. Then, on the left-hand page, resize the primary text frame so it fits the width of the first column and the desired height of the tab at the bottom of the column. Rotate the primary text frame on the left-hand page 180°. You’ll have something that looks like Figure 3.

Figure 3. This is the master spread for the first tab bank. The front of the tab is at the top of the right-hand page and the back of the tab is at the bottom of the left-hand page and flipped 180°. Note: There is no text in the tabs at this point. It was added here to make the figure clearer.
To view these landscape pages as the portrait pages they will ultimately become, all you have to do is select the spread in the Pages panel and then rotate the view by choosing (Page Attributes > Rotate Spread View > 90° CW) from the panel menu (Figure 4). Choose Clear Rotation from that same menu to restore the normal view.
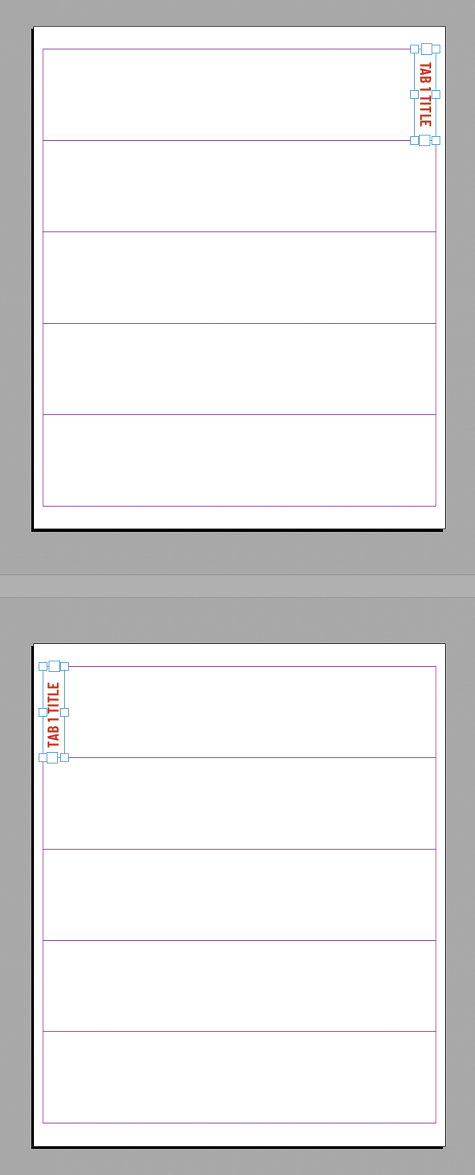
Figure 4. Document pages based on the master spread for the first tab bank, viewed with spreads rotated 90° CW.
Top: The right-hand page for the front of the tab
Bottom: The left-hand page for the back of the tab
Next, make duplicates of the parent page for each of the other tab positions (2nd bank, 3rd bank, 4th bank, 5th bank) and on each one, adjust the placement of the primary text frames accordingly (Figure 5).
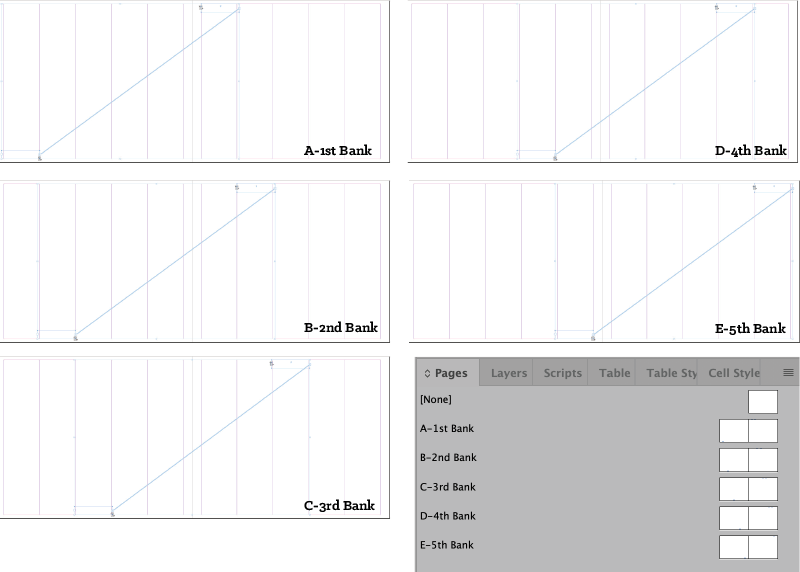
Figure 5. You can create as many tabs as you need, applying parent pages to automatically position them properly and align the labels on front and back.
Use text variables for faster updates and fewer errors
A template like this is the kind of thing that InDesign’s text variables were made for. They offer an easy and automated way to be 100% sure the text on the front of each tab matches what’s on the back. You enter your text just once, when you define the variable (Type > Text Variables > Define). Then you insert that variable for the tabs that need to match. Later on, when text on a tab needs to change, you simply edit the text variable (Figure 6) and the text is instantly updated everywhere the variable was used in your document.
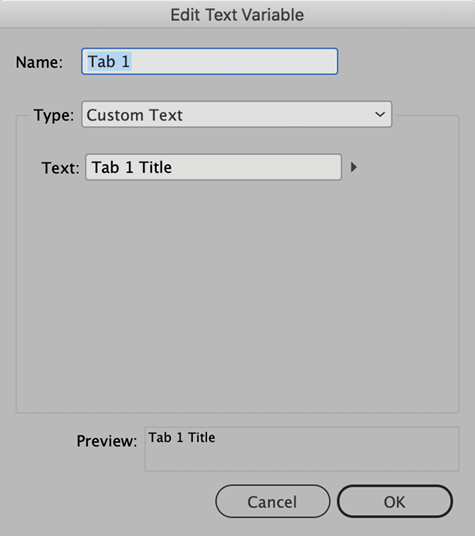
Figure 6. By using text variables in your template, you can change multiple instances of a label text all at once.
With that in mind, make a text variable for each of your tabs. I keep my variable names simple: Tab 1, Tab 2, and so on. That way, I never get confused about which variable applies to each tab.
Preventing Proofing Pains
Once (before I designed my tab template), I didn’t properly cross-check the table of contents against the actual tabs as they were laid out, so I didn’t notice that I was actually missing two tabs. Of course, I didn’t realize it until after I had printed 15 copies and completely used up my super-expensive blank tab stock.
This template eliminates the risk of that costly error. You can leverage the text variables you create for your tabs to create a list of your tabs in sequential order on your pasteboard.
On the pasteboard, make a new text frame and insert each of the custom variables you just made, separated by a paragraph return. You can take this one step further and duplicate this text frame, applying multiple columns (and resizing as necessary), so you can easily see the position that each of the tabs should be in the image on the right.
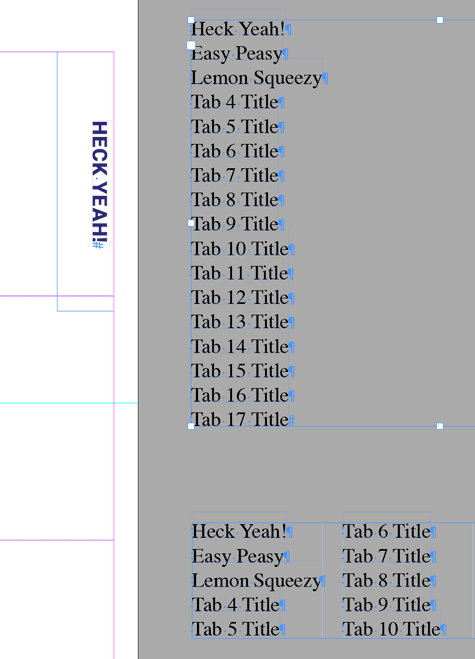
You can then use this easy-to-read list to cross-check your tabs against your table of contents. As you modify your text by redefining the text variables, your corrected labels will appear both on your live tabs and on the pasteboard!
Add more pages for more dividers
So far, we’ve created the first tab divider. Let’s say in total you have 17 tab dividers that you need to make. For that, you create 34 document pages: one page for the front and one page for the back for each divider.
To help you better keep track of the related document pages, I recommend applying color labels to them. Start by clicking the name of a parent page in the Pages panel to select the whole spread. Then, from the panel menu choose Page Attributes > Color Label and choose a color. Repeat this for all parent spreads using a different color for each one (Figure 7). Then, select all document pages in the Pages panel. From the panel menu, again choose Page Attributes > Color Label and this time choose Use Parent Color. The parent colors will be applied to all your document pages, making it easy to tell at a glance if you’ve applied the right ones.

Figure 7. Color code your parent pages and document pages with the Color Label command from the Pages panel menu.
To actually apply parent pages I recommend using the Apply Parent to Pages command from the Pages panel menu (Figures 8 and 9).

Figure 8. Using Apply Parent to Pages in the Pages panel menu…

Figure 9. … will let you apply and change parent pages quickly and precisely.
Continue applying parent pages sequentially to every two consecutive document pages, until you’ve cycled through all the banks (Figure 10).
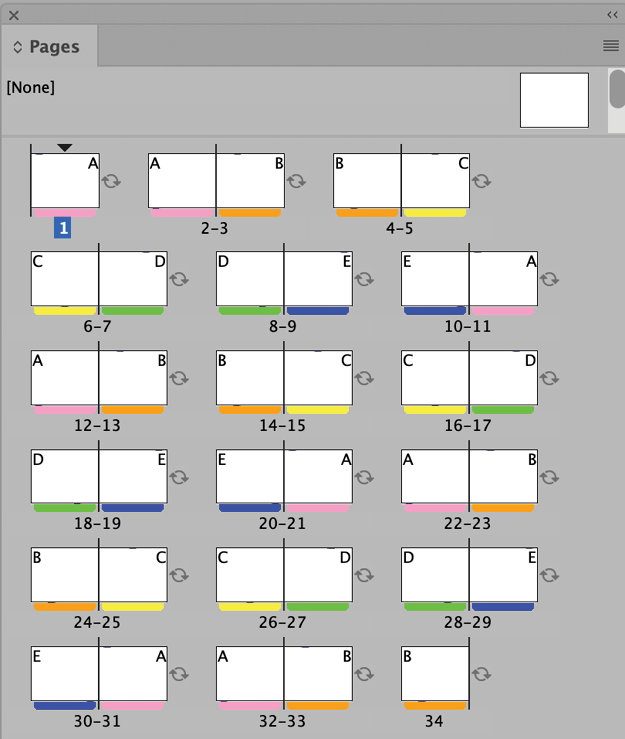
Figure 10. You will cycle through your banks every ten pages. Color coding your parent pages will let you keep tabs on a complicated document.
Add some tab text
Now, it’s time to insert your variables (Type > Text Variables > Insert Variable) into the appropriate text frames on each page (Figure 11).
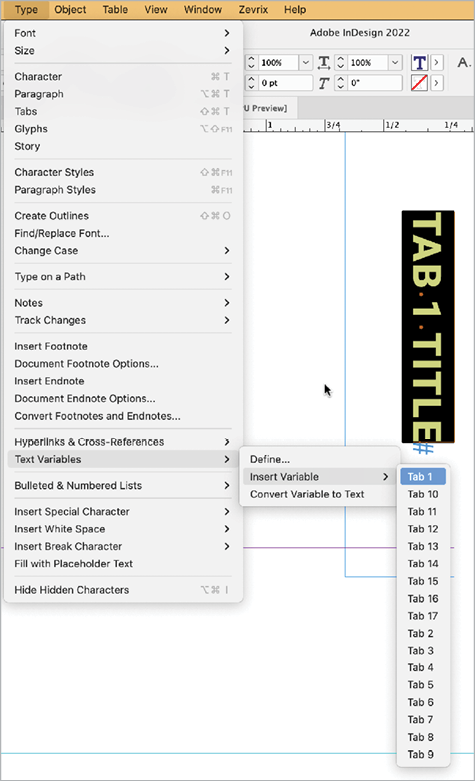
Figure 11. Add your binder tab labels to the template using text variables.
Or, if you’re like me and never want to take your hands off the keyboard, you can use one of InDesign’s most obscure and powerful commands: Quick Apply. With your cursor in the text frame, press Command+Return/Ctrl+Enter, then begin to type the word Tab. Quick Apply will automatically populate the dialog box with your text variable names, and you can use your Up and Down Arrow keys to select the text variable you want to insert (Figure 12) and press Return/Enter to insert the selected variable.
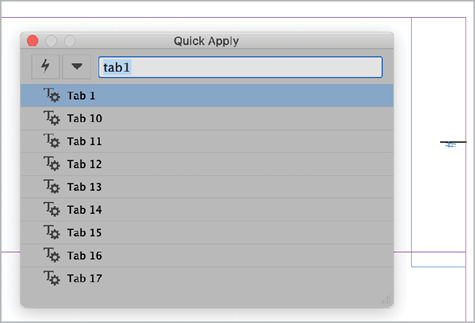
Figure 12. You can use Quick Apply to insert your text variables more quickly.
With the text variables in place, you now have the your template for your tab dividers. Whew! To test it, you’ll need to print it and, if necessary, adjust it to work with your laser printer. For consistency and efficiency, make any tweaks on the parent pages to affect placement of all the tabs in the same bank position at once.
Using Your Template
The reward for all that fiddly work is that you now have a slick template that you can use for multiple tabbed-document projects. For each one, you can return to the Text Variables dialog box, change the variable text, and—poof!—all the tabs in your document will be updated. You won’t need to navigate around a complex document, manually editing and checking each tab. In fact, your cursor will never even touch the document pages when you need to edit the labels on your tabs!
Now I know what you’re thinking at this point. What if the chapters in the book get rearranged so you need to change some of the tab positions (e.g., changing a tab from the 2nd bank to the 3rd bank)? Sounds like a major hassle, right? Nope. Because you used primary text frames on the parent pages, all you need to do to move the tab position is to simply apply a different parent page to the affected document pages. The text frame will automatically move, along with the text variable within, and the color label of the new parent page will be applied to the child page! See how all that up-front planning and effort pays off in the long run?
Do It Yourself? Maybe, Maybe Not
You will find this template indispensable if you are printing complex sets of tab dividers in-house on special tab stock. These products are reinforced on the back edge and have clear mylar on the tabs themselves. I special order this material from my paper supplier.
In theory, such products give you options for customizing your tab dividers with your own equipment. In my experience, though, printing tabs in-house is highly frustrating. The paper shifts as it goes through the machine, some laser printers don’t like the mylar, and it requires a tremendous amount of fiddling and hours of wasted time.
Likewise, most small print shops (the kind that do short-run jobs) will generally want the customer (that’s you) to supply the blank tab stock and also to send your native files so they can adjust positioning as needed. The folks at my local print shop have had just as much of a frustrating experience with trying to print the tabs as I did. For this reason, it can be very hard to find a print shop that willingly does tabs. But you can look to some specialty printers that can create professional-grade tab dividers. If you use these companies, you will have to follow their lead in preparing files to submit the labels for the dividers. That likely means not using the template we’ve created. Expect to pay $50 to $100 for a custom set of tabs—a cost that’s not unreasonable when you factor in the value of your time.
For suppliers of materials for making your own tab dividers and companies that will do everything for you, see “Sources and Resources” below.
Tab Be or Not Tab Be…
While there is no denying the pains of manually having to print duplex tabs, I hope the template techniques I shared in this article will make this process a lot less frustrating and maybe even fun! And, as I mentioned earlier, things like text variables, primary text frames, and color labels can make any long document project go faster and easier. Always take advantage of them when you can! In any case, I bet the next time you look at a tabbed document you’ll have a new appreciation for work that went into it.
Sources and Resources
Avery, the familiar brand of laser and copier labels and specialty paper products, offers Print-On Dividers in 5-bank and 8-bank formats, three-ring-binder punched or plain, and in packages of one or five sets.
ColTab is a reliable and affordable tab producer for the business-to-business market. It’s where I’ve been getting my tabs made since 2009. They can do one-off sets and customize them in many ways. And because it’s their main type of printing, it’s very streamlined for them (and for me).
Commenting is easier and faster when you're logged in!

Recommended for you

Tab Tips
Although most of us today will use InDesign's table and table styles features to...

Tip of the Week: Repeating Tabs
There are three new Links panel icons in InDesign CC that you'll see when workin...