Building a Photo Book with Object Styles
David Blatner shows how object styles can make designing layouts incredibly fast and fun.

This article appears in Issue 126 of InDesign Magazine.
For all the many things that InDesign does really well, there are some areas of design and layout that it handles terribly! For example, laying out a photo book (such as a wedding album or a collection of photographs from your vacation) can be very frustrating because InDesign lacks some basic abilities, such as:
- Switching the location of two photos
- Putting all the photos on a page into a grid
- One-click repositioning of photos
Sure, you can do all these things in InDesign, but not quickly, easily, or elegantly.
Here’s a great example: Let’s say you have two pictures on your page and you want to switch them. Here’s the basic process: double-click on one to select the image inside the frame, cut it to the clipboard, paste it elsewhere on the page temporarily, double-click the other frame to select the picture, cut the image… and I’m not even going to finish this sentence, because this whole thing is already way too long and annoying. When you think that InDesign has been around for over 20 years, doesn’t it seem crazy that this basic task should take more than one or two clicks?
Fortunately, there are some solutions that can help you lay out photo book pages quickly. (And these techniques are not only for photo books! You’ll find yourself using these for all kinds of documents.)
In this article, I’m going to focus on how you can use object styles in an unconventional way to build pages faster than ever before. The result is “one-click repositioning” for your photos.
Object Styles
You may use paragraph and character styles in your documents, but if you’re not also using object styles, then you’re missing out. Object styles are—as
you can probably guess—very similar to text styles; they allow you to apply a bunch of object formatting to one or more objects on your page, all with one click.
Gridify My Photos
Let’s say you’ve placed a bunch of photos on your page and now you want to organize them into a grid. It’s time-consuming to move each frame, one at a time. Here’s a trick I posted to make frames that uses the Content Collector tool in an unexpected way.
Object styles usually include descriptions such as fill and stroke colors, text wrap, and other such formatting. But a few years ago, Adobe quietly added a new feature to object styles: the ability to apply sizing and page positioning. This addition turns out to be super helpful when laying out document like photo books.
In fact, I created a whole InDesign template for a 12-by-12-inch photo album that contains 46 object styles (Figure 2). That sounds like a lot, but it wasn’t particularly difficult—I’ll explain the steps below. The object styles included formations such as “Half Left” (for an image that fills the left half of the page) and “Quarter Upper Right” (for an image that is one-quarter the size of the page, placed in the upper-right corner).

Figure 2. Object styles in the photo book template. See page 24 for how members can download a copy of this template.
Once the styles are built, laying out a page goes very quickly. You simply place an image anywhere on the page—without worrying about size or position—and then click one of the object styles. Because you’re using styles, you’re assured that the picture is exactly the right size and position every time. (I recorded a movie about how to use the template, which you can watch here.)
Swapping Photos
If you frequently need to swap images on your page, you need to install one of two free scripts. The first one (download it here) actually swaps two objects—that is, the frames trade positions. This works for any kind of InDesign object, not just images.
The second script (download it here) exchanges two images—you select two graphic frames that contain pictures, run the script, and the two images trade places. Quick, free, and super helpful (Figure 1).
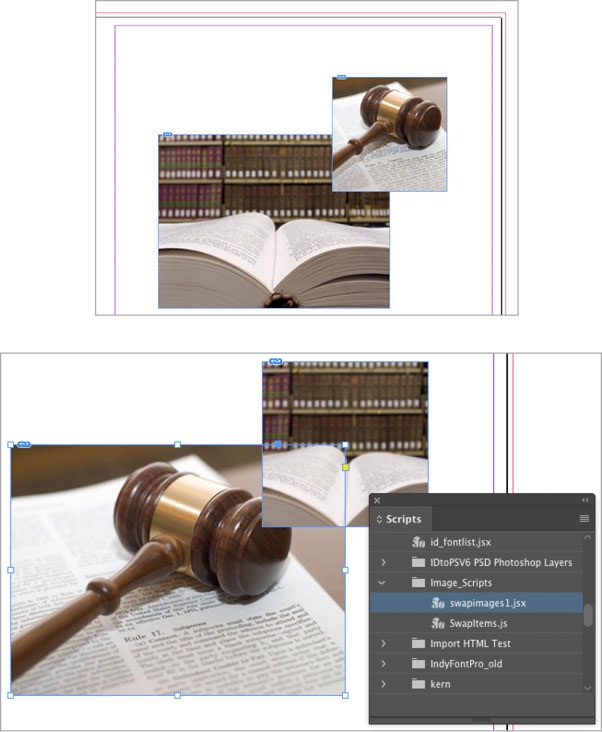
Figure 1. When you select two frames (top) and run the script, it switches the images (bottom). In this case, the frames have Frame Fitting applied to them, so the images automatically resize.
Making Your First Style
When making a photo album, you should first design a set of pages you’ll use. For example, one kind of page might be “4-up,” where four images fill a page, one in each quadrant. Another page may contain three images: one tall (half-page) and two smaller, quarter-page photos (Figure 3). For each image position, you’ll want to create an object style.

Figure 3. Sample layouts you might use for a photo album
Usually the fastest way to make an object style is to create one example on your InDesign page (for example, an empty graphic frame in the upper-left corner of the page). Then, while that frame is selected on the page:
Open the Object Styles panel (Window > Styles > Object Styles).
Choose New Object Style from the panel menu (or Option/Alt-click the New button at the bottom of the panel).
Give the style a name in the New Object Style dialog box.
Choose Size and Position Options from the list on the left, and set the first Adjust pop-up menu to “Height & Width” and the second Adjust pop-up menu to “X & Y” (Figure 4).
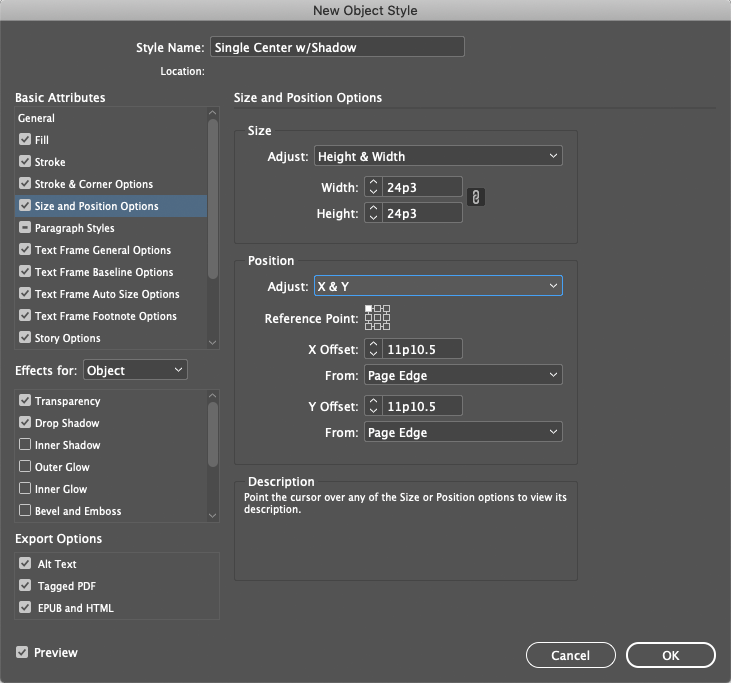
Figure 4. Setting the object style size and position
Because your sample object was selected on the page, its position and size are “sucked up” into these fields automatically, so you usually don’t have to adjust them. If your frame is supposed to bleed off the edge of the page, see “A Couple of Cautions,” below.
Choose Frame Fitting Options in the list on the left, and (assuming you want your image to fill the frame) choose Fill Frame Proportionally from the Fitting pop-up menu. Set the Align From icon to the center point, and make sure the crop amounts are all set to zero (Figure 5).

Figure 5. Frame Fitting tells InDesign how you want the image to fill the frame.
Click OK to save the style.
Now you can test it out. Delete the frame you made, place an image anywhere on your page, and click the new object style. It should snap to the prescribed location, and the image should automatically scale up to fill the frame (Figure 6).
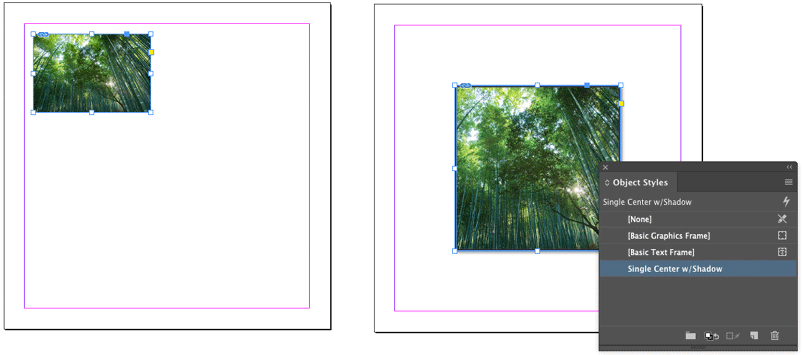
Figure 6. Place an image somewhere on the page (left), and then apply the style to have it snap into place (right).
That’s it! One down and many more to go. Yes, it’s tedious making dozens of these object styles, but once you’re finished, the benefits are great:
You can place a bunch of pictures at the same time, and then simply click the object styles to position and size them quickly.
If you don’t like how an image looks in one location, just choose a different object style, and the image jumps somewhere else.
You can change your mind about a page layout at any time by choosing different object styles.
A Couple of Cautions
While laying out pages with object styles is awesome and efficient, there are a couple potential hazards you need to avoid—especially when dealing with images that bleed.
Dealing with bleed
If you’re creating an ebook (a document designed to view on screen), then bleed—where an image extends all the way to the page edge—is easy: using the technique listed earlier, you just place the graphic frame at the page edge.
However, if your document is destined to print, then you will need to alter how you create your object styles (Figure 7).

Figure 7. In print documents, images at the edge of the page usually need to extend past it—this is called bleed. This document has bleed guides (colored red) outside the edge of the pages.
The reason: bleeding for print requires you to extend the image past the page boundary, out onto the pasteboard. (For more about bleed, see this article.)
The problem is that the position (X and Y) fields cannot include negative numbers. That means you cannot set the upper-left coordinates of a frame to a location on the pasteboard, like –p9 or –.125 in. Fortunately, there’s a simple solution: you can define your object styles to set the X and Y coordinates of a different corner.
After you make your example frame, set the reference point (on the far left of the Control panel) to a corner that is on the page. Note the X and Y fields in the Control panel.
When defining the X and Y positioning in the object style, choose that same corner point from the reference icon inside the New Object Style dialog box (Figure 8).
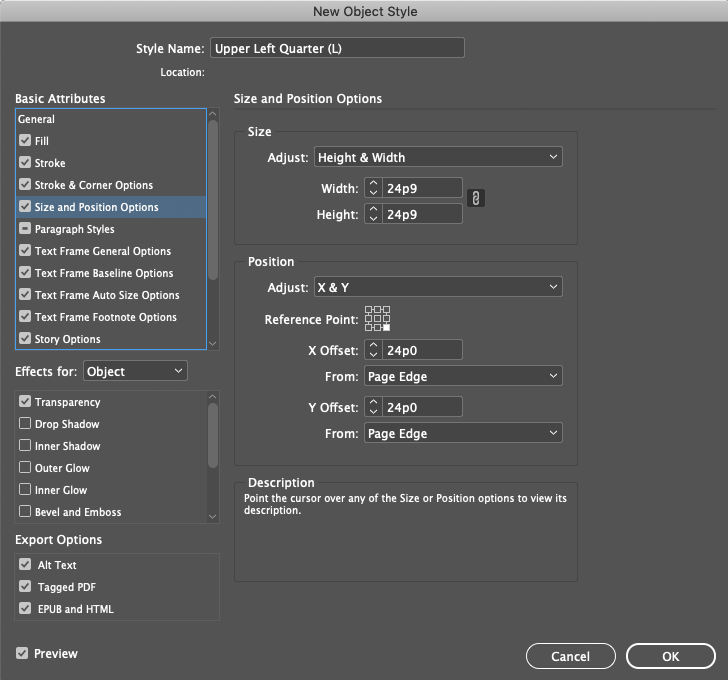
Figure 8. Because the reference point is set to something other than the upper-left corner, you may need to manually type in the X and Y values.
Type in the X and Y values you saw in the Control panel.
If all four sides of a frame extend beyond the edges of the page (a full-page image), you can set the reference point to the center-point of the frame instead of a corner.
Facing pages
Another minor “gotcha” when dealing with object styles has to do with facing-page documents. Most print albums are set to facing pages (with spreads that contain a left- and a right-hand page). Unfortunately, you’ll find that the object coordinates and sizing of images on a left-hand page are often subtly different than on the right-hand page.
For example, consider an image that takes up one quarter of the page and bleeds off the edge (Figure 9). An object style that positions the image correctly on the left-hand page will not work on a right-hand page, and vice versa.
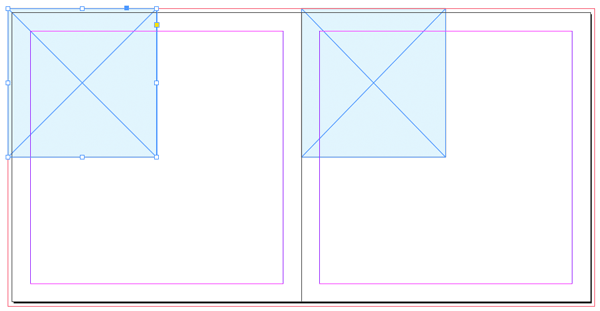
Figure 9. Due to the bleed guides, the position and size of this quarter-page image is different on a left- vs. a right-hand page.
The solution is to create two different object styles—one for positioning objects on left-hand pages, and one for right-hand pages. In my photo book template, I separated my object styles in two ways: First, I added an (L) or (R) in the style name, so I could tell at a glance which to use. And then, I put all the (L) styles in their own folder (what InDesign calls a “style group”; see Figure 10).
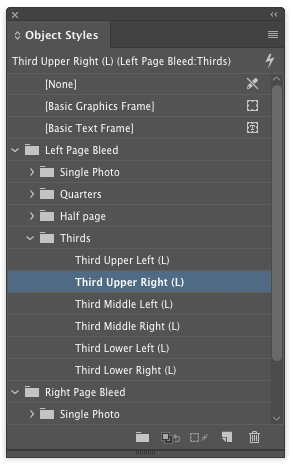
Figure 10. Separating left- and right-hand object styles
Good. Cheap. Fast.
Perhaps you’ve seen that old sign that says, “Good, Cheap, Fast: Pick Any Two.” Yes, making your object styles takes some time… but once you’re done, and have installed a script or two, you can start laying out consistently high-quality pages quickly, at no extra cost. Whether you’re building a photo album or any other kind of InDesign document, these techniques will go a long way to alleviating frustrations and getting your work completed on time.
Commenting is easier and faster when you're logged in!
Recommended for you

Taming Wild Assets with Adobe Bridge
Not a Bridge user? Alan Gilbertson shows you what you’ve been missing.

InDesign Magazine Issue 116: Excel Tips
Issue 116 of InDesign Magazine with articles on Excel tips, list spacing, tiny t...

InDesigner: Raphaël Freeman
Addison Lalier shows how one designer has mastered the complex layouts and types...


