


Incremental Improvement
The focal length of the lens determines the number of steps needed to make a full panorama — the number of shots you’ll take as you pivot around. Wide lenses require fewer steps to get the full sweep than longer lenses do. For example, my 24mm lens requires 12 steps to make a full circle. By contrast, a 28mm lens requires 16 images to do the same. I have marked one of my tripods with a combination of 16- and 12-shot indices. I choose which to use based on the focal length of the lens attached. You can use the table below to figure out how many steps you’ll need for your camera/lens combination.
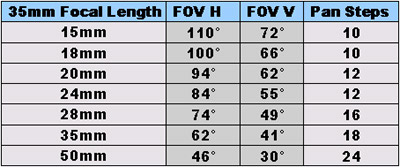
The number of steps you’ll need for a panorama depends on the focal length of the lens you use, as shown in this table. FOV is field of view, the angle of the image captured by the lens. FOV H is Field of View Horizontal (when the camera is held horizontally); FOV V is Field of View Vertical (when the camera is held horizontally). These FOV angles are switched when the camera is mounted vertically for panoramic imaging.
With my Mark II, which holds the N70 in the perfect spot for panoramic images, I added rotational cues on the tripod head instead of trying to build a rotational base myself. The method for doing this is to measure the diameter of the rotating part of the tripod, multiply by pi (3.1416…), then add the thickness of the paper times pi. Draw the indicator strip in Adobe Illustrator with the correct number of rotational steps, and print it on your printer. I have made mine weatherproof by covering them with clear packaging tape. I affix the strip to the tripod with double-sided tape.
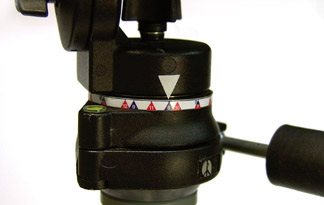
I created a handmade index around the rotating base of my tripod head for QTVR use. When making a panoramic image, I move the pointer (a triangle of white tape) from one number to the next. Note: red markings indicate 1/16 rotation while blue markings indicate 1/12 of the rotation.
Leveling the Field
In the hundreds of locations where I have made panoramic images, I find there is nothing more important than getting the rotating stage holding the camera level. The leveler the better! With the Mark II, I embedded a plastic spirit level in the base. I simply bought the level at the hardware store, drilled a hole in the base to accommodate it, and glued it in.
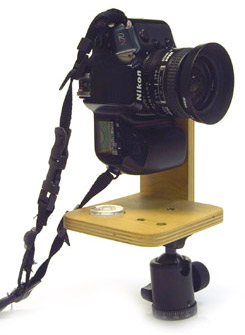
You can embed a spirit level in the base of your mount, as the author did with his Mark II, shown here.
Still, even with the embedded spirit level or with the commercially available mounts, the time it took to level the camera was significant and occasionally frustrating. For my Mark III, I added the rotational base to the mount itself, and I purchased a ball-leveling tripod from a camera store, and added this to the bottom of the rotational base. After adding the ball-leveling head to my third mount model, I can now level the entire rotational stage of the camera mount in about five seconds. And with a well-leveled camera, the panoramic stitching software does its work faster and more efficiently.
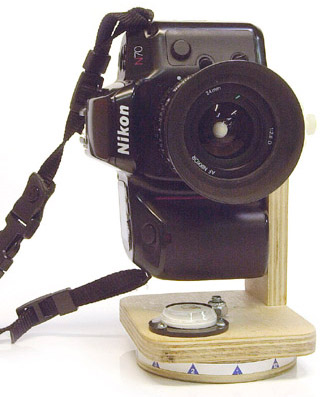
The Mark III, shown with a Nikon N70 camera and 24mm Nikkor lens.
Do It Yourself
Why do I persist in making my own QuickTime VR camera mounts? I own a Kaidan Kiwi +, but I still find that I am happier using a mount that is made specifically for a given camera and lens combination. And, I realized a few hundred panoramas ago that I shoot with the same lens and camera combination almost always. Once I got the system working, once I was happy with the images I was making, I had no reason to change anything.
My home-built mounts weigh only a few ounces, as opposed to the pounds of the Kiwi, the Peace River, or the Manfrotto. With the exception of the tripod screw (which I could tie down with string), I have no moving parts to lose, and I never forget anything when I go out, because my mount is a single piece.
I sand the wooden parts to a smooth finish, and I usually inscribe the model number, the date, and the camera and lens for which the mount is built. Once complete, I apply a coat of woodworker’s oil to protect the wood from staining, and the job is done.
Check back next time for a look at the software you’ll need for panoramic imaging — why you need it, which works, and which doesn’t.
This article was last modified on December 13, 2022
This article was first published on April 10, 2001
Commenting is easier and faster when you're logged in!

Recommended for you

InDesign Magazine Issue 143: Adobe Mobile Apps for Designers
Issue 143 has articles on Adobe Mobile Apps for Designers, Preferences You Must...

Scanning Around With Gene: Let's Have a Tupperware Party!
I’ve never been to a Tupperware party, though I was once given a Shaklee v...

Premium Member Benefit: Greeting Card Templates
Time for another exclusive template for our Premium members! (Not a Premium memb...