Automatically Transfer Photos from a Phone to a Computer with Lightroom
Follow this guide to transfer images easily and automatically from a phone to a computer with Lightroom.

Your phone’s camera roll is likely filled with photos and videos of important memories you would like to hang onto forever. If you have an iPhone with iCloud enabled, your photos are likely in Apple’s iCloud. With iCloud syncing, the Photos app on a computer provides you can access images from the iPhone. However, the Photos app doesn’t provide a convenient or automatic way to download everything at once to your computer. Adobe’s Lightroom system does. If you have a Creative Cloud subscription, you already pay for this service, so why not take advantage of it? Plus, let’s face it, Apple is making lots of money selling iCloud storage to millions of users around the world. There is no incentive for Apple to provide an easy way to move iPhone photos to a computer. Using Lightroom instead of iCloud may save you money. Follow this guide to transfer phone images easily and automatically from a phone to a computer with Lightroom.
Start with Lightroom on the Phone
Use Lightroom on your phone to upload photos and videos to the Lightroom cloud. After successfully uploading to Lightroom’s cloud, it is safe to delete them from the device camera roll. This will clear up space in iCloud or on your device and possibly saving you money.
Lightroom mobile phone setup
If needed, install the Lightroom app on the phone. Lightroom is available for free from your device’s app store. Launch Lightroom on the phone and sign in with your Adobe ID. A Creative Cloud All Apps Plan or a Photography Plan unlocks Premium Lightroom mobile, providing access to Lightroom’s cloud ecosystem. Choose whether to auto add photos from the phone. I recommend deselecting this option (Figure 1).

Figure 1. Uncheck the auto add option to prevent adding unwanted images.

Figure 2. Add photos icon.

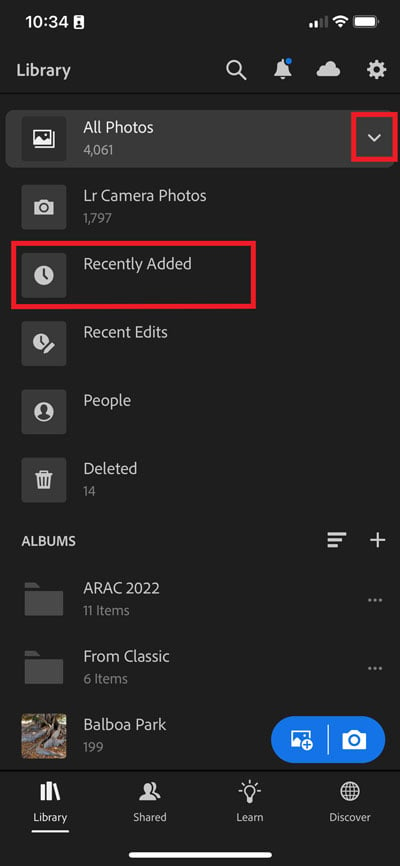
Figure 3. Tap on the disclosure triangle on the right side of All Photos to see Recently Added.

Figure 4. This image has completed uploading to the cloud.
Lightroom on the web
Confirm that all photos have successfully uploaded to the cloud at lightroom.adobe.com. Sign in with your Adobe ID. The Lightroom website shows the contents of your Lightroom cloud. Every photo and video shown here is safely in the cloud.
Finish with Lightroom Classic on a Computer
Lightroom Classic is a catalog database system for computers. Lightroom Classic manages photos and videos that live on local hard drives. Classic requires everything in the catalog to be on a hard drive. When a Classic catalog is connected to the Lightroom cloud system by turning on the sync function, Classic acts like a vacuum to pull down what it finds in the cloud. Classic will continue automatically downloading images as it finds new ones.
How it Works
Lightroom on the phone uploads images to the Lightroom cloud. Lightroom Classic on a computer downloads images to a hard drive. This transfer happens automatically when the apps are open and connected to Wi-Fi.
Lightroom Classic Setup
Your phone photos and videos are now in Lightroom’s cloud and ready for download to a computer. Decide where the photos should live before you start downloading them. By default, Lightroom will download photos to the user/Pictures folder. This is not ideal. I recommend storing photos on an external hard drive to avoid filling up the computer’s startup drive. Create a new folder on an external hard drive and name it something appropriate, like My Phone Photos. If needed, install Lightroom Classic on the computer using the Creative Cloud application. Make sure to choose the correct Lightroom application. The Lightroom Classic app icon says LrC. Don’t install Lightroom (Lr). (Figure 5)

Figure 5. Install Lightroom Classic, not Lightroom.

Figure 6. Lightroom sync preferences. Choose a custom location for downloaded images.

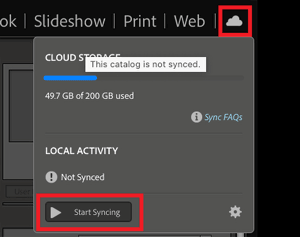
Figure 7. Sync Lightroom Classic with Lightroom

Figure 8. Lightroom Classic successfully synced with Lightroom. All photos have downloaded.
Do a Happy Dance
Confirm the transfer has completed by checking your hard drive. You should see dated folders filled with the phone images inside of the folder you created for downloaded. The phone photos and videos are now copied and organized by date on the computer or external drive. They are also imported into the Lightroom Classic catalog. You can edit and further organize the photos with Lightroom Classic or simply be happy knowing they safely transferred to the computer. Every time you open Lightroom Classic it will query the Lightroom cloud for new content and begin downloading anything it finds. This article is for members only. To continue reading, please log in above, or sign up for a membership today! Thanks for supporting CreativePro!
Commenting is easier and faster when you're logged in!
Recommended for you

What’s New in Photoshop 2021
Feature-rich update offers plenty to excite and impress even the most jaded Phot...

Double Click on Tools for Extra Options
Everyone loves to double-click? but you might be surprised at what you get when...

CreativePro Video: Better Auto Color Correction in Photoshop
In this week’s CreativePro video, Jesús Ramirez demos how to get better automati...


