
Working With Bulleted and Numbered Lists in InDesign
With a little care and effort up front, you can create great-looking numbered and bulleted lists.

This article appears in Issue 55 of InDesign Magazine.
Maybe it’s just a sign of our shortening attention spans, but these days we seem to want more and more of our information in quickly-digestible bullet points. And then there’s our insatiable need to quantify. We absolutely love lists: the Top Ten this, the 100 Greatest that, 12-step programs, 50 ways to leave your lover, and so on. Lists have gotten so popular that they’ve spawned a whole new journalistic category: the listicle, and judging from its power to get people to buy magazine and read blog posts, it seems like it’s here to stay (Figure 1).

Figure 1: Just a tiny sample of the evidence that we have become addicted to lists.
So with all these lists to work with, we can be thankful that InDesign has robust tools for creating bulleted and numbered lists.
The mechanics of creating bulleted and numbered lists are straightforward, but what about the design considerations—and those quirky problems that sometimes arise when working with numbered lists, like how to align the number, how to continue numbering across stories or documents, and what to do if you need to export your lists and retain those bullets or numbers?
Before we dig deeper, here are the basics:
Bulleted and numbered lists are formatted with automated hanging indents, with either a bullet character or the number as the first (hanging) character(s).
To apply either a bulleted or numbered list format to selected text, Option-click (or Alt-click) on the Bulleted List or Numbered List icon on the Paragraph Formats level of the Control panel to open the Bullets and Numbering dialog box (Figure 2), and then choose the list type, the bullet or numbering style, and the alignment. As always, select Preview to see how any changes affect your selection. Conveniently, you can select a character style to be automatically applied to the bullet or number; if you don’t have one already made, choose New Character Style and make one on the fly. Once you’re satisfied with how things look, click OK, and then capture the formatting in a paragraph style by choosing New Paragraph Style from the Paragraph Styles panel menu.

Figure 2: The Bullets and Numbering dialog box, where you specify the numbering or bullet style as well as the list’s alignment and amount of indent
Bulleted lists
So far, so good, but here are some things to consider when making bulleted lists, a veritable list about lists:
If you’re tired of using the same old circular bullet character, use the Add button to choose a glyph from a different font. This is handy, especially if you’re after a dingbat that’s unavailable in your text font—checkmarks (4)and pointing hands (+) are best avoided unless you’re after a retro look—but sometimes your chosen bullet may not vertically align perfectly with the rest of the text. The solution? Apply a character style to the bullet character, and adjust the baseline shift and possibly the font size for that character style. If your text begins with a cap, align the bullet vertically to the cap height. If the text begins with lowercase characters, align the bullets to the x height (Figure 3).
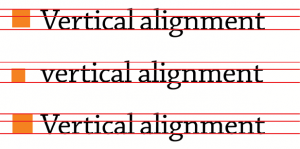
Figure 3: In the top example, the bullet is out of vertical alignment with the text that follows. In the second example, the scale and position of the bullets has been adjusted to the x-height—applicable since the text is lowercase. In the bottom example, the position of the bullet is adjusted to the cap height of the text.
Typically, bullets use hanging indents, so you’ll need to make the first-line indent the same as the left indent but negative; for example, if your left indent is 11 pt, then make the first-line indent –11 pt. When you plug in a negative first-line indent, the Tab field automatically becomes blank, the
tab being set at the left indent value. An em space is usually a sufficient amount of indent when working with hanging indents, but you will need more if you’re working with a numbered list that includes two- and three-digit numbers.
If you prefer your bullets to be flush rather than hanging, you’ll probably want less space after the bullet. You can replace tab character (^t) in the Text After field in the Bullets and Numbering dialog box with a space or an en space from the drop-down menu to the right of the field (Figure 4).

Figure 4: Flush left bullets with a word space after the bullet character
Keep punctuation to a minimum while adhering to the house style. Unless the bullet point is a full sentence, don’t end it with a period.
Add space before the first and after the last item in the list (Figure 5). After you’ve made a bullet paragraph style, make two variants based on it: bullet_first with extra space before, and bullet_last with extra space after.

Figure 5: A bulleted list with a half-line space before the first and after the last bullet item
Presumably you want your bullet and number styles to be stylistically the same except for the list type, so base your number list style on your bullet style or vice versa. That way, if you need to change paragraph style specs, you’ll need to make only one change.
Indenting the text after the bullet means you lose the strong flush-left alignment of your text, so some people prefer outdenting the bullet to strengthen the left axis of the text (Figure 6). This requires indenting the body text by the same amount that you indent the bullet.

Figure 6: Outdenting the bullet character maintains the flush-left alignment of the text.
Because they tend to be short and pithy by nature, bulleted lists don’t do well with justified alignment. With lines that are inevitably short, there will be big word spaces that make an even type color impossible. For this reason, even if your body text is justified, your list paragraphs will work better ragged. p>
If you opt for ragged alignment with your bullets, you’ll need to be vigilant about uneven rags. It’s tempting to use the Balance Ragged Lines feature, but this will likely create as many problems as it solves. It’s up to you to fix the rag manually by applying No Break to phrases you want kept together or adding some forced line breaks.
For bulleted lists in instructional-type texts where “bottoming out” of columns may not be necessary, consider using Keep Options to keep all the lines in the paragraph together. That way, you can avoid orphaned lines ending up at page or column top.
Bulleted lists don’t fare well with Optical Margin Alignment. If you’re using Optical Margin Alignment on your story (a good idea in my opinion), choose Ignore Optical Margin Alignment in Paragraph Style Options to make exceptions of your bullet and number lists.
For longer lists, consider using the Split Column feature to divide the list into two sub-columns (Figure 7).

Figure 7: Splitting a bullet list into sub-columns
Numbered Lists
All the considerations we have for working with bulleted, or unordered, lists also apply to numbered lists, and here are a few considerations specifically for numbered lists:
Numbering implies a specific order of steps, and the benefit of autonumbering is that if you rearrange steps, the numbers update accordingly.
Applying autonumbering is pretty self explanatory: instead of bullets, choose numbers and the style of numbering, the character style for the number, and the alignment, and you’re done.
If you want the numbering to begin at anything other than at one, change the Mode to Start At, and enter the number you want.
Personally, I prefer to omit the period after the number, since the space between the number and the item is sufficient differentiation.
As useful as “live” numbers are, there are a few aspects of working with numbered lists that can cause frustration.
Numbering across frames
Numbering lists that continue across unthreaded frames (and across documents) is easy enough to accomplish when you know where to look, but the necessary component—list styles—is somewhat buried and a little obscure.
List styles, a peculiar variant in the pantheon of InDesign styles, have only two checkbox options. The “[Default]” list style applied to numbered lists does not allow numbering across unthreaded text frames, so you’ll need to create a new list style and incorporate it into the paragraph styles for those paragraphs you want sequentially numbered. In the Bullets and Numbering dialog box, choose New List from the List drop-down menu, name the style, and check both of the available options (Figure 8).
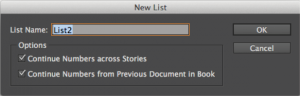
Figure 8: The New List dialog box
Creating a Multi-level List
These days I prefer to use InDesign rather than Word for most of my word processing tasks, but there is one area where Word still has the edge, and that is when it comes to creating multi-level outlines. And yet, while InDesign doesn’t give you the convenience of easily collapsing and expanding different levels of your outline (though you can fake it quite well with Conditional Text), it is possible to make robust multi-level outlines with numbered lists.
To make this happen, you need to specify the level number, insert a number placeholder to indicate the previous level, and check Restart Numbers at This Level (Figure 9). Note that increasing the amount of left indent with each level is sufficient differentiation to establish hierarchy in a numbered list. There’s no need to also introduce additional sizes, weights, and font styles.

Figure 9: The numbering options for the Heading 2 and Heading 3 styles shown above.
Aligning Numbers
If your lists contain single- and double-digit figures, then you’ve doubtless experienced problems trying to right-align the numbers with each other. To achieve this, in the Bullets and Numbering dialog box, set the Alignment to Right, and then increase the left indent and/or decrease the first-line indent to move the text to the right and
create enough space for the numbers on the left of the text. Getting the right combination of left indent and first-line indent can be tricky. Here’s a suggested approach: using the frame tool (with the stroke set to None), draw a box to measure the rightmost edge of the two-digit numbers (having done so, delete the frame). Now subtract this number from your left indent value, make it a negative number, and you have your first-line indent amount (Figure 10).

Figure 10: The appearance of a numbered list with with both one- and two-digit numbers can be improved by right-aligning the numbers and subtracting the width of the numbers from the Fist Line Indent value.
An easier, alternative approach is to use a two-digit numbering style (assuming your numbered list doesn’t go beyond 99). This way, with two digits, using lining numbers, i.e., glyphs with the same set width, the numbers will always align.
Converting to Text
One last consideration with bullets and numbers: if you plan to export an InDesign story to an RTF file, you’ll need to convert the automatic numbers (or bullets) to text—otherwise, they’ll be stripped out of the converted document. Select the list, and choose Type > Bulleted and Numbered Lists > Convert Numbering to Text. You will now be able to select the numbers or bullets as text. The numbers will no longer be “live,” but they will survive intact when you export the story.
Another reason for converting numbers to text is to create a step list that uses drop cap numbers (Figure 11), since there is no way to combine drop caps with live numbers.

Figure 11: To use drop caps in a numbered list like this, you
must first convert the numbers to live text.
Lists, then, are not rocket science, but there is more involved in creating good-looking lists than first meets the eye. Following these basic rules will ensure that your bullet and number lists are readable—and quickly digestible. Like so many other aspects of InDesign, the initial setup of the list can take a few extra minutes, but that prep time upfront pays dividends when you find yourself using these common types of paragraph again and again.
This article was last modified on October 21, 2024
This article was first published on October 23, 2013
Commenting is easier and faster when you're logged in!

Recommended for you

TypeTalk: Footnotes and Endnotes
TypeTalk is a regular blog on typography. Post your questions and comments by cl...

Scanning Around With Gene: Turning 25 in 69
Over the years, one of my favorite design publications has been Graphis, the int...
Case Study: Designing a New Logo
Developing a new logo for an established brand is always a tricky thing. You wan...