
Using Flash for the First Time: Part 3
This article originally appeared on the Adobe Design Center.
This is part 3 of a three-part article on how to build a simple animated banner in Flash and add it to a web page using Dreamweaver. In this final part, you learn about file size, banner standards, how to set publish settings, how to add the banner to a Dreamweaver web page, and how to add Flash Player detection.
You must have Dreamweaver 8 or Adobe Dreamweaver CS3 installed to complete most of this part of the tutorial series. If you don’t use Dreamweaver, you can complete the first part of this article and use the HTML that Flash outputs with a different HTML editor. However, you won’t be able to enjoy some of the benefits of using Flash and Dreamweaver together!
Note: This article uses Flash CS3 Professional. If you still use Flash 8, please read the previous version of this article.
If you’re still using Flash MX 2004, you can read this even earlier version of the article.
You can also watch a video tutorial version of this tutorial series in the Creative Suite 3 Video Workshop.
Requirements
To follow along with this article, you will need the following software:
Flash CS3 Professional
Dreamweaver CS3
Sample files:
gnome_part3.zip (ZIP, 93K)
Prerequisite knowledge:
Part 1 of this series
Part 2 of this series
Considering Your Audience
When you create a banner, you often need to follow certain guidelines for submitting that banner to a particular site or service. For the purposes of this article, following established advertising guidelines is not a great concern because you’re not submitting the banner to a company for advertising purposes (and each service will vary and provide directions, or provide a kit such as this one from DoubleClick).
This section briefly explores some of the considerations you might have when creating a banner in a real-life project, or a project for wide distribution. When you create a banner that you submit to an advertising company, often you need to make sure that the file meets their specified file size, dimension, target Flash Player version, and frame rate guidelines. Sometimes you have to consider other rules about the kinds of media you can use, button code you use in the FLA file, and so forth.
You have created the banner and resized its dimensions. When doing so, you actually set the banner to established and standardized dimensions for what the Interactive Advertising Bureau calls a “wide skyscraper.” The file size is also reasonable for a Flash ad of this size. You will discover how to reduce the file size in an upcoming exercise. For information on standard advertising dimensions (and many other useful guidelines), check out the Interactive Advertising Bureau’s Standards and Guidelines page. However, ensure that you confirm the advertising guidelines for the advertising service, client, or website that you’re advertising with first. Guidelines might include standards for file size, dimensions, sound and video usage, and buttons.
What’s more important (for the purpose of this article) is that you understand how to create Flash content, export it from Flash, and add it to your own website. The lesson to draw from banner guidelines is that you need to consider your audience. Whenever you create a Flash site, you should think about the kind of people who will see your content — like you would when you create any website. Is your audience a wide range of individuals with many kinds of computers using different versions of Flash Player (or none at all)? Or is your audience primarily fellow Flash developers and new-media companies? Your audience should affect the version of Flash Player you target. For example, if you think a diverse audience (often a large audience with a wide range of computer capabilities) will visit your site, you should target an earlier version of Flash Player, such as version 8. If you think other web professionals will visit the site, then a later version of Flash Player (with a detection system) should be fine. For information on Flash Player version penetration, see the worldwide ubiquity stats on Adobe’s website. You will set your Flash Player and add a Flash Player detection system in upcoming exercises.
Note: If you send your banner to a company to host, they usually have special requirements for how you add button code to your FLA file. Often they want you to add a specific variable (such as clickTAG) instead of a URL. Refer to the advertising service, client, or website guidelines for the correct button code to add to your FLA file. Some companies also limit what frames per second (fps) rate you can use in the SWF file. When you design a banner, try to keep your fps rate as low as possible. Definitely use 18 fps or lower; ideally stick with 12 fps.
Checking Your Publish Settings
Often you need to save banners to earlier versions of Flash Player, but in this part of the tutorial we will explore the Publish Settings dialog box so you understand how to change your settings in case you need to for the provider or audience you’re targeting.
In earlier parts of this tutorial, you made changes in the Document Settings dialog box. You set the dimensions and fps rate for the SWF file. In this final section, you will make sure that the Flash Player setting you want to target is correct, and that you export the files you need. Many Flash authors make these settings when they create the FLA file because they are aware of what they need to output and target:
- Open the banner2.fla file you saved from completing part 2 of this series. If you don’t have banner2.fla, open banner_pt3.fla from the source files ZIP archive that accompanies this tutorial. Look inside the start folder.
- Select File > Save As and then rename the file as banner3.fla.
- Select File > Publish settings. The Publish Setting dialog box opens, where you can change many different settings for how you want to publish your files.
- Click the Formats tab and then make sure that the Flash (.swf) check box is selected.
- Clear the HTML check box. For this exercise, you don’t need to output an HTML page. You just need the SWF file so you can embed it in an existing HTML page using Dreamweaver.
- Click the Flash tab and select Flash Player 9 from the Version pop-up menu if it isn’t already selected. When you add Flash advertisements to an HTML page, you might select an earlier player version. This is the menu you use to do so. Note that you might need to revert to an earlier version of ActionScript if this is the case.
- Select ActionScript 3.0 from the ActionScript version pop-up menu, if it isn’t already selected. If you ever use an earlier version of ActionScript for your ad, you change the ActionScript version using this menu.
- Select the Compress Movie check box from the Options section (it should be selected by default). You do not need to make any other selections on the Flash tab.
- When you finish, click OK to accept the changes to your document.
- Select File > Publish when you have finished editing your FLA file. This publishes the SWF file to the directory where you saved the FLA file.
- Go to the folder to which you published the banner’s SWF file. Check the file size of the document (it’s called banner3.swf).
As I mentioned previously, file size is not a great concern for this tutorial because you’re not submitting the banner to an advertising service. If you need or want to reduce the file size of your banner, you can go to the Publish Settings dialog box again (File > Publish Settings) and click the Flash tab. You can reduce the quality of the bitmap image you use in the background by changing the JPEG quality to a lower number. You could move the slider to 60 and click Publish. When you check the SWF file again, the file size will be smaller.
There are other ways to reduce the file size of a SWF file. If you need to design a file to a specific maximum file size, make sure you publish your work regularly and check the current file size. Bitmap images, sounds, and video quickly increase a SWF file’s size.
If you don’t have Dreamweaver installed, this tutorial ends here for you. If this is the case, you can return to the Publish Settings dialog box from this exercise and make sure you select the HTML check box under the Formats tab. When you publish the document, an HTML file is exported with the SWF file. You can open this file, copy the HTML code you need, and paste it into your website. Notice that this file contains some extra tags that you won’t need if you have an existing website, such as <head> and <body> tags. You will need the code and scripts that embed the SWF file into a web page, and you can also upload the JS file that exports with the SWF and HTML files to activate the SWF file within pages viewed using Internet Explorer.
If you do have Dreamweaver, carry on. In the following exercises, you will place and edit the banner in a web page.
Adding Flash to a Dreamweaver Site
You might have a web page already created for a banner. We have created a page for you, which is ready to have a banner of this size placed on it. Make sure that you download the gnome_part3.zip file at the beginning of this article. Open the ZIP file and find the website folder inside the start folder. Inside that folder are the documents you need to edit. You will modify the gnome.html page in the following exercise.
Note: You can find a finished version of the website in the website folder nested within the finish folder.
- Open the page called gnome.html in Dreamweaver CS3. You can find this document in the start > website folder of this article’s source files.
- Save a copy of this file in the same folder as the SWF file you published in the previous exercise (banner3.swf).
- Save a copy of rightnav.css and peek.jpg in the same folder as the SWF file you published in the previous exercise. Look inside the start > website folder. This document adds styles (such as text color and margins) to the gnome.html file.
- Make sure you’re in Split view (View > Code and Design). When in Split view, you can see and edit the code you’re working on and also select the SWF file easily in Design view.
- In gnome.html, select the large 160 x 600 image placeholder on the right side of the web page (see Figure 1). This is where you want to add the Flash banner to the web page.
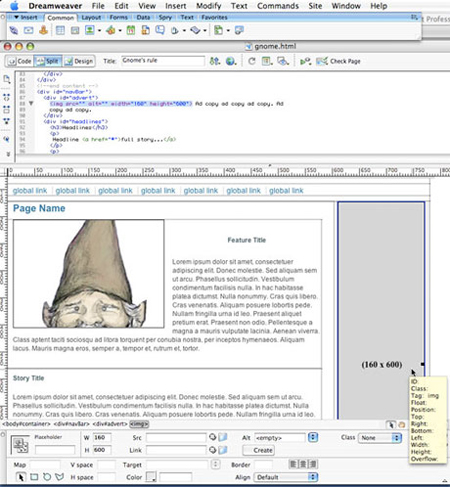
Figure 1. Select the large image placeholder on the right side of the web page in Dreamweaver. Click on this image to view larger. - Press the Backspace or Delete key to delete the image. Leave the text input cursor at that position in the HTML document.
- Select Insert > Media > Flash. This opens the Select File dialog box, where you can select the SWF file of the banner you created.
- Select the banner3.swf SWF file, which should be in the same folder as your web page (see Step 2).
- Click OK.
- In the Object Tag Accessibility Attributes dialog, enter a title into the Title text box. You might enter Banner for the gnome workforce union website, or whatever appropriately describes your banner. Click OK to insert the SWF file into the web page. (See the gnome.html document in the finish > website folder to reference the code that’s added to the document.)Note: Optionally, you can also enter an access key for Flash content that you insert. Enter a one-letter keyboard key in the Access Key text box. For example, if you enter U, users can use Control+U to access the SWF file in the browser. You can also add a tab order for the SWF file. If you have a bunch of links or form objects on the page, you can have the SWF file(s) enter the tab order of these objects (when the user presses the Tab key to cycle through the page elements).
- (Optional) Select the SWF file and click Play in the Property inspector to view the banner’s animation. Click Stop when you’re finished viewing the SWF file.
- Choose File > Save to save your changes to the document.
- You should now see the Copy Dependent Files dialog, which copies a JS file so the SWF file plays appropriately in Internet Explorer. Click OK to copy this file to your folder that contains the SWF and HTML files.
- Select File > Preview in Browser > iexplore (Windows) or Safari (Macintosh), or select your preferred browser, to preview your site (which now contains the SWF banner) in a browser window.

Note: If you don’t see your banner, make sure that you have Flash Player 9 installed.
About Roundtrip Editing
By now you might want to change something in your Flash banner. Say you want to change the frame rate or add some more text. It’s easy to return to Flash to edit the document from within Dreamweaver.
- In gnome.html, select the SWF file in Design view in Dreamweaver and then open the Property inspector (Window > Properties). The Property inspector displays controls for the SWF file.
- Click the Edit button in the Property inspector (see Figure 2).

Figure 2. Select the SWF file and click the Edit button in the Property inspector.
Flash opens the associated FLA document in the Flash authoring environment, or opens a window for you to locate the associated FLA document, and then open it in Flash. - Make your edits in Flash. Notice that “Editing From Dreamweaver” appears in the authoring environment to indicate you’re editing a file from the Dreamweaver environment.
- Click the Done button next to Editing From Dreamweaver (see Figure 3).

Figure 3. You can edit the FLA document directly from Dreamweaver. Click Done when you’re finished. - Flash updates the FLA file, publishes the SWF file, closes Flash, and then returns you to the Dreamweaver document. Your document is updated in Dreamweaver.
- To view the changes to your SWF file in Dreamweaver, either view your site in a browser (File > Preview in Browser > (browser)) or select the SWF file in Design view and click Play in the Property inspector.
Checking for Flash Player
Most people who visit your website will have the Flash Player 8 or Flash Player 9 plug-in installed. In rare circumstances, a visitor might not have the plug-in installed. You can do several different things when a visitor without Flash Player visits your site. When you have a site that uses Flash primarily for functionality, you might want to send that user to a custom page that links to the Adobe site where the user can download the player.
The Check Plugin behavior in Dreamweaver enables you to verify whether visitors to your website have the Flash Player plug-in installed. After the behavior checks for a plug-in, you can route the visitor to different URLs, depending on whether they have the minimum required plug-in. For example, if the visitor doesn’t have Flash Player, you can open a page that links the visitor to the Macromedia website to download the latest version:
- In gnome.html, click inside the <body> tag (click in the space before the closing angle bracket) and open the Behaviors panel in Dreamweaver (Window > Behaviors).
- Click the Add (+) button and select Check Plugin from the behaviors pop-up menu.
- Select Flash from the Plugin pop-up menu.
- Leave the If Found, Go To URL text box blank. This text box controls what page the visitor with the specified plug-in sees. Leaving the text box blank ensures that users stays on the same page if they have Flash Player installed.
- Type a URL into the Otherwise, Go To URL text box. You need to specify an alternative URL for visitors who don’t have the Flash Player plug-in. Type noflash.html into the text box.Note: I provided a noflash.html document for you with the source files, included in the sample files that accompany this tutorial; it’s inside the website folder found in both the start and finish folders. Either save this document in the same folder as the gnome.html document you’re working on or create your own file in this location. Ideally you would create a custom web page for users without Flash Player.
- Select the Always Go to First URL If Detection Is Not Possible check box. When selected, this option effectively means “assume that the visitor has the plug-in unless the browser explicitly indicates that the plug-in is not present.” Because you add an alternate ad for visitors without the plug-in, this option is preferable for this exercise. Figure 4 shows the selection you should have made up to this point to add Flash Player detection.

Figure 4. Make these selections to add Flash Player detection in Dreamweaver using a behavior. - Click OK. When you finish, Dreamweaver adds the following code to the <body> tag:<body id=”container” onLoad=”MM_checkPlugin(‘Shockwave Flash’,”,’noflash.html’,true);return document.MM_returnValue”>
You can find the finished files in the source file directory, inside the finish folder.
You can also add Flash Player detection in Flash authoring if you aren’t using Dreamweaver:
- Go to the Publish Settings dialog box (File > Publish Settings) and make sure that you select HTML in the Formats tab.
- Select the HTML tab.
- Select the Detect Flash Version check box and type a version of Flash Player to detect.
Summary
Now you have completed your first Flash site and inserted it into a Dreamweaver web page. You have learned how to create a new file, import content, create new assets in Flash, add simple animation and ActionScript, and publish your work for the web. You also learned how to use Dreamweaver to insert the SWF file into an existing web page, probably one that’s similar to a simple page you’ve created in the past.
This introductory step of learning Flash and adding a SWF file to a web page is an important one when you’re learning to use Flash. You now have the fundamentals under your belt and understand the essential nature and workflow of creating content with Flash. Hopefully you’ll feel better equipped to learn how to create increasingly interactive, entertaining, functional, or instructional content using Flash.
About the Author
Jen deHaan was raised by wolves in the deep woods of the Canadian north. Canada’s chief exports include motor vehicles (or their parts), lumber, newsprint, nonmetal materials, and wheat. One overcast day in 2004, Jen left her life as a Flash deseloper (designer/developer) in Canada to write Flash documentation and samples at Macromedia in San Francisco. Aside from her ongoing work at Adobe as an instructional designer for web and video products, Jen runs several community sites for fun, and maintains a blog at https://www.webvideoblogger.com and https://weblogs.macromedia.com/dehaan. She believes that _root tends to be evil and misses Tim Horton’s coffee.
This article was last modified on January 8, 2023
This article was first published on January 9, 2008
Commenting is easier and faster when you're logged in!

Recommended for you

WhatTheyThink.com Launches Printing Industry Blog
WhatTheyThink.com, the leading online media organization serving the printing an...

Sort Files with Adobe Bridge
Adobe Bridge offers a far richer set of file-sorting options than your OS. They...
Scanning Around With Gene: Why Oh Why Wyoming?
Despite having travelled quite a bit around the United States, I’ve never...