

You know what end marks are, right? Maybe you call them by another name, but we’ve all seen or used them. They’re the little icons/symbols/dingbats/doo-dads at the end of an article in print or onscreen. For example, we use a little red square in InDesign Magazine to separate the end of an article from the author’s bio.

Of course, it’s not too much trouble to make a paragraph style with the appropriate spacing and font, and add a single character paragraph to create your end mark.
But there’s an even slicker way to go. You can use a nested style or GREP style to put an end mark above, below, or to the side of a paragraph of text.
To put an end mark above the paragraph, create a character style that applies the dingbat font, baseline shift, and tracking.

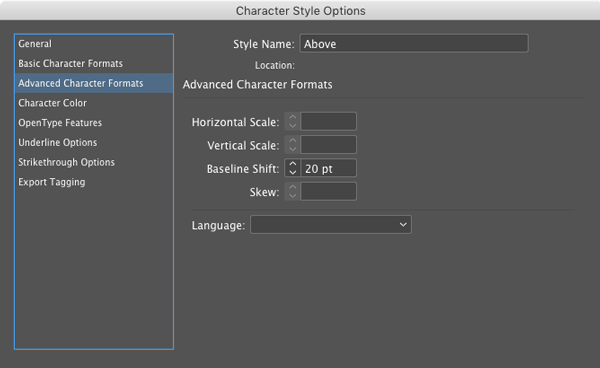
Use a nested style or GREP style to apply the character style to the first character in the paragraph.

Then just add the desired character (in this case, the letter n) at the start of the paragraph to make something like this.

To make an end mark below a paragraph, make two character styles, one that applies the font and shifts the character down.

And another that pulls the mark back to the left with negative tracking.

In the paragraph style, use a GREP style to apply the dingbat style to the last character in the paragraph, and the negative tracking style to the 2nd to last character in the paragraph.

Then just type the desired character at the end of the paragraph and the end mark will appear beneath the last letter of the text.

To add an end mark on the side of a paragraph, again create two character styles. One to apply the font and any baseline shift needed to make the end mark align vertically with the text.

And another to push the end mark to the right with positive tracking.

Then create a paragraph style with a GREP style that applies the dingbat style to the last character in the paragraph, and the positive tracking style to the 2nd to last character in the paragraph.
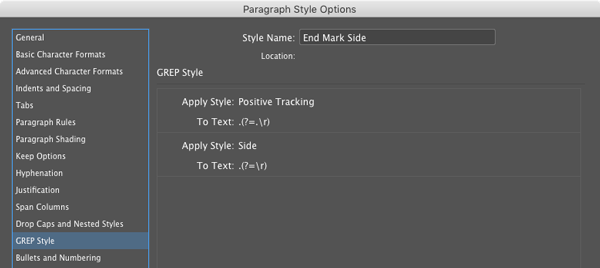
Again, just type the desired character at the end of the paragraph. This time the end mark will to the right of the last letter of text.

By choosing different fonts and positioning of the icons, you can create a variety of end mark effects.

This article was last modified on July 25, 2019
This article was first published on May 18, 2017
Commenting is easier and faster when you're logged in!

Recommended for you

Rotating Text with a Character Style
Learn the trick for applying character rotation with a style, something that's u...

Creating Number Circles
Try one of these techniques to add some pop to your next numbered list.
How to Find Notes in InDesign Files
Wondering if there are editorial notes in your file? Here's the fastest way to l...