

The Creative Suite applications are now Creative Cloud applications, and will no longer be available (beyond CS6) except as part of a Creative Cloud subscription. Illustrator has provided us with a full set of new features and productivity enhancements that include major changes to how you will work with type, create brushes, and prepare your artwork for print or the web. Users with the newer displays, such as Apple’s Retina displays, get crisp and clear HiDPI views of their artwork, and users with Touch devices aren’t forgotten, either.
Several aspects of working with type have been revised in Illustrator CC. Finding the font you want has never been easier. Type any characters found in the name, and a list drops down with all fonts that contain those characters anywhere in their name. The order in which they appear no longer matters. While the list might start out long when you’ve typed only a few letters, you can narrow the search by typing anything else you know about the name, including the font style you want, such as bold or italic.

A font search on “gar ad” finds each string regardless of the order in which the letters were typed.
Converting area type to point type, and vice versa, is now an on-the fly maneuver with a new widget that’s available whenever you select a type object. No more starting over because the client wants a pithy sentence expanded to a full paragraph. The type doesn’t reflow until you make an edit, like deleting the returns that are automatically added when converting area type to point type in order to maintain its appearance.

Area type (top) is converted to Point type (middle), and one return is deleted (bottom)
Changing the color of your type is more intuitive now thanks to a change that automatically activates the Fill color when the Type tool is selected and the Stroke proxy in the Tools panel is active, as long as no stroke itself is selected. And most creatively, you now can rotate, scale, and reposition individual characters “inline,” while they remain part of the original word, even if not all characters are transformed. You used to have to cut and paste characters you wanted to transform onto their own layers, but no more. This new feature also works with Touch devices.

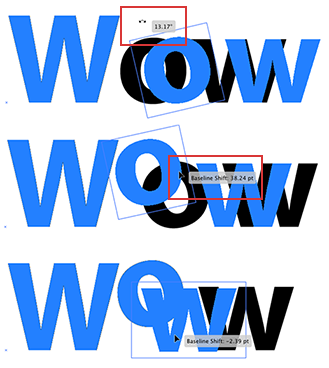
The “o” and final “w” above were individually rotated and repositioned using the Touch Type Tool, but remain on the same layer and part of the same word as the “W.”
While developing a new method for transforming type, Illustrator CC also transformed the Free Transform tool itself. It’s now both Cursor- and Touch-enabled, with an onscreen widget that is displayed as soon as the tool is selected. Cursor indicators change when you hover over them, showing whether you can scale, rotate, or otherwise distort the object. The widget has icons for constraining proportions, free transforming with the indicators (rotate, scale, etc.) and restricting the transform to either Perspective or Free Distort. You can directly interact on the screen with a moveable reference point around which the rotation will take place.
![]()
Using the new Touch Free Transform widget, the star is distorted with perspective.
The way in which you create Art, Scatter, and Pattern brushes has also been enhanced. Now you can create brushes from embedded images in the same way you would create them from vector art. Since large images affect performance, Illustrator will attempt to optimize them first so they’re small enough to use, but within some size limits, virtually any image can be turned into a brush using all the features available to the type of brush you make, such as stretching an Art brush between guides or scattering the image around a path.

An Art brush was made from both vector art and photos extracted in Photoshop.
Pattern brushes have the added new option to let Illustrator create the corner tiles for you. Many of us found the rules for creating corner tiles that fit so difficult that we avoided working with them. Now create your artwork (vector or raster) as usual for the side tile, but instead of creating the corner tiles swatches before creating the pattern brush, drag the side tile into the Brushes panel to open the dialog, then choose from among four methods Illustrator can use to auto-generate the inside and outside corners. Of course, you can still make your own corner tiles, but if one of the auto-generated corner tiles works, your job just got a lot easier.


Automatic Corner Generation provides four options for corners; the artwork shows separate choices for both inner and outer corners.
Another major addition to Illustrator CC will help you create layouts for websites and mobile devices. The new CSS Properties panel can generate the CSS code automatically for named objects and styles that correspond to your HTML or for unnamed objects, although the feature works better with named objects and styles. Use the Export Options dialog to define how Illustrator treats the objects for the CSS, including whether or not the CSS includes vendor prefixes for working with the very latest CSS features.

The CSS Export Opti
ons dialog lets you control many aspects of the code that is generated.
After naming everything you want to export and setting your Export Options, selecting an item to export generates the CSS code to copy and paste into your HTML. You can also export all the code at once if you prefer. If your page contains complex artwork, in most cases you can select the object, then copy the code for either SVG or PNG.

The CSS Properties panel displays code for selected styles and objects.
Illustrator CC also comes with a number of productivity enhancements. Subscribers to the Creative Cloud have already received the refined Links panel and the ability to unembed images, as well as to package files using the new File > Package command that includes all your linked images and fonts.
Further productivity enhancements include:
- Multi-place images, allowing you to use the Place command with several images at the same time
- Search for swatches using part of either the name or the CMYK value
- Easier methods for creating guides
- Updated support for AutoCad libraries
- The option to discard White Overprints which otherwise might cause problems downstream, enabled by default in the Print and Document Setup dialogs
- An option in the Separations Preview panel to preview only those spot colors actually used in the document
- Sync your custom settings (Preferences, Keyboard Shortcuts, Presets, and more) to the Creative Cloud in order to transfer them instantly to another computer, or just as a backup for an individual computer.
![]()
Use the Control panel to unembed images

After selecting three images in the Place dialog, two were placed, while the third waits in the “loaded” cursor.

Select the options you want to sync to your Creative Cloud storage, ready to download to another computer or to restore a computer to the settings saved in the Cloud.
Adobe Illustrator CC brings some welcome enhancements and smoother functioning to this venerable application. Whether you’re creating new brushes, getting files together for the printer, or coding a website using the mockup you made in Illustrator, you’ll all be able to enjoy being more productive and creative than ever before.
This article was last modified on December 14, 2022
This article was first published on May 6, 2013
Commenting is easier and faster when you're logged in!

Recommended for you

Scanning Around With Gene: Part 2 of That '70s Type!
Part 1 of That ’70s Type! Setting type is like re-decorating your home: yo...

Learn About Photoshop CC While You Use It With the New Features Panel
We are all creatures of habit and develop our favorite ways of getting work done...
Stocksy United: a sustainable option for photographers
Stocksy United is a new co-operative stock photography site co-founded by Bruce...