
Acrobat How-to: Traditional Proofreading in PDF

It is interesting to note the advances that have been made in the concept of softproofing over the past couple of years. Way back at Seybold San Francisco in November 2001, I sat on a panel discussing PDF Workflows. A question from the audience asked about softproofing. At that time I responded that at GTS we didn’t really have a softproofing workflow — that we did sometimes use PDFs for final approvals, e-mailing the publisher/editor individual pages that were under deadline pressure. The publisher/editor would print the PDF file, mark it up in the traditional way, and fax us back the final corrections. This allowed us to save days of time in FedExing hard copy proofs back and forth and allowed us to do a final proofing pass electronically.
I also stated that we perceived a lot of obstacles impeding the implementation of a softproofing workflow. Those included an aging proofreading workforce that was not comfortable working on computers and a lack of good, standard tools in the then-current version of Adobe Acrobat. In meetings with editorial staffers at the various publishers, I had heard again and again that older proofreaders were not comfortable trying to read on-screen and that they would need to be able to mark up using standard proofreader marks.
I wasn’t home from San Francisco more than a couple of weeks than we received a call from one of our major publishing clients. They had made a company-wide decision to move toward “paperless” workflows. They asked us to design a workflow that would use Adobe PDF as the proof and that would give them a workflow that would not require a complete retraining of their proofreaders, using as many commonly accepted practices as possible from traditional proofreading.
The result was the document GTS Paperless Workflow, which served as the basis for my presentation at PDF Conference 2003 in Anaheim. This document used Acrobat 5.5 as the basis and attempted to utilize as many “normal” proofreader marks and practices as possible. Since that time, this basic formula has been used to handle proofreading functions for a large number of the textbooks created by The GTS Companies. That document still stands as a “best practices” reference when using Acrobat 5.5 and I don’t think that there is much to expand on in that realm.
Many current workflows are still utilizing Acrobat 5.5 or earlier. This is particularly true for book production, where Quark 4.x is still the baseline application and few have migrated to the OS X-only Quark 6. This means that these users cannot utilize Acrobat 6 Professional on their Macs because it too is OS X-only.
However, for those who can and do use Acrobat 6 Professional, Adobe has expanded the toolset to include a rich array of new tools that can make markup and workflow of softproofing much more intuitive (see Figure 1).
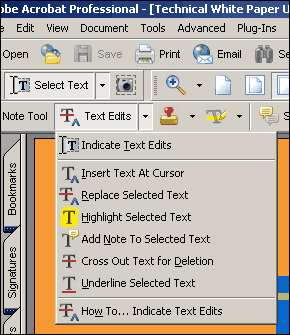
Among the new tools added by Adobe to Acrobat 6 Professional is the “insert” tool. While there was an insertion icon in Acrobat 5.5, the new insertion tool works much more like one would expect.
Note that you can insert, replace, highlight, add a note, delete, or underline material all with an insertion point that now looks like traditional proof markup (see Figure 2).

As with any comment in any version of Acrobat, there is a text note associated with the insertion point. Here I’ve asked for a word to be inserted at the insertion point.
Just as in Acrobat 5, you also have the standard highlighting tool, but under highlighting you can also choose cross out, or underscore.
Customized Proofreading Marks
Another option for creating proofreading marks that are closer to traditional proofreader marks is to use the rubber stamp tool. In Acrobat 5.x this is possible, but the steps that one has to go through to create a custom stamp makes it less than easy for the average user. With Acrobat 6 Professional, there is a “create custom button” right under the stamp tool (see Figure 3).
Using this tool you can create a stamp from any PDF, JPEG, TIFF, or EPS file. To demonstrate, I created a bunch of common proofreading marks in Adobe Illustrator and saved them out as EPS files (although PDF would have made the job easier). Then I just went to “create custom stamp” and clicking on select, I could select the EPS file for the stamp that I wanted to add. Once added, I could put it into a special stamp group that I called “proofreading” (see Figure 4).

These marks can then be put onto a page and, with their corresponding “sticky note”, can be used to add detailed comments or corrections.
Note: Remember, all comment items have a note attached, even if it’s not visible at the time you place the mark. Double clicking the mark will open the corresponding sticky note).
Better Proof Printing
Probably the best improvement in Acrobat 6 Professional has been the ability to create a printed proof that can be used for off-line reading of proofs. Because it is so difficult to have both the proofed PDF and the original paging document open on screen at the same time, many compositors have opted for a “mixed” paper/paperless workflow. That is, while no paper proofs are sent to clients, paper proofs are generated for use in-house. To enable a fully paperless workflow, paging operators would need to be able to view both the marked up proof and the paging document at the same time. Some compositors have set up special stations with dual monitors just for that function. In addition, proofreaders would need to be able to view both an original proof and the corrected proof at the same time for anything past the first round of proofs.
The expense of setting up special workstations is more than most compositors can justify, therefore, they have gone with the option of printing PDF proofs with annotations showing for these uses. However, if you’ve ever tried printing a file with annotations showing, then you know that it isn’t always the easiest thing to read. If notes are overlapping text areas, then you lose the ability to see what’s under the notes. If a note is placed off the page, or in an area too close to the margin, they are either cut off altogether or areas are “cropped.” In our early workflows, we would print on a tabloid page and move all notes to the margins outside the live page area. This tended to be very labor intensive as each proof had to first go through this “cleanup” pass.
One workaround in Acrobat 5.x was to print the separate comments file and then try to figure out where on the page the correction that the comment refers to is located. In practice, this was very confusing and caused those using the system to complain bitterly. It is a sure-fire way to set up a workflow for failure.
With Acrobat 6 Professional, we now have the ability, from the comments print menu, to create a side-by-side proof with leader lines running to the point of the comment/correction (see Figure 5).

Now an operator or proofreader can see exactly where a comment/correction is being made. When printing this type of proof, we usually print it on tabloid paper and set Acrobat to size the page to the paper size. The resulting page is usually a little smaller than the actual page size, but is readable. If you prefer, there is an option to have the same view split between two pages, so the actual document page is on one page and the comments are on another with the leader lines between the two (see Figure 6).

Copyright © 2002-2004 BinaryThing Pty. Ltd. All Rights Reserved. Used with Permission.
This article was last modified on September 24, 2004
This article was first published on September 24, 2004
Commenting is easier and faster when you're logged in!

Recommended for you

Tip of the Week: Use Bookmarks to Navigate Inside InDesign Documents
This InDesign tip on using bookmarks to navigate in InDesign documents was sent...

CreativePro Video: Fill Live Illustrator Text With a Gradient
In this week’s CreativePro video, Mike Rankin shows us how to quickly fill text...

Shutterstock's Image Collection Surpasses Three Million Images
Shutterstock (www.shutterstock.com) announced today that its image library-compr...