

Pre-press specialist and scripting guru Kasyan Servetsky recently blogged about an issue that he had encountered on the Adobe User-to-User InDesign forums and provided an explanation of the solution. The original poster wanted to create a page-a-day type of calendar—with the month as a heading and a large digit for the date—and have the date automatically generate. The answer provided in the forums (which I expound on here) was to utilize masters, page sections, and automatic page numbering.

First, start a new section on page 1 by right-clicking on the page icon and choosing Numbering & Section options. Choose to start page numbering at 1. Next, create a master page for January, create a text frame with the month’s name, and another text frame with space for a large date. In that second text frame, instead of an actual digit, use automatic page numbering by going to the Type menu and choosing Insert Special Character > Markers > Current Page Number.
Apply that master to the first page in the section you just created and add all the pages you need for the rest of that month. Do this from the Pages panel menu and be sure to indicate to use that month’s master page.
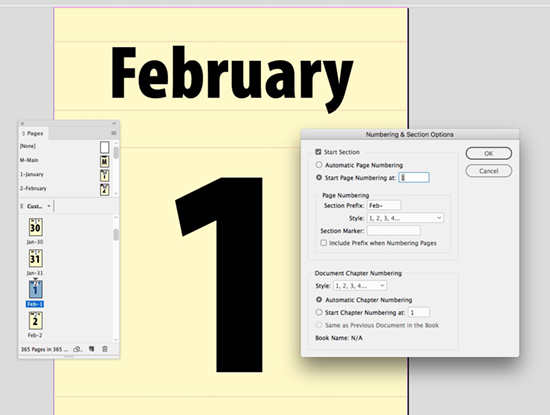
Duplicate your January master page eleven times using the Pages panel menu item. Name each master and change the month’s name in the appropriate text frame. Create a new page at the end of January (yes, now you have January 32), select it, and start a new section. Repeat the section and numbering process from above, apply your February master, and add the necessary number of pages. Repeat until the you get to December 31st.
Like with most things in InDesign, there is often more than one way to accomplish a task. You might find it easier to create a 365-page document, then bulk apply masters to a month’s worth of pages at a time, or add pages using a different method. Also, I find that adding a page prefix makes it easier to keep sections visually distinguishable in the Pages panel. Do that in the Numbering & Section Options dialog box. Use either a number or even the month’s abbreviation and do not check Include Prefix when Numbering Pages.
While this method works great for a calendar where you already know exactly how many pages you need, another approach could be used when pages might need to be added to a section at any time. In that case, you might have one master and—where we had put the month’s name—insert a section marker (Type > Insert Special Characters > Marker > Section Marker). Name the section in the Numbering & Section Options dialog box and it will change depending which section the page ends up in.
This article was last modified on July 25, 2019
This article was first published on November 25, 2017
Commenting is easier and faster when you're logged in!

Recommended for you

InDesign How-to Video: How to Create Sections in Long Documents
In this week’s InDesignSecrets video, Erica Gamet shows how to create sections w...

Indesign Basics: Numbering Pages
InDesign can number your pages, but a little bit of setup goes a long way, as Er...

How to Share a Custom Dictionary
Dave wrote us the following: I was wondering if its possible to have the whole c...