
Going Deep with Footnotes
Whether you're explaining, referencing, or elaborating, footnotes and endnotes are an invaluable designing tool.


This article appears in Issue 95 of InDesign Magazine.
True to their name, footnotes are simply notes at the foot of the page. They contain ancillary information that supports or extends the main text by providing additional information or giving credit to sources. They are numbered in some way (using numbers, letters, or symbols) and they are keyed to the text by a note reference (often also called a cue or callout).
And, as with every little (and big) part of a page layout, someone has to format them. For something as widely used and important as text notation, and for all its typographic controls and nuances, InDesign hasn’t paid a lot of attention to footnotes.
Sadly, InDesign knows how to make only one type of note, namely, the footnote. (Please note that we’re not talking about the Notes feature, the one under Type > Notes. See issue 93 for more on that kind of note.) It’s not possible in InDesign to create endnotes, margin notes (also called side notes), or table notes. Well, you can, but you need to make them manually or with the add-ons I’ll talk about in this article.
Similarly, InDesign’s built-in footnotes feature has various restrictions and leaves much to be desired. For example, you can have only one footnote stream per InDesign story. In this article, we’ll first deal with what InDesign has to offer out of the box, and then we’ll show what can be achieved with workarounds and scripts.
Footnote Features: Few and Far Between
Footnotes were first introduced in InDesign CS2 (back in 2005), and the feature remained unchanged until recently, despite years of pleas from users to improve them and to add functionality. CC 2015 introduced a mildly interesting improvement
that allowed footnotes to honor another page item’s text wrap. So now you can place a page item with text wrap enabled overlapping the footnote area, and space is created in the footnote area for the page item.
Finally, Adobe added a couple more features in CC 2017: the option to let footnotes span text columns and the ability to override column-spanning and the space between footnotes and text on a page-by-page basis. We’ll discuss these features in detail later in this article.
Setting Up Footnotes
Before you do anything with footnotes, it’s good practice to set up paragraph and character styles for the three main footnote elements: a paragraph style for the note text, and character styles for the footnote number and the footnote reference. As I’ve researched and troubleshot notes, I see that most of the problems with footnotes are caused by the lack of well-defined styles. Fortunately, the styles are fairly easy to set up.
The note: Create a paragraph style; let’s call it footnote. Here we’ll set any formatting required for the footnote itself. Most of the examples of footnotes in this article are set in 9 points on 11 points of leading and have a first-line indent of 9 points.
The note number and the reference: You could, in principle, get by with a single character style for both the footnote number (which appears at the beginning of the footnote) and the reference (which appears in the body text), but it’s wise to use a separate style for each, because that makes for a more flexible system.
The note references are almost always superscripted—but when you define the character style for the note reference, I recommend you avoid InDesign’s built-in “superscript” feature. Instead, I like to set the type size (or apply vertical and horizontal scaling) and then set a Baseline Offset. Alternatively, if your font contains true OpenType Superscript numbers, you may want to enable that in the character style.
You can call these styles whatever you want, though I usually name them footnote reference and footnote number (Figure 1). Now that we’ve set up the required styles, we can further specify the appearance of our footnotes.
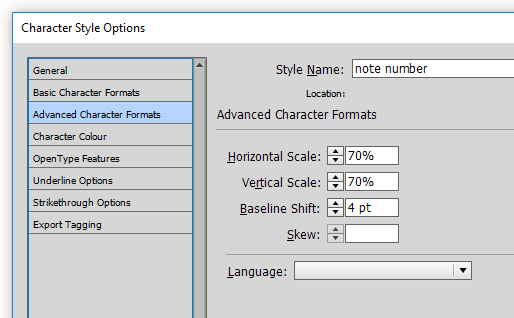
Figure 1
Footnote layout
Once you’ve built your footnote styles, you should set up your document footnote options by choosing Type > Document Footnote Options. This dialog box has two tabs—Numbering and Formatting (Figure 1a,) and Layout.
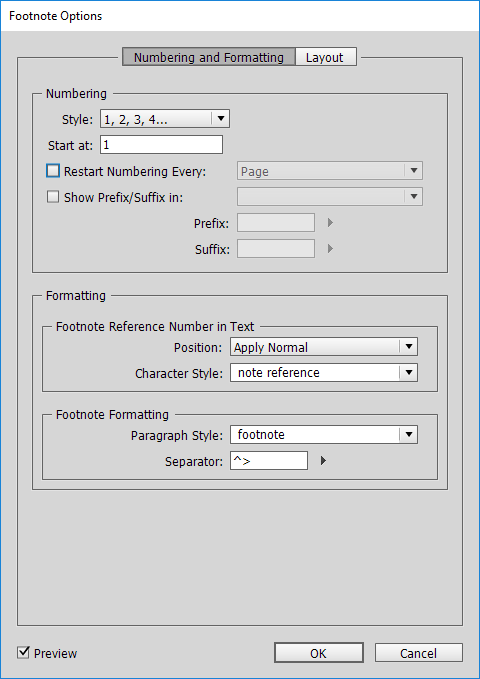
Figure 1a
Numbering
The Numbering and Formatting tab has two panes. In the Numbering pane, you set the properties of the numbers: the style (roman, Arabic, or symbols); the start number; and whether or when numbering should restart. The options for restarting the footnote numbering are Page, Spread, and Section.
As I said earlier, the scope of footnotes is the story—that is, every story in an InDesign file contains its own footnotes. Unfortunately (to put it mildly), the footnote options set in the Footnote Options dialog box apply to the whole document! This means, for instance, that if a document has four stories, each containing footnotes, and you set the start number to 10, then the notes in all four stories will start at 10. The start number you set in the Start At field is typically used to set the start number in book documents. If you want footnotes to number automatically across separate stories, you’re out of luck—you’ll have to unite them into one story.
You can add a suffix and/or prefix to the footnote number and/or the footnote reference. I’ve never used this, nor have I ever seen a situation that would call for a prefix or a suffix (and I’ve processed a great variety of notes), so I won’t cover those options in this article.
Formatting
You can control the format of the footnote reference by applying the character style for the reference in the Formatting pane of the Numbering and Formatting tab: in the Character Style field, choose the footnote reference style you created earlier. Because size and position are handled by the style, choose None for Position.
In the second part of the Formatting pane, you set the paragraph style to be used for the footnotes and the separator—that is, the character or characters between the footnote’s number and the text. You can type any character there and/or select a separator from the little triangle menu. For example, in Figure 1a, I’ve set the separator to an en space by typing ^> (or you can choose En Space from the drop-down menu).
Curiously, the Footnote Options dialog box lacks the option to apply a character style to the note number. However, we can get around that by using a nested style in the footnote’s paragraph style; see the sidebar “Setting a Nested Style.”
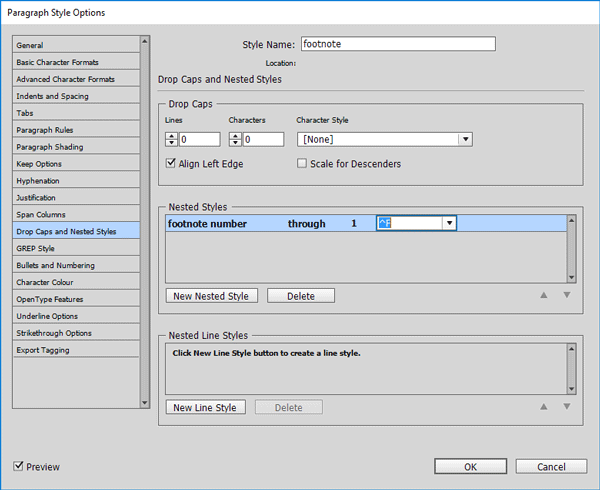
Figure 2
Setting a Nested Style
To apply a character style to footnote numbers, you’ll have to create a nested style:
Edit the footnote’s paragraph style. Click Drop Caps and Nested Styles, and then, in the panel on the right, select Nested Styles.
Click New Nested Style. In the Nested Styles drop-down menu, select the character style you created in step 1, footnote number (see Figure 2).
In the next drop-down menu, choose through, and then enter 1 (which is probably there already), and in the last drop-down, enter ^F (which is the code for the footnote marker). You can select an item from the drop-down menu or type a character, as shown in Figure 2.
Layout
The Layout pane in the Footnote Options dialog box contains various options for setting the layout of the footnotes at the bottom of the text column (see Figure 3). The first option, Span Footnotes Across Columns, was first introduced in CC 2017. With this option enabled, footnotes span across text columns. Of course, this only works in multi-column text frames. Sadly, in frames with more than two columns, you can’t select which columns should be spanned: it’s all or nothing.

Figure 3
Tweaking the Space Between Text and Footnotes
Like all the other footnote settings, column spanning and the spacing options are set as document defaults, but unlike all those other settings, they can be overridden at the level of the text frame.
This means that when you lay out a document, you can vary the space between the text and the notes page by page. This is extremely useful, as we’ll see later on.
The items in the Spacing Options pane speak for themselves: Minimum Space Before First Footnote sets the space between the main text and the first footnote on the page (which could be the continuation of a note on an earlier page), and Space Between Footnotes, well, that sets the space between the footnotes. (Space Between Footnotes is the equivalent of paragraph Space Before and/or After. The normal Space Before and After features don’t work, between footnotes because each footnote is treated as though it were inside its own text frame. But if you have a single footnote that consists of more than one paragraph, then Space Before and After does work between those paragraphs.)
The two settings in the First Baseline area of the dialog box—Offset and Min—have the same functions as those in the Baseline Options tab in the Text Frame Options dialog box. I strongly suggest leaving those set to the default values (Leading and zero). If you use any other options, you’ll just have to do a lot of work in the footnote’s paragraph style to make up for it.
In the Placement Options section of the Footnote Options dialog box, you can indicate whether footnotes on the last page of the story should be placed at the foot of the page (possibly leaving a huge gap between notes and text) or whether they should be placed immediately after the text. In my opinion, you should turn this checkbox on. Unfortunately, due to a bug, this feature is not currently working when you have the Span Footnotes Across Columns option enabled.
In the Rule Above controls, you can set a rule to be placed above the first note and/or continuation notes. The appearance of the rule can be set in the usual way: weight, color, type, and so on. Usually, when you set a Rule Above for a paragraph in InDesign, and when you set the rule’s offset to 0, the rule is placed at the baseline of the first line of the paragraph. However, for footnotes, the Rule Above works differently: it’s placed based on the Offset selected in the First Baseline section. Use Left Indent to set the horizontal position of the rule, and Width to set the rule’s width (length). Tip: Negative numbers let you set the beginning of the rule outside the text frame edge.
Creating a Footnote
OK, now that you have set up your document’s footnote options, let’s add a footnote in the text: Place the cursor where the note reference should appear, and then choose Type > Insert Footnote. The footnote is created at the bottom of the text frame, and the insertion point is activated in the note so that you can immediately start typing the note text. With the styles we set up earlier, the note looks as shown in Figure 4.
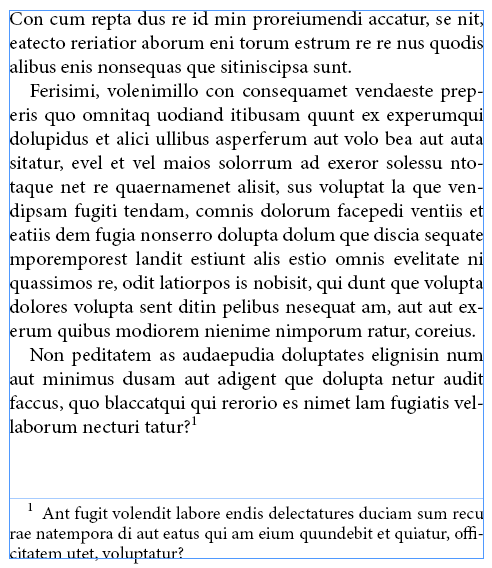
Figure 4
To return the insertion point to the text—that is, after the note reference, in the main body of the column—choose Type > Go to Footnote Reference. If you find yourself using those menu items a lot (Insert Footnote and Go to Footnote Reference), I strongly suggest you assign a keyboard shortcut to them using Edit > Keyboard Shortcuts!
These are the basics of setting up footnotes in InDesign and inserting them in a text. In the next few sections, we’ll deal with some features that you can use to typeset pages, and some third-party tools to get more mileage out of InDesign’s footnote feature.
Highlighting References So You Can See Them
When you’re editing text, hunting down those tiny little note references in the text can become cumbersome. How might you lessen this tedium? You can make note references temporarily more visible by highlighting them. An easy way to do that is to edit the reference character style: turn underlining on, set the underline color to anything bright, and then set the weight to about the type size and the Offset to about -3 points. You can then enable and disable the highlighting simply by toggling the character style’s underlining.
Varying the Space Between Text and Notes
One way to balance pages and/or deal with widows is to vary the space between the text and the footnotes. Before CC 2017, the only way to increase the space between the text and the notes was to set the keep options at the paragraph that breaks across the page (naturally, this works only when the last paragraph of the text breaks to the next page). In Figure 5, for instance, we want to balance the two frames (removing the unsightly space at the bottom of the second frame).
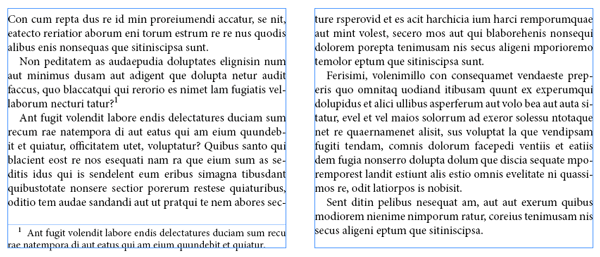
Figure 5
These two pages don’t lend themselves to tightening or loosening any of the paragraphs, and the only way fix the recto page is by creating more space between the text and the notes on the verso page.
To do this in CC 2015 and earlier, determine the number of lines in the breaking paragraph on the second page. In our example, that’s 4. Then set the paragraph’s Keep Options (Type > Paragraph > Keep Options) to keep the last five lines together (see Figure 6).
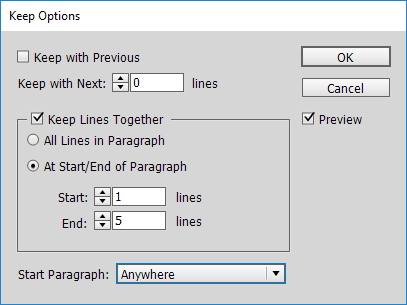
Figure 6
The result is that the line above the footnote moves to the next page, balancing the pages. The downside of this method is that you almost certainly have to redo these keep settings if the text ever reflows.
But don’t despair; I wrote a script to automate this process, and it’s very simple to use: Place the cursor in the paragraph that breaks across the page, and run the script, which you can download here.
Fortunately, starting in CC 2017, varying the space between text and notes has become much easier. The Text Frame Options dialog box gained a Footnotes tab. One of the things you can set there is the space before the first footnote (Figure 7).
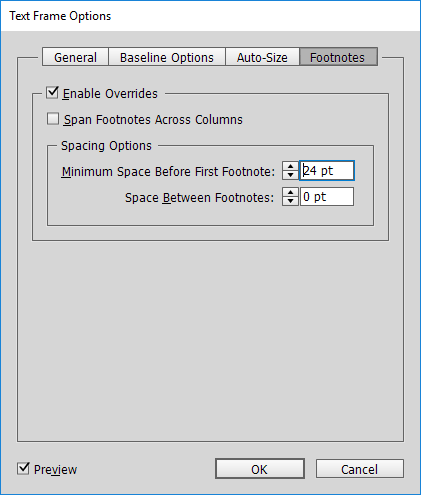
Figure 7
Naturally, this affects the selected text frame only—but, again, if your text reflows, you may need to revisit this to adjust the space.
Combining Notes on the Same Line
If your text contains many short notes, they tend to stack up into a so-called “chimney effect” (Figure 8).
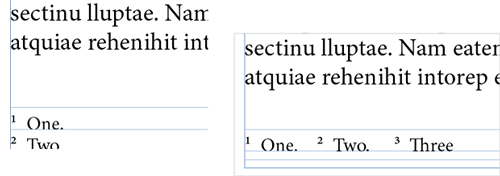
Figure 8
In these cases, it would be helpful to place one note after another note on the same line—which can be done manually in InDesign, but it takes some time and is a bit fiddly. (The process involves adjusting the left indent of each footnote, and then giving it a zero leading—and sometimes some baseline shift—to “move it up” next to the footnote above it.)
To make things easier, I created a script to place multiple notes on one line—which some people call inline notes or breaklines. You can find the script as well as a full explanation of the manual process here.
You can also use this same script to place a short note in the breakline of a previous, longer, note. The result often looks better and, maybe more importantly, can be used to balance a page. In Figure 9, for instance, by placing the short note 53 on the same line as note 52, we avoided having to break the last line of the last paragraph on the page. Plus, the two notes look much better like this.

Figure 9
Footnote Workarounds
We now turn to some features that InDesign doesn’t offer, but which have been requested by many users: endnotes, margin notes, table notes, and multiple footnote threads. Of course, just because InDesign can’t give you an endnote or table note automatically doesn’t mean you can’t make one manually (by creating your own frames and typing numbers and such). But because publications often have dozens—even hundreds or thousands—of notes, that’s usually not reasonable. So let’s look at some workarounds, including some scripts I’ve created to help the process.
Cross-references and footnotes
You can think of a footnote as a special kind of cross-reference: after all, you have a paragraph (the footnote at the bottom of the page), and in the text you create a small “cross-reference” to it (which looks like a little number). When you look at footnotes that way, you can see that InDesign’s cross-reference feature could actually be used to create your own system of notes. And, as it turns out, this technique is extremely helpful to help us get around InDesign’s noteworthy limitations.
I will first explain how to use this feature manually, to create a footnote by making a cross-reference. And then I’ll describe the scripts I have created (and which you can download) that make use of this technique and perform the task far faster than we humans can.
Creating a cross-reference is very simple. First, you need to place the footnote (or endnote, or margin note, or whatever) in a frame somewhere. The note should have a paragraph style that applies automatic paragraph numbering. For more about numbering paragraphs, see issue 55 and this article at InDesignSecrets. Also, when I say “numbering,” remember that you can, of course, use numbers or letters.
Once you have a numbered note, you can create a cross-reference to it by placing your text cursor in the position where you want the number (in the main body text), and then:
Open the New Cross-Reference dialog box (Type > Hyperlinks & Cross-References > Insert Cross-Reference). See Figure 10.
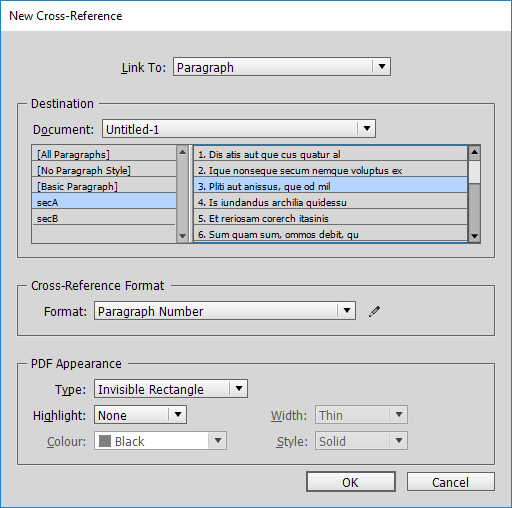
Figure 10
From the Link To pop-up menu, choose Paragraph.
Choose the paragraph style name in the list on the left side in the Destination pane—that is, the style that is applied to the footnote.
Select the footnote paragraph in the list on the right side.
In the Format pop-up menu, choose Paragraph Number.
If you click OK at this point, InDesign places the number in the body text, but it looks like any regular number—to make it look like a note reference, we need to apply some formatting (typically superscript, or italic, or placing the number in brackets). We can do this with a combination of a custom cross-reference format and a character style. So, to do this, before you click OK to close the New Cross-Reference dialog box in step 5 above, click the pencil icon in the Cross-Reference Format section. This opens the Cross-Reference Formats dialog box (Figure 11).
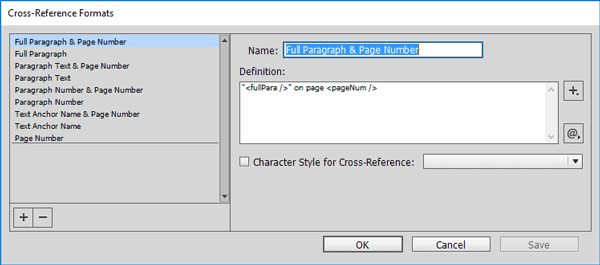
Figure 11
Then:
Select Paragraph Number from the list on the left.
Click the large + at the bottom left.
In the Name field, enter a name for the cross-reference format, say, note reference.
Tick the checkbox at Character Style for Cross-Reference, and choose the character style you want to apply in the drop-down menu. The result looks as shown in Figure 12.
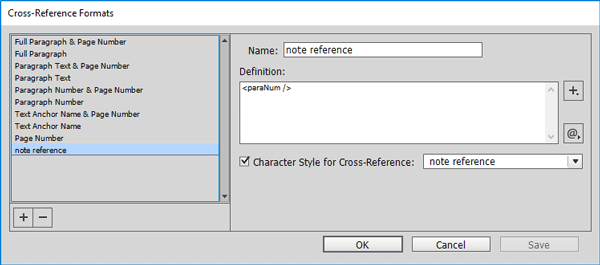
Figure 12
Now when you click OK, InDesign places the number in the body text and applies the appropriate character style. If you, say, wanted the note number to be placed in brackets, you could insert them around the paragraph number code in step 4 above, so that it looks like this: [<paraNum />]
So that’s the basic technique for creating what appears to be a footnote by using a cross-reference. It may seem confusing at first, but after you’ve tried it once or twice, you’ll see that it is quite straightforward. However, it’s not fast. That’s where the scripts come in.
Endnotes
Endnotes are just like footnotes, but they sit at the end of a chapter, or in a later “Notes” section. As I said, InDesign has no built-in feature to create these, but it’s possible to make your own using the cross-references trick I mentioned above. Or, if you already have footnotes in your documents, you can convert them to endnotes using a script you can download here.
Because the note numbers are handled by InDesign’s paragraph numbering, and the note references are InDesign cross-references, the endnotes produced by the script are dynamic—that is, when you add or delete an endnote, they are numbered automatically, and the note references are updated automatically.
I should mention that the script converts the document’s footnotes one story at a time, placing the notes at the end of each story. If your “story” is a single chapter, this means that the script produces end-of-chapter notes.
End-of-book notes can also be produced with the help of a different script. It, too, uses InDesign’s paragraph numbering for the note references, but because InDesign’s handling of cross-references across documents in a book was so awful up to CC 2017 (and in some respects remains clumsy), the end-of-book note references are plain text—that is, they’re not built with cross-references. However, the end-of-book script can be used to update these static references. It’s something that you have to remember to do manually, but it’s very quick.
Margin notes
Like endnotes, InDesign can’t create margin notes (also called side notes). However, like endnotes, margin notes can be created from InDesign’s footnotes by—you guessed it—cross-references. Or, if you have a lot of them to produce, you can use this script.
While margin notes are similar to other notes in several ways, unlike footnotes and endnotes, in margin notes the note numbers and references are optional. That is, because the margin note is usually positioned close to the text it is referring to, the number or symbol is sometimes omitted.
The script’s interface is straightforward (Figure 13).
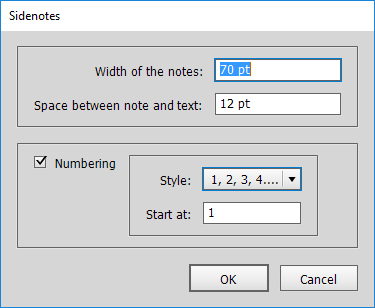
Figure 13
You specify the width of the notes, the space between the text and the notes, whether the notes should be numbered, and the accompanying numbering format and start number. You can come back and change the format and start number later.
Each margin note is created as an anchored text frame, and by default is placed at the line in which the note reference occurs (Figure 14).
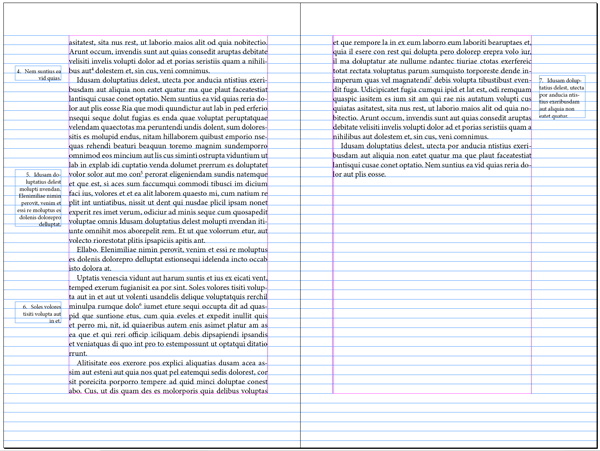
Figure 14
This means that when the text is edited and reflows, the notes travel up or down with the note reference, even to the next or the previous page. If you prefer your margin notes stacked at the top, center, or foot of the page (Figure 15), the margin note converter script comes with an auxiliary script to do that.
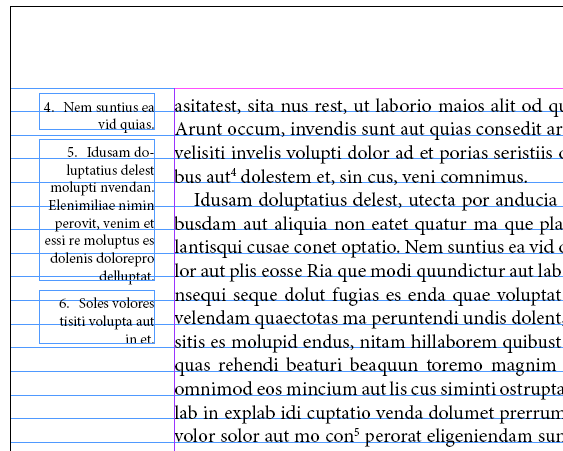
Figure 15
Table notes
In one of the most frustrating limitations involving footnotes, InDesign simply cannot place footnotes in a table. If you place a Word document that contains table footnotes into InDesign, those table notes are placed as plain text at the end of the document, and the note references in the tables are rendered as plain text.
I should point out that table footnotes come in two guises: with their own footnote streams (that is, each table has its own footnotes, placed directly under the table), and with their footnotes merged alongside the main text’s footnotes. The former can be created relatively easily. The latter can be set up, but the process is complicated and requires custom scripting, which is well beyond the scope of this article.
To create footnote streams (where the table footnotes are all together in a group), you simply follow the same steps as I described earlier in the section “Cross-references and footnotes.” Once again:
Create a character style for the note numbers and the note references—call it something like note reference table.
Create a paragraph style for the notes—call it something like footnote table. The paragraph style must include automatic numbering, and should apply the character style to that number (for example, see Figure 16).
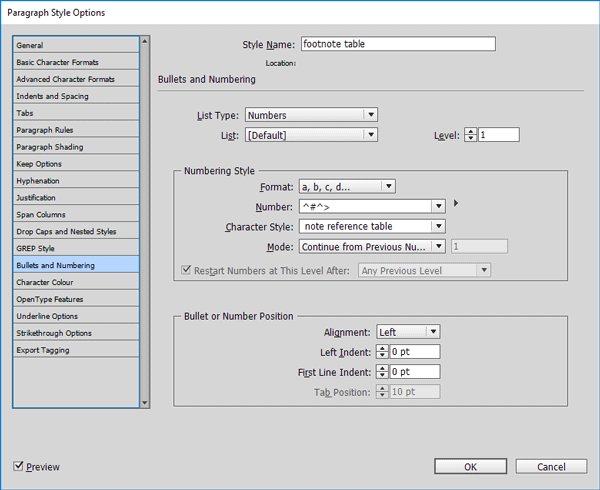
Figure 16
Create a custom cross-reference format as described earlier, and call it note reference.
Place the footnotes after the table (or wherever you want them), and apply the footnote table paragraph style (Figure 17a).
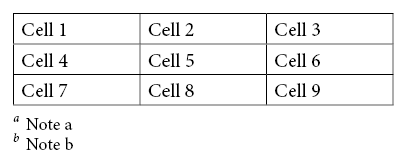
Figure 17a
Place the cursor where the first note reference should be placed—for example, at the end of cell 1. Use the New Cross Reference dialog box to insert a cross-reference to the footnote you want to point to (Figure 18).
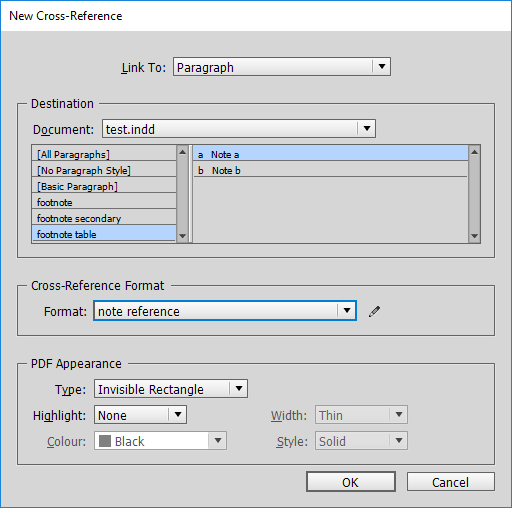
Figure 18
You can see what’s happening in the document if the New Cross-Reference dialog box doesn’t obscure the table.
Finally, click OK to close the window. The result is shown in Figure 17b.
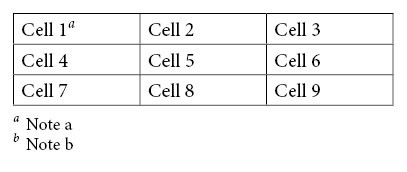
Figure 17b
The nice thing about creating footnotes like this is that you can have more than one reference to the same note—something that happens quite often in tables (see Figure 17c).
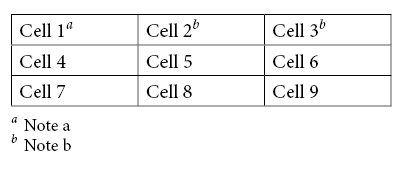
Figure 17c
Footnotes in columns
As mentioned earlier, starting with CC 2017, InDesign handles column-spanning footnotes. What it cannot do, however, is set footnotes to span columns when each column is in its own text frame. The workaround for this is yet another variant of cross-referenced footnotes. Scripts are available for both workarounds here.
Multiple footnote threads
Sometimes a publication needs more than one footnote stream—a combination of footnotes and endnotes, a mix of footnotes and margin notes, two or more parallel footnote streams, or even footnotes inside footnotes. Of course, InDesign normally allows just one footnote stream per story, and the fact that footnote number formatting is a document-wide property doesn’t help! So creating multiple streams of footnotes calls for some combination of InDesign’s footnotes and a secondary system of notes.
You can see a simple example of two footnote streams in Figure 19—one numbered with Arabic numbers and one with letters. In this case, the footnotes with numbers are InDesign footnotes, and those with letters are just paragraphs in a separate story (and with a numbered footnote paragraph style applied to them). The references in the body text are, once again, InDesign cross-references. (The footnote references are highlighted for clarity. See the sidebar “Highlighting references so you can see them” on this technique.)
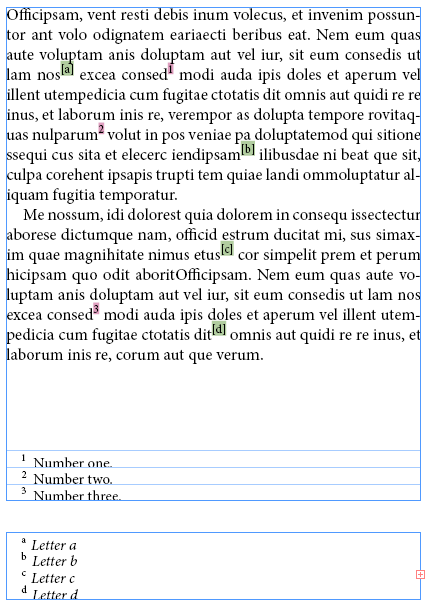
Figure 19
Let’s look at one more example of multiple note streams, this time rather more extreme. The sample shown in Figure 20 is from Thomas Hobbes: Leviathan, published by Oxford University Press.
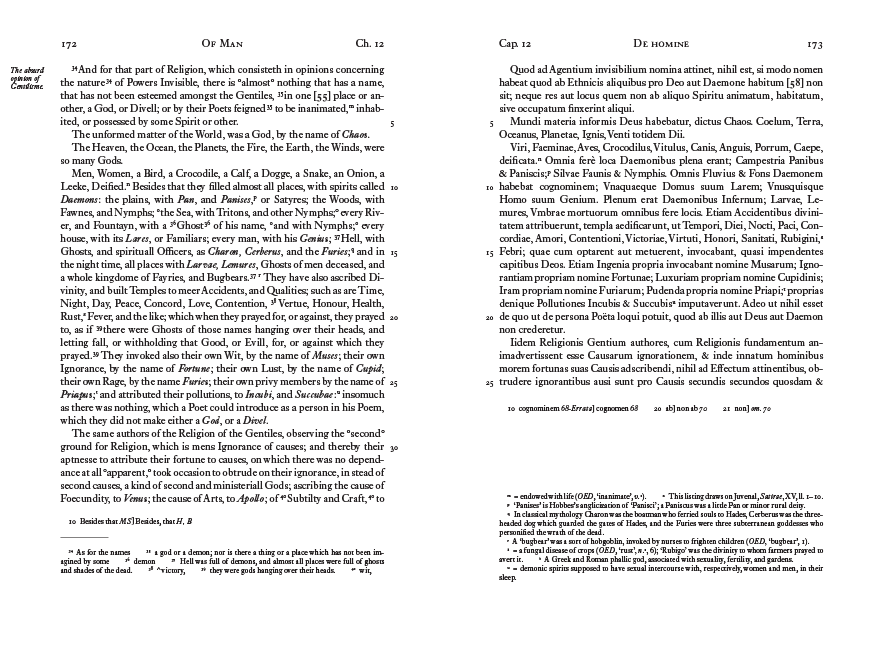
The size of the publication (about 2,000 pages) and its complexity (thousands of margin notes, three footnote streams, each stream with close to a thousand notes) meant that the publication couldn’t have been produced without extensive scripting. To make it more complex: the book is a parallel translation with the English on the verso pages, the Latin on the rectos; some of the footnotes are keyed to line numbers rather than references in the text; and the letter o wasn’t used, to avoid confusion with the number 0.
As you can see, this project could easily drive a team of people crazy (especially if the text later had to be edited!), but virtually all of the tedious work was done with scripts (those listed in this article, and several custom ones, too). That said, humans weren’t off the hook entirely: fitting the notes to the page and judging where notes should go was a manual job, naturally.
Notable Notes
Footnotes are an important part of printed works, and it is therefore surprising that Adobe has left the footnote feature with all its imperfections and limitations for what has been well over a decade. We hope to see more improvements to this feature in the future. But in the meantime, at least now you know the basics of creating footnotes, and how many of the footnote feature’s shortcomings can be addressed by workarounds and custom scripts.
Editor’s Note: We thank Oxford University Press for permission to reproduce pages from Thomas Hobbes: Leviathan, ed. by Noel Malcolm.
Commenting is easier and faster when you're logged in!

Recommended for you

InStep: Highlighting Tables
Diane Burns shares a creative technique for drawing attention to important tabul...

InReview: Zevrix Output Factory 2
A high-end solution for automating the printing and exporting of your InDesign f...
Making Yearbooks With Jostens Monarch
Scott Citron profiles a company bringing innovation and efficiency to high schoo...