
CC Libraries
Integrated with Creative Cloud services like Adobe Stock and apps like Photoshop and Illustrator, CC Libraries offer some amazing advantages over traditional InDesign libraries.
This article appears in Issue 83 of InDesign Magazine.
Only a year ago, in the February 2015 release of InDesign CC 2014, a new kind of library was introduced to Adobe InDesign—called a CC library (short for Creative Cloud library). This CC library lives side by side with the traditional and familiar InDesign object library feature, which lets you store and reuse almost any kind of object you can create in InDesign. And CC libraries are in some ways similar… but in other ways very different. Different in a way that may excite you, or frustrate you, or, more likely, both.
The first version of CC libraries was pretty rudimentary, but Adobe enhanced it further with the release of InDesign CC 2015, in June of that same year, and even more with the November release of InDesign CC 2015.2. The result is that CC libraries are beginning to become not just interesting, but actually quite useful.
Unfortunately, the great majority of InDesign users (yes, I’m talking about you!) haven’t even tried the new CC library feature. In fact, your only encounter with it may be when the CC Libraries panel pops open unexpectedly if you create a new style or a new swatch color! So it’s time you were more formally introduced.
What’s New and Useful with CC Libraries
Most of you are probably asking: Why would I want another library format? You might not even use the regular InDesign object libraries. So here’s a list of what’s new and perhaps useful about them (and, need I say, things that InDesign libraries can’t do) to make them worth your trying out.
Note: From here on, I’m calling object libraries “InDesign libraries” because they work only with InDesign documents; CC libraries work with many Adobe apps.
Here’s what CC libraries can do:
- Accept any InDesign objects to be reusable in other documents, and these graphic assets are stored in two formats: as InDesign snippets, and also as PDF for use in Illustrator and Photoshop
- Are accessible from any computer or mobile device to which you have access with your Adobe ID or viewed in a web browser (because they’re stored as Cloud files as well as locally on your computer)
- Are found in Adobe Illustrator and Photoshop as well (virtually identical panels, with all the same content!)
- Accept color swatches, color themes, and paragraph and character styles (which can be applied in Illustrator and Photoshop as well as InDesign)
- Work with free Adobe mobile apps
- Allow for entries/objects to be edited and updated by their original applications
- Accept license-free artwork from the Creative Cloud Market and purchasable photos from Adobe Stock, all managed within the panel
- Can be shared with others and used in collaborations with colleagues
The CC Libraries Panel
By default, in InDesign CC 2015, the CC Libraries panel is added to your existing workspaces. You can include it in any workspace you create. If you don’t see it, choose Window > CC Libraries to open it.
The CC Libraries panel is empty until you add assets to it. By default, it then creates a new library called My Library, which you can rename from the panel menu. You can create as many new libraries as you like, using the menu beside My Library at the top. To make it easier to search and find your assets later on, you should create and name libraries based on the projects you’re working on.
Tip: Organize the CC Libraries panel in its own vertical dock, to the left of your regular panels. That way you can let it grow long to reveal more items, or drag it wide to view Adobe Stock images at large size.
You can also create a new CC library by migrating an existing InDesign library: when an InDesign library is open, click the Migrate button ( ) to migrate all the assets to a new or existing library. Alternatively, select items in a library, right-click, and choose Migrate Selected Item(s) to CC Libraries.
To view a library, choose its name from the library menu; you’ll see I’ve named mine “Kerala Travel Guide” to match the name of the project (Figure 1).
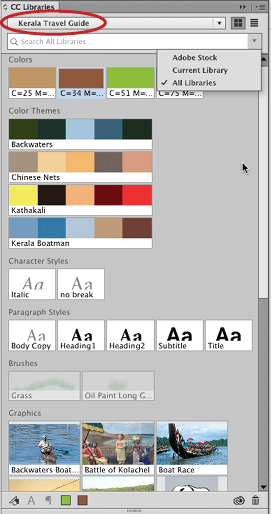
Figure 1: Use the CC Libraries panel controls to add and use assets in a library.
When you show items in list view, a label indicates the creator of graphics assets (Id for InDesign, Ai for Illustrator, Ps for Photoshop) or the file type (JPEG, SVG, PDF). Assets that InDesign can’t use are grayed out, like the Brushes category you see to the right. You can switch between list view and icon view at the top of the panel.
Adding Assets to a CC Library
As I said earlier, you can add a wide variety of helpful assets to your CC libraries. For example, you can add frames, paths, text on a path, or any other InDesign object (or group of objects). But you can also add paragraph and character styles, colors, and color themes—separate from any particular InDesign objects.
By the way, my examples in this article come from a travel guide I’m creating about the Indian state of Kerala (Figure 2). As we go along, you’ll see me working with a number of personal photos as well as other assets to demonstrate all of these types of imports.

Figure 2: Pages from the Kerala Travel Guide
Adding an InDesign object
You can select any InDesign object (a text frame, graphic frame, group of objects, and so on) and drag it into a CC library. The CC Libraries panel displays InDesign objects with an “Id” icon in list view, or with a tool tip saying “Created in Adobe InDesign” in icon view. You can also select an object and click the Add Graphic icon at the bottom of the panel.
Note that if the InDesign object includes a link to an external graphic, the graphic is not added. You must embed the graphic before adding the InDesign object.
By the way, the CC Library assigns a generic name to each InDesign object you add, such as “Artwork 5,” which is then displayed beside the thumbnail. It’s often a good idea to rename it to something more recognizable, which you can do by double-clicking on its name.
Adding a paragraph or character style
Unlike traditional InDesign libraries, CC libraries can save text formatting—whether or not you have used paragraph or character styles. There are three ways to add text formatting to a CC library:
- You can select any styled text in an existing InDesign document (or even just place your cursor in the text) and then click the Add Paragraph Style button or the Add Character Style button in the CC Libraries panel.
If your text has a paragraph or character style applied to it when you add it to a CC library, the library remembers it. However, if any local formatting is applied on top of the style, the CC library will give the style a generic name, such as “Paragraph Style 1.”
- Open the Paragraph Styles or Character Styles panel. Select the desired style name(s) in the panel. Click the “Add selected style to my current CC library” button (). If you’ve selected a style group, all of the styles within it are added.
- When you create a new paragraph or character style, you have the option—which is turned on by default—to add the style to the current CC library (Figure 3). You can select which library to save the style to, and when you click OK, InDesign adds it to both the style panel and the selected CC library.

Figure 3: By default, when you add a new style or swatch, it is added to your current CC library. This option is sticky, so your most recent setting will stay current until you change it again.

Adding colors
You can add colors to your CC libraries, either from a selected object (or text) or from the Swatches panel, and then use those colors elsewhere in InDesign, or in any other app that has a CC library feature.
To add a color from a selected object, click the Add Fill Color icon in the CC Libraries panel. Or, if your object or text has a stroke applied, you can click the Add Stroke Color icon.
Alternatively, you can add colors from the Swatches panel to your CC library (so that you can use them in other documents or apps). Select one or more solid color swatches (gradients don’t currently work), and click the “Add selected swatch to my current CC library” button in the Swatches panel. If you’ve selected a swatch group, all of its component colors are added.
Tip: To prevent the CC Libraries panel from flying open whenever you add a new style or color swatch (which may not even have anything to do with your current CC library), deselect Add To CC Library. This option is sticky; best to leave it unchecked until you really need it.
Adding a color theme: A color theme is a group of exactly five colors which can be saved, reused, and shared. Very much like with individual colors, you can click “Add this theme to my current CC library” to add any color theme to the Color Themes section of your CC library (Figure 4).

Figure 4: After creating a color theme with InDesign’s Color Theme tool, you can click this button to add it to your current library.
For more about working with color themes, see the “Adding Color Themes” sidebar in “What’s New in InDesign CC 2015.2,” InDesign Magazine December 2015.
Using CC Library Assets in InDesign
Once you have added assets in your CC library, you can begin to use them in your InDesign documents (or, as I said, in Illustrator, Photoshop, and so on). You can place graphics, apply paragraph or character styles to text, or assign colors to text or objects. In this section, we’ll talk about how to use library assets imported from InDesign CC, Illustrator CC, or Photoshop CC. You can also use the library to work with Adobe Stock photos, but I’ll explain that in a later section.
Adding assets in Illustrator CC and Photoshop CC The CC Libraries panel looks almost exactly the same in Illustrator CC or Photoshop CC as in InDesign, except that in the former two, it’s called the Libraries panel. In Photoshop CC, you can drag a layer to add it to a library. By default, it will name the new asset by the layer name (Figure 5). In this example, the asset name is initially Background; I’ll rename it Great Hornbill after the name of the bird in the picture.

Figure 5: I’m adding a Photoshop image to my library by dragging a layer to Photoshop’s Libraries panel.
Placing a graphic
There are two ways you can place graphics from a CC library into an InDesign document: by right-clicking on one or more selected items and choosing a Place command from the context menu, or by dragging the assets onto the page. In either case, you’ll see InDesign’s normal “place gun” cursor, which lets you click or drag.
If the graphic originated in InDesign, the only option when you right-click is Place Copy. InDesign recognizes the snippet file (IDMS) and copies it into the document; that is, you get one or more editable InDesign objects. Dragging and dropping produces the same result. In other words, the assets are not linked to the CC library. This means that if you later edit the InDesign asset in the library (I’ll explain how that works later), it will not update on your document pages.
However, CC library assets that originated in Illustrator or Photoshop are handled very differently. If you right-click on one of these, you can choose between the Place Linked or Place Copy commands:
- A place linked graphic is not linked to your hard drive or a server and doesn’t have a normal file path; rather, it’s linked to a named CC library, and marked by a cloud icon both in the Links panel and on the corner of the graphic itself (Figure 6).
- A place copy graphic is embedded as a copy of the asset. It shows no icon on the graphic, but appears in the Links panel with an “embedded” icon (
 ). (This is basically the same as placing a linked graphic and then choosing Embed Link from the Links panel menu.)
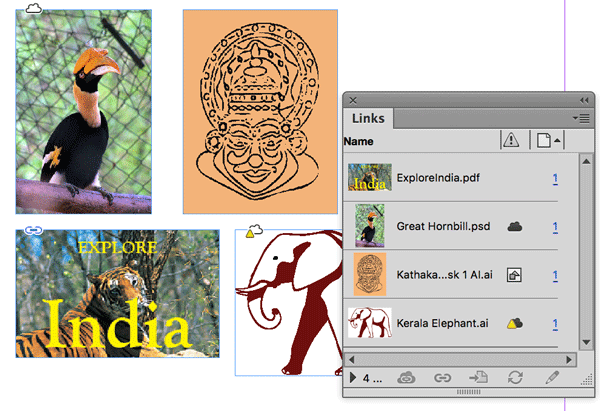
Figure 6: Clockwise from bottom left: a link to a local drive or server, a link to a CC library asset, an embedded image, and an out-of-date link to a CC library asset.
If you drag one of these graphics onto your page, it will become linked to the library. If you want an unlinked, embedded copy, hold down Option/Alt when you drag-place the graphic.
Of course, the great thing about linked graphics is that when you edit them once, every instance gets updated wherever it appears. Note that you can edit a CC library asset only in its original application (again, more on that in a moment). If the links are out of date, you’ll see the out-of-date cloud icon in the Links panel and on the graphic (Figure 6 again).
Character and paragraph styles
Working with paragraph and character styles is a bit simpler than understanding how graphics are handled.
If you want to move paragraph or character styles from a CC library to your Paragraph Styles or Character Styles panel, first ensure no text or text frames are selected on your page when you select the styles in the appropriate section of the CC Libraries panel. (You can select more than one by clicking on one and then Command/Ctrl-clicking on others—or Shift-click to also select all the items between.) Then right-click the selection, and choose Add to Paragraph Styles or Add to Character Styles.
If you want to apply a single CC library paragraph or character style to text, first select the text in your document. (You can either select a text frame with the Selection tool or select text with the Type tool.) Then just click on the style in the CC library. InDesign both applies the formatting and adds the style to the Paragraph Styles or Character Styles panel.
Note that style hierarchies included in styles—such as Based On or Nested Styles—are honored. For example, if you created a nested style as part of a paragraph style, both the paragraph style and included character styles will be added to the appropriate panels.
Colors and color themes
You may want to apply colors in a CC library to objects or text. If so, first select the object or text in your document, and then choose the fill or stroke proxy (at the bottom of the Tools panel, or the top of the Swatches or Color panel). Finally, to apply the color, just click any color from the Colors or Color Themes section of a CC library.
Or, you may want to add a color or color theme from a CC library to your Swatches panel in your current document:
- When you apply a CC library color to any object or text on your page, InDesign automatically adds that color to your Swatches panel. Or, you can select one or more colors in the CC library, right-click one of them, and then choose Add To Swatches.
- In the Color Themes section of a CC library, click on a color theme, right-click, and choose Add Theme To Swatches. The color theme will appear as a color group containing the same swatches. Or, click on the color theme to enlarge the swatch display in the library. Then, right-click the swatch you want to add, and choose Add To Swatches. Only that swatch will be added to your Swatches panel.
Adding Images
You may want to add artwork and photographs to your project, either for free from the Creative Cloud Market or by purchasing a subscription to Adobe Stock. I wanted to add both artwork and photographs to my Kerala Travel Guide.
Creative Cloud Market
The Creative Cloud Market was added as a free service for Creative Cloud members back in 2014, but many users still don’t know it exists. The Market contains assets licensed to Creative Cloud members to use, royalty free, in their design projects. It appears in the Creative Cloud desktop application (found in the menu bar on a Mac or the taskbar in Windows). Click on Assets, and then on Market.
There’s a drop-down menu to search for particular types of artwork. These include PSD files for placement or user interfaces; vector shapes, which are saved as SVG files; icons and patterns, which are often PNG or SVG files; and Photoshop brushes.
I had my best luck by searching for a topic in the search field at the top. For example, for my travel guide, I was looking for vector art of an elephant, so I used “elephant” as a search term (Figure 7). If you find something you like, click the download button, and select the library where you want to save the art.
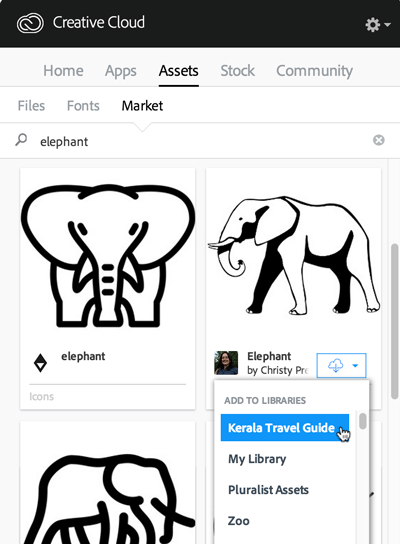
Figure 7: When you search the Creative Cloud Market, you can select royalty-free art, which you can save to a CC library.
There is one major problem with the vector art: it is currently all saved in the SVG format—and InDesign CC doesn’t currently read SVG. We’re all hoping this will change in the future, but in the meantime, when you place an SVG file from a CC library into your InDesign document, you get a bitmapped PNG image.
Fortunately, it’s pretty easy to convert an SVG graphic to vector art that InDesign can read: double-click the asset in the CC Libraries panel, which opens it in Adobe Illustrator. Now select all the artwork, and click the Add button in Illustrator’s Libraries panel to create a new CC library asset. You can now close the original SVG graphic without saving, and delete the old SVG from the CC Libraries panel if you want to. When you switch back to InDesign, you can use the vector art document properly.
Adobe Stock
One of the enhancements that came with the InDesign CC 2015.2 update in November 2015 was the integration of the Adobe Stock service into Creative Cloud libraries. Creative Cloud members get access to over 45 million photos, illustrations, vector graphics, and videos (though you typically have to pay an extra fee for the rights to use the high-quality images).
You can search Adobe Stock from within the CC Libraries panel. I was looking for pictures of the Chinese fishing nets that are an iconic feature of the Kerala backwaters. At the top of the panel, I chose Adobe Stock from the field’s menu, and searched for “Kerala fishing” (Figure 8). To see the results clearly, it’s a good idea to enlarge the panel as much as possible. I found an image I liked a lot, clicked the download button, and saved it to my Kerala Travel Guide library.

Figure 8: You can search Adobe Stock in the CC libraries panel. If you’d like to download a preview, you can save it to your current CC library.
Alternatively, you can choose File > Search Adobe Stock to open your web browser to the Adobe Stock website, where you can see the pictures larger. You can download a preview image from the website to your selected CC library.
I dragged the downloaded file from the library into my layout to use as a cover image. Initially, it appears as a low-resolution place linked image with a watermark (Figure 9). I can leave it in that format while creating proofs or even applying effects in InDesign.
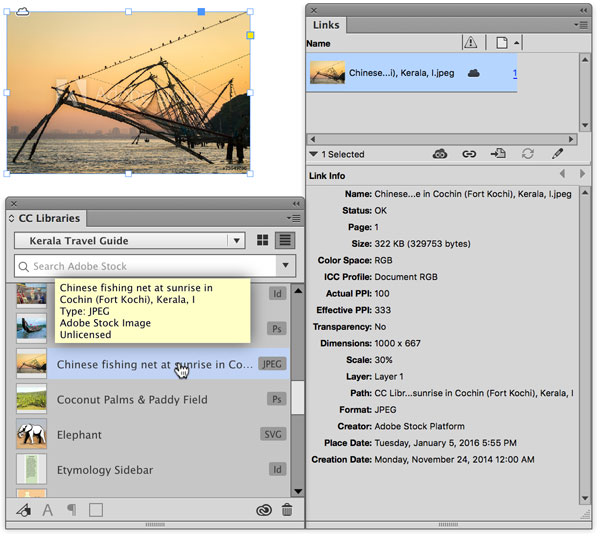
Figure 9: A downloaded but unlicensed Adobe Stock photograph can be placed with a watermark at low resolution.
I chose to buy that image, so I right-clicked the thumbnail of the image in the CC Libraries panel and chose Buy Image. (You’re actually licensing the image, not buying it.) You’ll be prompted that you’re using one of your monthly quota of images. Within a short time, the watermark goes away. The low-resolution image is replaced by a high-resolution image (Figure 10).

Figure 10: Once you’ve licensed an Adobe Stock photograph, it’s replaced with a high-resolution version with no watermark.
For more information, see Using Adobe Stock and Designing with Adobe Stock.
Adding Assets Using Mobile Devices
In the past few years, Adobe has released a number of free mobile apps designed to capture or create artwork, colors, and other assets. They integrate with Adobe desktop apps and use their file formats. In many cases, CC libraries provide the connective tissue between desktop and mobile applications. For example, I used the Adobe Capture CC app on my iPad to add color themes and shapes to the project. See Take Your Design Workflow Mobile with Adobe Capture CC and Adobe’s Mobile Creative Apps at CreativePro.com for more information on mobile workflows.
Managing CC Libraries
As you start to work more with CC libraries, you’ll find there are a number of maintenance tasks you’ll need to perform with your libraries and library assets, such as renaming them, deleting or editing assets, or viewing them in a web browser.
Renaming and deleting libraries
It’s easy to rename a library: just select the library from the CC Libraries drop-down menu. Click the panel menu, and choose Rename [library name]. When the name is highlighted, retype it, and click Rename.
Similarly, to delete a library that you no longer need, select the library from the menu and choose Delete [library name] from the panel menu. You’ll be asked to confirm the deletion.
Moving, copying, duplicating, renaming, or deleting assets
Sometimes library assets need to be moved, copied, renamed, deleted, or duplicated:
- To duplicate one or more library assets, select the assets. Right-click, and choose Duplicate (for one asset) or Duplicate Selected Items (for more than one). The duplicate is named the same and placed in the same library (yes, this works).
- To copy or move library assets to another library, select the assets. For one asset, right-click, and choose Copy To or Move To. If you select more than one asset, right-click, and choose Copy Selected Items or Move Selected Items. Then in the submenu, select the new library name to copy or move the assets.
- To rename an asset, right-click an asset in a library, and choose Rename. You can also just double-click the asset name. The name is highlighted. Type the new name, and then press Enter or Return.
- To delete one or more assets, select the items, right-click, and choose Delete or Delete Selected Items. The assets are deleted immediately. Remember that CC libraries are shared across “the cloud,” so if you delete something in InDesign, it will disappear in all the places you use that library (other apps, and so on).
Editing and Relinking an Asset
Whether and how assets can be edited depends on what kind of assets they are:
- To edit a color, double-click the color swatch (or right-click on the color and choose Edit). The InDesign Color Picker appears, and you can select a color, and click OK. Note that editing a color swatch inside a CC library does not change any instances where you’ve used that color in your InDesign documents. To change those, you must use the Swatches panel.
- To edit an InDesign asset (that is, library items that were originally InDesign objects), double-click it, or right-click and choose Edit. InDesign will open the library item as a new, temporary InDesign document. After you make your changes, simply save and close the temporary file. The asset in the library is automatically updated.
- Similarly, to edit an Illustrator or SVG graphic, you can double-click it in the CC Libraries panel (or right-click and choose Edit). Illustrator CC should launch and open the graphic for you. Again, this is just a temporary file that you can edit. When you save the graphic and close it, it is automatically updated in the library. Of course, if you have placed this library item in your InDesign document as a linked graphic, you’ll be prompted to update it in the Links panel.
- For some reason, InDesign’s CC Libraries panel cannot currently force Photoshop to edit images. So, until Adobe fixes this, to edit a Photoshop asset (or other bitmapped asset like a JPEG), you’ll have to open Photoshop yourself, open its Libraries panel, double-click the asset, and edit it in Photoshop. When you save, and if this is a place linked graphic, you’ll be prompted to update it wherever it’s placed.
- Unfortunately, you cannot edit paragraph and character styles in a CC library. Instead, you’ll need to create a new style and add it to the library. Then, if necessary, delete the previous style. Similarly, color themes cannot be edited, so you’d need to replace them instead.
Editing linked files created in Illustrator or Photoshop InDesign CC 2015.2 sports an Edit Original command in the Links panel, even when the graphic is stored in a CC library. Choosing that option launches Illustrator so you can edit the graphic. If you do the same with a Photoshop library graphic, you’ll get a warning that “this item isn’t directly editable in InDesign.” You’ll have to manually open Photoshop and right-click the file in the library to edit it.
I mentioned updating graphics that are linked to CC libraries, but sometimes you need to relink your graphics—changing them to link to another library graphic. You can do this in the Links panel (not the CC Libraries panel). First, select the graphic to be relinked, and then click the Relink From CC Libraries icon or choose Relink From CC Libraries from the panel menu. Now, in the CC Libraries panel, you’ll be prompted to select a graphic to relink. Select a different graphic, and click the Relink button (Figure 11).

Figure 11: To relink a graphic to another CC library graphic in the Links panel, click the Relink From CC Libraries icon. Then, in the CC Libraries panel, select the replacement graphic.
Searching for assets
The more you use CC libraries, the more assets you add, and the harder it is to find them again! Using more libraries (for example, a different library for each project or client) can help you organize your assets. Another option is to use the search field at the top of the CC Libraries panel—yes, the same search field that can be used to search for Adobe Stock can also be used to search for assets in libraries. Click the small triangle to the right of the search field, and choose Current Library or All Libraries.
When you’re searching for assets, remember that you can type almost anything that may appear in the name or description of the item. For example, if you don’t remember the name of the paragraph style, but you know that it uses the Franklin Gothic font, you can just type “Franklin,” and the CC Libraries panel will display all the character and paragraph styles that use that font.
Working with library assets in a web browser
Another way to work with a CC library is to view it in your Creative Cloud Files area on the web. The Files area includes libraries, files that you’ve uploaded, and artwork created in mobile devices.
Some commands (like those for sharing or collaborating) open your web browser to this area automatically. For example, an easy way to view your library assets is to use the Creative Cloud Desktop application. Choose Assets > Files > View On Web. You can also view it by logging in to your account at Adobe.com and clicking the Libraries link in your profile.
When viewing your libraries in a web browser, the categories are summarized at the upper left. Clicking on a library opens thumbnails of its contents (Figure 12). At the upper right are commands for working with assets: you can choose viewing and sorting options; find commands to move, copy, rename, and delete assets; or use the sharing and collaborating commands described below.
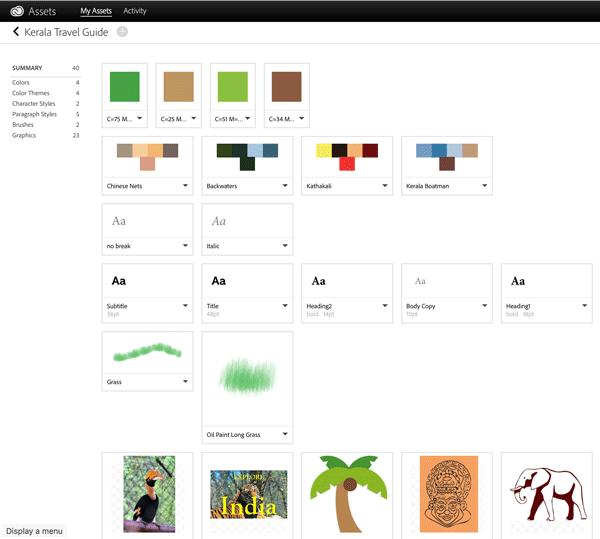
Figure 12: You can also access your CC library assets in a web browser.
Sharing Assets and Collaborating
Similar to cloud services like Dropbox or Google Drive, the Adobe Creative Cloud provides the ability to share a link to a library (or other Creative Cloud file) or to collaborate in working with your assets with other colleagues. But let’s get clear about Adobe’s terminology: Sharing lets users download a read-only copy of a folder, or individual assets, but leaves your assets unchanged. Collaborating gives a colleague full access to edit or share the assets.
Sharing assets
Public sharing of assets ensures that you retain complete control over your content. Recipients get read-only access to your assets, which means they cannot upload, update, or delete them. When working with individual files on disk (or in the cloud), the shared assets are accessed using a unique short adobe.ly URL that you send via email or copy/paste to share. At any time, you can turn off the URL to revoke access.
When it comes to sharing a CC library, select the library in the CC Libraries panel, and choose Share Link from the panel menu. You’ll get switched to your web browser, and see the Send Link window. If your asset is not already public, you must check Create Public Link. Then a public link and URL are created (Figure 13).
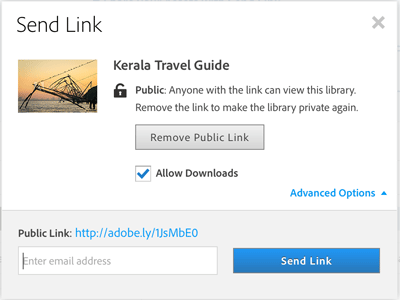
Figure 13: You can send a read-only copy of your CC library assets to colleagues to view or download.
Specify the email addresses you want to send the link to, or copy the link provided. If for some reason you want people to be able to see your assets but not download them, click Advanced Options, and deselect Allow Downloads.
Clicking the short URL opens the shared file or folder in a web browser. Recipients don’t have to be Creative Cloud members to view or access publicly shared files and folders.
If you want to stop sharing the library, choose Share Link again from the CC Libraries menu. The web interface opens, and in the Send Link window, choose Remove Public Link.
Collaborating
Sharing a library of assets is interesting, but what’s really cool is that you can collaborate with colleagues on a library! As I said, collaborating means you’re giving editing rights, too, so they can view, edit, use, rename, move, or delete the contents of a shared library. Be careful whom you choose—the CC Libraries panel doesn’t have an undo feature. Collaborators will need an Adobe ID; if they don’t have one already, they can create one when they accept the invitation.
Inviting colleagues. To invite colleagues to collaborate on a library, select the library in the CC Libraries panel, and choose Collaborate from the panel menu. You’ll be transferred to the Libraries section of My Assets (as described above in “Working with library assets in a web browser”).
An invitation window appears where you can enter an email address and optional message to the person you’re inviting to share a library (Figure 14). After doing so, click Invite. You can then invite additional colleagues as well.
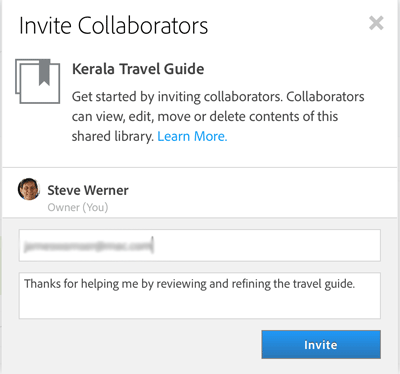
Figure 14: When beginning a collaboration, this dialog box creates an invitation to those you want to include.
When someone accepts your invitation (see below), you’ll receive a notification and the activity will show in the Home tab of the Creative Cloud desktop application. In the Libraries category of your Creative Cloud files, the library now appears in the Shared section, and a small Share icon appears beside its name.
Accepting an invitation. If you’re logged in with your Adobe ID in the Creative Cloud desktop application, you’ll see an Updates And Requests banner at the top of the application. Click the banner, and click the Accept button. You’ll also receive an invitation email, sent by Adobe Creative Cloud, with a link you can click to accept (Figure 15).

Figure 15: Your invitee will receive a link to begin the collaboration process.
All invited members of the Shared Library can now perform all the functions I’ve described above.
Managing a shared library. You can manage collaborators to a shared library by choosing Collaborate from the CC Libraries panel menu. The Collaborators window in the web interface displays the status of your invitations. The person who initially shared the library is the “owner.” Collaborators who haven’t yet accepted the invite have “Invited” displayed next to their names/email IDs.
To remove a single user, click the X icon next to the user, and click Remove Access (if the collaborator has accepted the invitation) or Remove Invitation (if the collaborator hasn’t accepted the invitation yet). Or, to take back the whole thing so that you’re no longer collaborating, delete all the users of the library.
On the flip side, if you are a collaborator on someone else’s shared library, and would like to stop sharing it, select the name of the library in the CC Libraries panel, and choose Leave Library from the panel menu.
Important limitations. Adobe has restricted the file space allocated to a paid Adobe ID to 20 GB. A free membership is limited to 2 GB. Shared assets take up space in each participant’s storage quota, including free members. That would limit the ability to share many large files with free members.
For more information about collaborations, view the Collaboration FAQ.
Take it for a spin!
While the Creative Cloud library feature is still evolving, its advantages over old-fashioned InDesign libraries are clear (and will only grow in the future). So why not kick the tires? When you have a new project or a point in your schedule with a little time to experiment, give CC libraries a try. Once you see them in action, chances are you’ll wonder how you ever got along without them.
Commenting is easier and faster when you're logged in!

Recommended for you

FSI FontShop International Releases FF Meta Serif
It took three years and three designers to develop FF Meta Serif: Erik Spiekerma...

Poll Results: How Often Do You Use Free Fonts?
The results of our poll asking about free fonts, and a new poll asking about you...

Creating Halftone Effects with Vectoraster
With this powerful Mac app you can make custom vector halftones, stipple designs...