InCopy vs. Word
Choosing the right editorial program for your workflow

This article appears in Issue 147 of InDesign Magazine.
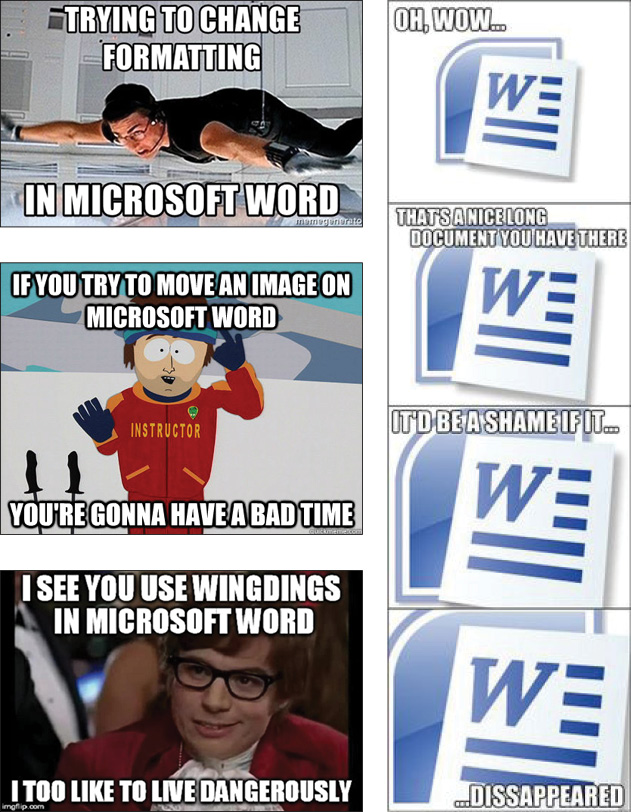
Since the dawn of desktop-publishing-time, publishers have needed a workhorse editorial application to create and manage text content. For most, the obvious choice was Microsoft Word. But as any longtime Word user will tell you, the program has more than its share of quirks and limitations (Figure 1).

Figure 1. Coping through humor: Word’s inability to perform seemingly basic tasks has inspired legions of painfully funny memes.
So, shortly after Adobe introduced InDesign back in 1999, the company released InCopy to provide authors and editors with an alternative to Word—a tool that lets you write and edit in the context of the layout, but without disturbing any page elements. More than 20 years later, InCopy has its ardent fans (including me), but the vast majority of companies still use Word, many simply out of habit or ignorance of the benefits that InCopy offers.
In this article, I’ll compare a Word workflow to an InCopy workflow and evaluate the pros and cons of each to help you make an informed decision regarding which one is right for you.
Cost
Let’s start with one of the first factors that people consider when choosing an application to use: cost. Microsoft Word comes pre-installed on most Windows computers. But regardless of which platform you’re on, in order to continue using it you’ll need to sign up for a Microsoft 365 subscription ($70/year) or purchase Office for a one-time price of $150.
Adobe no longer offers perpetual licenses for its software, so if you want to use InCopy, you need a subscription—either for Creative Cloud as a whole ($600/year) or for InCopy by itself ($60/year).
So, for the vast majority of InDesign users there’s no additional cost to use InCopy, and the cost of Word is relatively low. For someone who doesn’t already have Creative Cloud, the difference of just $10 per year for the basic subscriptions probably won’t be a determining factor.
Editing and Formatting Text and Tables
Let’s take a look at how each of these tools handles basic editing of text and tables.
Being a dedicated word processor, Microsoft Word has powerful text editing features that are sufficient for most users. When placed into InDesign, text can retain its formatting (with some prior planning and set-up work in InDesign). This process can be made relatively bulletproof when the Word users properly apply styles to the text (which is, of course, far from a sure thing).
Also, any hyperlinks, footnotes, and endnotes can be retained and converted to their InDesign equivalents. Other powerful Word features that you won’t find in InCopy include things like drawing tools, Outline mode, Compare and Combine Documents, Translate, Grammar Check, and the ability to insert citations, charts, and math equations. Word also offers the handy ability to select non-contiguous text and apply formatting to it. This is definitely a plus for Word, but you can accomplish a similar result in InCopy using the Eyedropper tool. (Check out this post for details.)
On the other hand, what makes InCopy particularly advantageous from an editing workflow perspective is that InCopy shares the exact same text engine with InDesign. So, formatting attributes are automatically retained and any styles used in InCopy transfer seamlessly to the InDesign layout on import.
Further enhancing the InCopy experience are the three views that the program provides: Galley view, Story view, and Layout view. Layout view shows text formatted exactly as it is in the InDesign layouts. Galley and Story view display content using the font, size, and spacing of your choice, allowing you to edit text using your preferred appearance. InCopy also offers a Glyphs panel, which shows you every character available in a given font. This makes it a breeze to insert characters that can be hard (or impossible) to type, like fractions, math symbols, trademarks, and currency.
InCopy prevents users from applying “faux” font styling by allowing them to choose typefaces available on their computer only. The fake bold and italic that sometimes mucks up Word documents is simply not a thing in InCopy.
Both Word and InCopy users can create and format complex tables with headers and resizable rows and columns. But in my opinion, InCopy comes out on top with this feature simply because the size and formatting of the table is retained between InDesign and InCopy, where the Word-to-InDesign workflow requires tables to be reformatted after import. Add to that the ability of InCopy to leverage table styles for consistent and easy formatting, and InCopy wins the table challenge hands-down.
Round-Trip Editing
For most users, a Word-to- InDesign workflow is a one-way street (The exception being those folks who’ve discovered the magic of Em Software’s WordsFlow. See Jamie McKee’s review in Issue #143). What I mean here is that once the designer flows the Word content into the InDesign layout, the editor is cut off from that content. They are no longer able to make direct edits—unless of course they edit the Word document and resubmit it to the designer, which results in a lot of lost time and effort on the part of the designer. The typical solution is that the designer generates a PDF file of the layout and sends it to the editor, who, in turn, indicates edits using the Comments feature in Acrobat, then hands the PDF back to the designer for the designer to make the edits. Make no mistake: This workflow works and is quite common to this day. But is it efficient?
By contrast, an InCopy workflow is always a two-way street. Once InCopy content is flowed into InDesign, the designer can make that content available to editors so they can make edits in the same file that the designer is working on in InDesign. As a matter of fact, these two tasks can occur simultaneously! As I mentioned before, because InCopy and InDesign share the same text engine, edits can be made seamlessly and in real-time. Editors can open the InDesign layout directly in InCopy for editing and see the layout as it will appear in its final form, with accurate line breaks, hyphenation, and copyfit status. This is InCopy’s raison d’être—it allows editors and designers to both focus on what they do best (Figure 2).

Figure 2. The Word workflow is a one-way street, preventing content from being edited in Word after import into InDesign. InCopy, on the other hand, is a two-way street that provides bi-directional editing of content even after the content has been placed in InDesign.
One of the things I like best about the InCopy workflow is its flexibility. There are several ways in which you can implement it. For example, some companies like to start off the editorial process using Word, because their editors need to pass manuscripts back and forth with authors before the content is flowed into InDesign. At this early stage of the game, it makes sense to use Word as the vehicle for the content because it’s very unlikely that authors would have a tool like InCopy. Then, once the Word content is flowed into InDesign, the designer can export that content to InCopy stories and take advantage of InCopy’s strengths for the remainder of the editorial/production process.
Another strength of the InCopy workflow is the use of assignments to control which content is editable by each user. An assignment acts like an “instance” of the InDesign layout. You can include specific stories from a document in an assignment, so that when a user opens that assignment, they have access to only the content you want them to edit. This is a great workflow when you have numerous editors who need access to specific stories only.
It’s important to understand that it’s the designer’s role and responsibility to control these assignments and who has access to them. The time and effort it takes to manage these assignments, however, is often worth the trouble to give content editors access to the information that they are responsible for editing. And most designers would love to stop the madness of having to make the text edits themselves!
Color
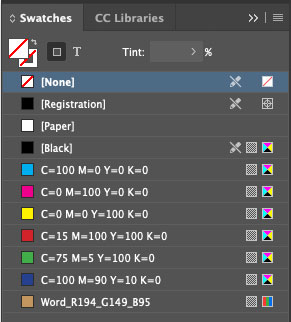
Typically, we think of the application of color as a job for designers, not editors. But in some workflows, editors are responsible for applying color to text to add emphasis or other meaning. It’s easy enough to apply any color to text in Word, using a model like RGB, CMYK, or HSB/HSL. Unfortunately, regardless of which color model you choose in Word, InDesign will import your colors as RGB swatches, which usually require cleanup after import (Figure 3).

Figure 3. Colors from Word are converted to RGB when placed in InDesign regardless of how you defined them in Word.
InCopy offers the same Swatches panel as InDesign, which makes it very easy to consistently apply color to content with no unexpected shifts in appearance or color values at any point in the workflow.
Images
Naturally we’re focused mostly on text content in this article, but it’s often necessary for editors to place new logos or other images into certain documents. So let’s look at a few key points related to imagery.
Word allows users to insert images in most common formats and to resize and crop them. However, any cropping and positioning of the image you perform in Word will not carry over to InDesign. You also can’t link to an image from Word; any images you place into the document become embedded.
By design, InCopy has only limited features for working with images. InCopy users can only place images by anchoring them within the text they’re editing. You can’t create new image frames or modify the geometry of existing ones. However, you do have the ability to replace images in existing frames that have been exported to InCopy, as well as position and size them within the frame as needed. You can even use the Edit Original feature to open an image in programs like Photoshop and Illustrator if need be. And since you have access to the same Links panel as InDesign users, you can view link information, update modified linked images, embed (or un-embed) images, or relink to different images altogether (Figure 4).

Figure 4. Using InCopy, content creators can place, position, and scale images in an InDesign layout.
Track Changes
Both Microsoft Word and Adobe InCopy have features that can track any edits made to the text content in a document (Figure 5). The features are quite similar, both providing the ability to see changes that have been made to a document as well as who made the change and when. Both programs also provide the ability to accept or reject a change. The ability of InCopy to track changes in a live InDesign layout throughout a project certainly gives it a slight leg up compared to Word. Note that InCopy doesn’t show tracking information in the Layout view. Change information appears in Galley or Story views only.

Figure 5. How tracked changes appear in Word (top) and InCopy (bottom).
Footnotes/Endnotes
Microsoft Word gives users the ability to add footnotes and endnotes for the purpose of citing references throughout a document. This is a must-have feature for anyone creating long documents with a lot of citations and references, and for the most part it works very well within Word. Outside of Word, these footnotes and endnotes are retained when the content is placed into an InDesign document, which is very beneficial from a workflow perspective.
InCopy also provides the ability to insert footnotes and endnotes in a document in very much the same way that Word does (Figure 6). Simply choose Type > Insert Footnote or Type > Insert Endnote to add a reference and the corresponding footnote/endnote text to a document. InCopy uses the footnote/endnote settings defined in the InDesign document to determine the formatting of the references and the notes, which is helpful to maintain consistency throughout a document.

Figure 6. Both Word (top) and InCopy (bottom) allow you to add footnotes to a document.
Find/Change
For editors who need to clean up documents by finding and changing content, Word’s basic Find and Replace feature works as advertised. Word even has an advanced feature which helps you to isolate your search to specific areas of a document, including pages, sections, comments, footnotes/endnotes, tables, and headings (Figure 7).

Figure 7. Word’s Find/Replace feature allows you to find a word or phrase and change it very easily.
InCopy also has a standard or “Text” Find/Change for finding words or phrases and replacing them with new content. It also allows you to build search queries using GREP, which is a pattern-matching method that leverages Regular Expressions (the RE in GREP) to make very complex search queries possible (Figure 8).

Figure 8. In addition to a standard Find/Change, InCopy provides powerful GREP search options for finding content based on patterns.
For example, maybe you wanted to find any text that appears within parentheses or any string of digits followed by a hyphen. These kinds of queries are all possible using GREP. So, if you have more robust find/change needs, you’re going to find InCopy to be quite powerful. For more information on the use of GREP, see Issue #59.
InCopy also offers a Glyph search, which is helpful for finding and replacing specific characters in text. These can be identified using the Glyphs area within the Find/Change dialog box or via the character’s Unicode value.
Other InCopy Advantages
Here’s a list of other unique features of InCopy, which can be extremely useful in some workflows:
- Auto-Activation of Adobe Fonts
- Conditional Text
- Layers
- QR Codes
- Text Variables
- XML Tags
Training
Training is another factor that you shouldn’t overlook. Obviously, someone will need to train staff if you decide to switch from Word to InCopy. Trying to implement an InCopy workflow by telling folks to “figure it out” on their own is a recipe for frustration and lost time. I’m not just talking about authors and editors here. Designers also need to learn new roles and responsibilities, as they are the ones controlling the workflow itself. If you’re considering moving to InCopy, be sure to make training a high priority.
That said, extensive training is sometimes overkill. Many users will never need to access every last bell and whistle. They just need fundamental instruction on the use of styles and basic features within the program.
Even with successful training, there will be a brief but significant disruption while everyone adjusts to life outside their comfort zone and relearns how to get their work done. The length of the adjustment period (and the accompanying dip in productivity) will depend on the willingness of staff to adapt and their ability to absorb new information.
You might also use training so you don’t have to switch programs. Even if your colleagues say, “We’ve been using Word for 20 years!” that doesn’t mean they’ve been getting the most out of the program. A lot of frustrated users simply don’t realize there’s a better way of doing things already at their fingertips. Maybe your editorial workflow just needs a tune-up instead of a new engine. Or perhaps you can take advantage of Em Software’s WordsFlow, so that you get some of the capabilities of InCopy while still using Word. Talking to everyone involved, as well as reviewing requirements and procedures will be your guide.
The Final Word on Word (vs. InCopy)
Both Word and InCopy have their place in design workflows around the world. Deciding which one makes the most sense for your organization often comes down to the kind of content you produce, the people you’re working with, and the features you rely on. I hope this article has provided the information to help you make an informed decision regarding which workflow makes the most sense for you and your organization.
Commenting is easier and faster when you're logged in!
Recommended for you

Cleaning Up White Space Problems in Word Files
Proven methods for removing messy white space characters that can cause trouble...

Formatting in a Flash
How do you take 50 unstyled, manually formatted Word files and turn them into a...

Going From Markdown to InDesign
How to use Markdown as an authoring tool in InDesign workflows


