
Taming Wild Assets with Adobe Bridge
Not a Bridge user? Alan Gilbertson shows you what you’ve been missing.

This article appears in Issue 139 of InDesign Magazine.
One of my favorite recent books, The Cosmic Revolutionary’s Handbook, by astronomers Luke A. Barnes and Geraint F. Lewis, begins Chapter 2 with the words, “At night, the sky is dark. If this is new information for you, the rest of this book is going to blow your mind.”
This is the best introduction to a chapter since A Tale of Two Cities, so, in a shameless act of plagiarism inspired artistic homage, I am going to start with this:
A working designer collects a vast array of files. If that is new information for you, the rest of this article is going to blow your mind. It is the story of Creative Cloud’s most underestimated app.
In the Beginning
Long ago, there was a slow and ungainly infant asset manager called File Browser, which shipped with Photoshop 7. It’s safe to say that nobody loved File Browser. There wasn’t much to love, because it was just a tacked-on adjunct to Photoshop itself, with few advantages and some unpleasant side effects like chewed desks and hair loss.
This was unfortunate, because when File Browser grew into its awkward adolescence with the first iteration of Creative Suite and was renamed Adobe Bridge, it hung on to its reputation of being slow, unwieldy, and of little use. Plus, almost everyone thought it was just for photographers, and so most people—especially designers—ignored it completely. They missed the additional capabilities and performance improvements that the Photoshop team, which owned Bridge at the time, were building into the product.
Adobe didn’t help matters by also ignoring Bridge in the fanfare of announcements about all the spiffy new stuff in each new version of Photoshop, Illustrator, and InDesign. They didn’t explain Bridge—ever. If the annual presentations at Adobe
MAX were any indication, Bridge was an embarrassing stepchild, never allowed to party with the grownups.
This nihilism permeated Adobe, and a few years ago the Photoshop team announced in their private beta forum that, since “nobody was using Bridge” Adobe had decided they were going to phase it out!
Well! If you ever doubted the power of strident protest, know that the howls of fury were loud enough to reach far beyond the Photoshop team, past the marketing department, through several layers of management, and deep into Adobe’s dark and mysterious corridors of power. It is said that the CEO’s desk trembled, although that may be apocryphal. The torches and pitchforks may have had some influence, however.
The result was that not only has Bridge not gone away, it has been liberated from its Photoshop overlords and now has its own engineering team and prerelease (beta) program. It is a full-fledged, standalone product in the pantheon of Creative Cloud applications. At Adobe MAX 2020, for the first time ever, a presentation was devoted to Bridge.
We’ve come a long way, baby.
What Is Bridge Actually Used For?
Bridge is, at its most basic, an asset manager. The most basic asset manager is part of your operating system itself: Explorer (Windows) and Finder (macOS) allow you to organize, copy, move, and view files on local or network storage, but they are only a starting point. Bridge offers much, much more.
If you need any convincing that Bridge is a big deal for InDesign users, consider that when David Blatner and Anne-Marie Concepción gave their CreativePro Week 2020 presentation, “The Best of InDesignSecrets,” the first two tips were about Bridge.
The answers to “What is it for?” fall roughly into three categories:
- Asset management
- Workflow acceleration
- “Wow, I didn’t know you could do that!”
I like to think of Bridge’s four basic skills as: See, Search, Sort, and Select.
See: Viewing Your Assets
There are many different ways you might want to look at your assets, and Bridge gives you choices. Like InDesign, Bridge comes with predefined workspaces and lets you build your own. Changes you make to the view in Bridge, such as resizing panels or shuffling them around, are sticky, just like in InDesign. Unfortunately, unlike in InDesign, you can’t reset just one workspace. It’s an all-or-nothing Reset Standard Workspaces option.
The default workspace is called Essentials (Figure 1), which is much like Explorer or Finder, only with better thumbnails and your choice of info under them. The Content panel is front and center, surrounded by an assortment of other useful stuff. By default, each thumbnail shows the file name below, but you can change that with a quick visit to the Preferences dialog box.
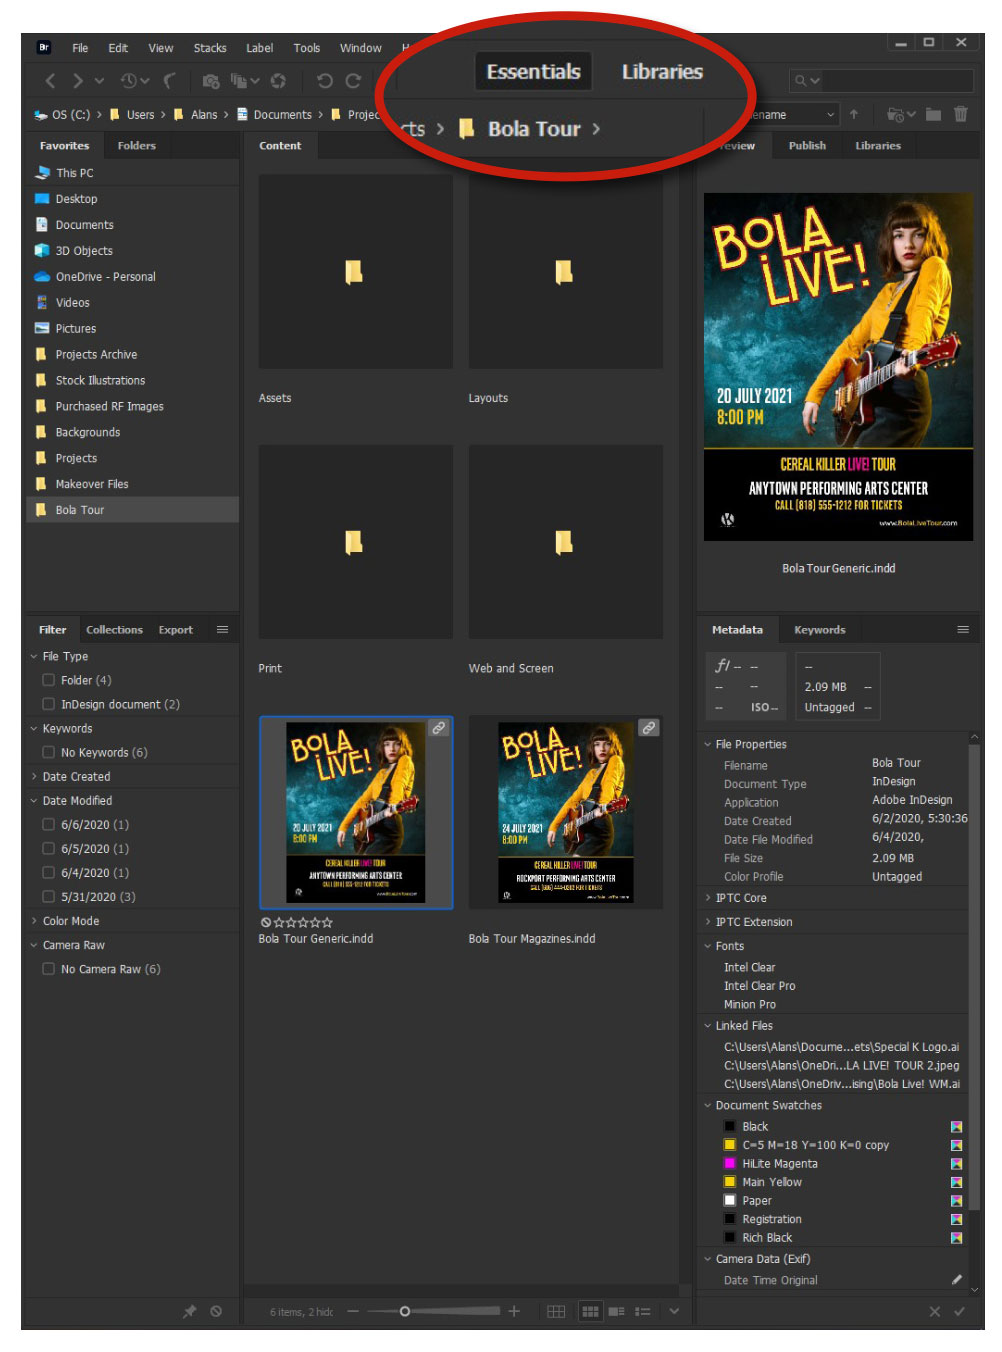
Figure 1. The Bridge Essentials workspace
In Bridge’s Preferences, choose Thumbnails; there the Details area lets you choose what you want to show (Figure 2). In this case, I want to see only dimensions and file size. Depending on the size of your monitor and your workflow needs, you could show more or less. Oh, one other helpful tip: Turning on Show Metadata on Hover gets you a tooltip-style popup with the file’s basic metadata.
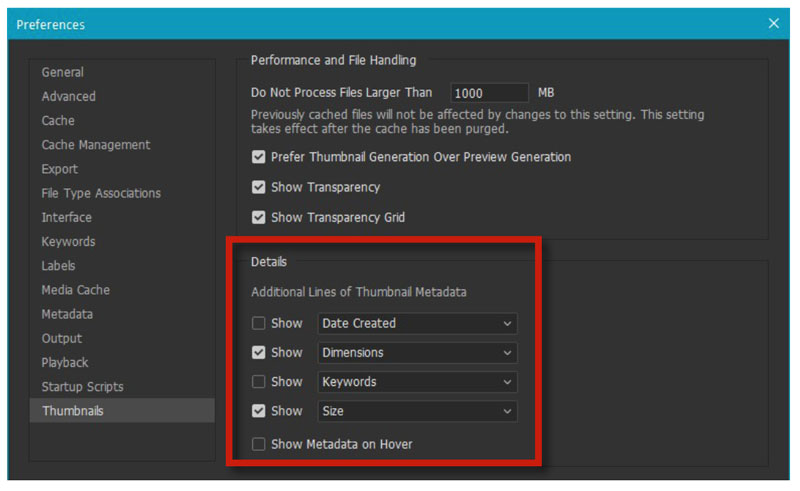
Figure 2. Set your preferences for thumbnails.
A quick look
Depending on your InDesign Preferences settings, Bridge will let you page through your INDD files in the Preview window. By default, InDesign saves only two pages of a small thumbnail size, but you can change both the number of pages and the size of the thumbnails (Figure 3). The larger the saved thumbnail and the more pages, the larger the InDesign file will be.
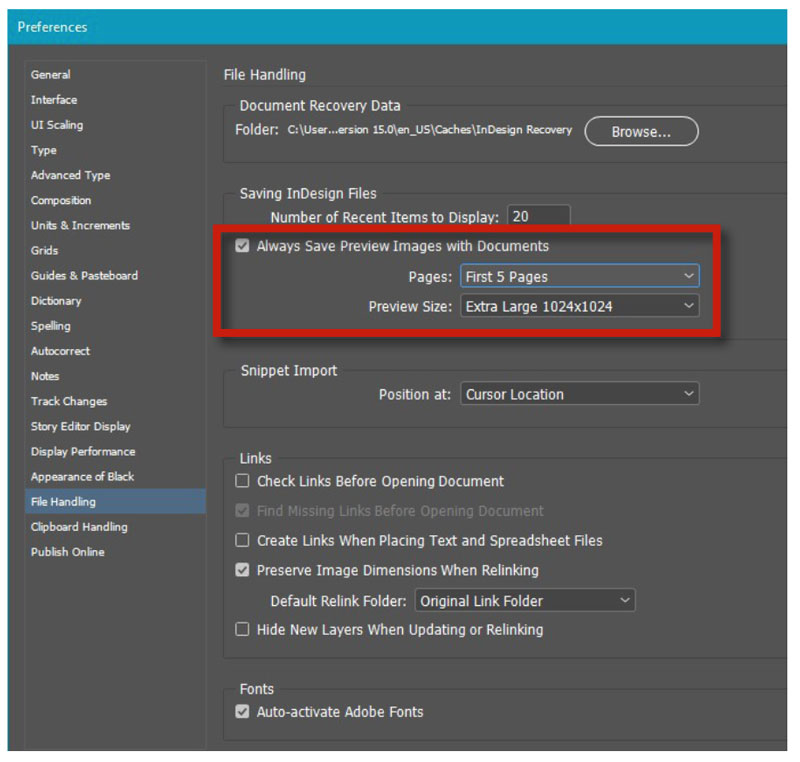
Figure 3. Bridge lets you save multi-page previews.
You can also page through PDFs, preview audio or video files, or flip through multiple artboards in Illustrator files.
Resize or look closer
You can change the size of the thumbnails Bridge displays using the familiar Ctrl/Command+plus and Ctrl/Command+minus shortcuts, or by adjusting the slider at the bottom of the panel. Bridge will show proper thumbnails for all your Creative Cloud design file types.
For a super close-up look at image files, use Bridge’s full screen view: Select an image, and press the spacebar. The image will fill the screen, resampled to fit if it’s too large. Click the image once to see it at its full native resolution. (In the “Select” portion of this article, I’ll cover another important viewing option: Review mode.)
Most of the time you want to see files in the current folder (Figure 4), but sometimes you might need to see what’s in the subfolders, too.

Figure 4. The default view shows just the contents of the current folder.
In the View menu, select Show Items From Subfolders (Figure 5), wait a few seconds, and the entire contents of the folder tree appears (Figure 6).

Figure 5. In the View menu, turn on Show Items From Subfolders.

Figure 6. The entire contents of the folder tree becomes visible.
Camera Raw and Develop settings
I won’t get into all the ways that Bridge works with Adobe Camera Raw and Photoshop, but one visual feature that is useful for designers is that Bridge will show image thumbnails for raw or DNG (Adobe’s open digital negative format) files the way they look with any adjustments (aka Develop settings) that have been applied. This is a big advantage compared to the view that Explorer or Finder provides.
A plenitude of panels
The Favorites panel (Figure 7) is yours to command. Bridge puts a few things there by default, but you can add or remove folders or individual files, as you need. Keep the folders you access most often at the top of the list, and drag in key folders (or right-click any item and choose Add to Favorites) for current projects while they are active. This little workflow convenience can save a ton of time when you are working on several projects simultaneously.

Figure 7. The Favorites panel is for your most-frequently accessed items.
Docked with Favorites is a Folders panel, in case you want to browse your OS directory structure from inside Bridge.
Below these is the Filter panel (Figure 8), a fantastically useful feature that lets you select only the items you want to see and hide the rest. As an InDesign project progresses, its key folders tend to accumulate multiple versions, PDFs of those versions, assorted notes, scans of design sketches, and more. Before long, you’re having to scroll to get to the file you want to open or view. This is when the Filter panel becomes your best friend. The more files there are, the more useful it becomes.
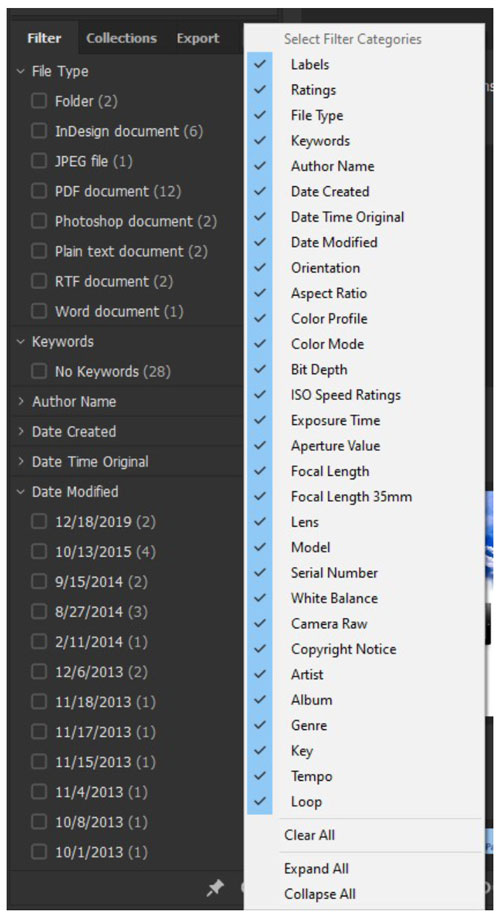
Figure 8. The Filter panel lets you filter using a dizzying range of metadata types, but you don’t need to use them all.
In situations like the example in Figure 6 where we viewed all the items in a bazillion subfolders, the sea of thumbnails becomes instantly manageable when you can choose to see only what you need. In this example, I only need JPGs and PNGs (Figure 9), 93 files out of 417. Everything else disappears thanks to the Filter panel. And it’s not just time saved—your concentration isn’t broken by having to scroll for one file in a sea of thumbnails.
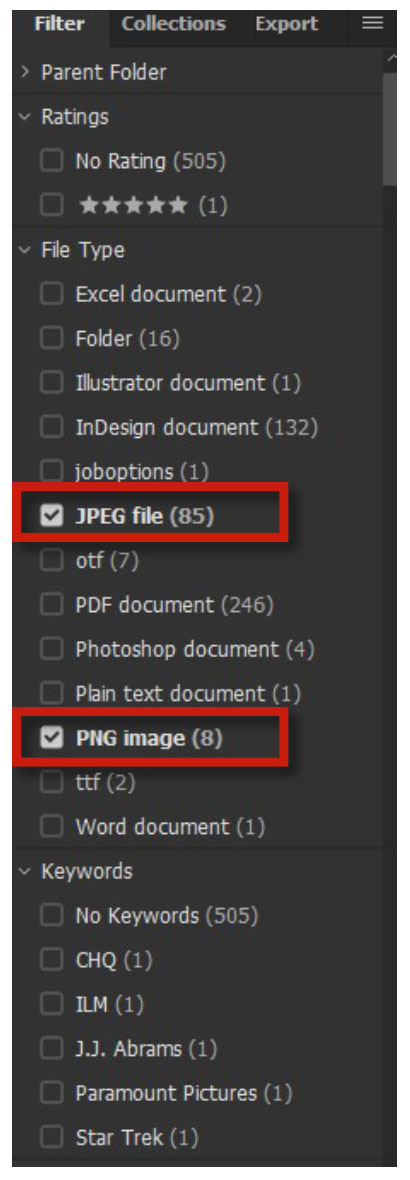
Figure 9. These filter selections will allow only JPEG and PNG images to show in the Content panel.
You can filter by date, by type of file, by keyword, by rating, or by color profile. If you want to see only the InDesign files that were modified in the last few days, or just the five-star rated Photoshop images but not the rest, a couple of clicks makes everything else vanish. And it’s fast. Your scroll wheel will thank you.
The Filter panel is my most-used panel after Contents, by far.
But it gets better!
Notice the little pin icon at the bottom of Figure 8? Normally, Bridge will clear your filter selections when you switch to a different folder, but if you want to browse in several places while keeping the same filter settings, click that pin icon to make them sticky. Click again to toggle off the “stickiness.” To clear all your filter selections at once, click the No Parking icon—it’s hidden behind the menu in Figure 8, but is really there, I promise.
Over on the right side of the default Bridge window is the Preview panel (which is self-explanatory). Below it, the Metadata and Keywords panels are docked together (Figure 10).
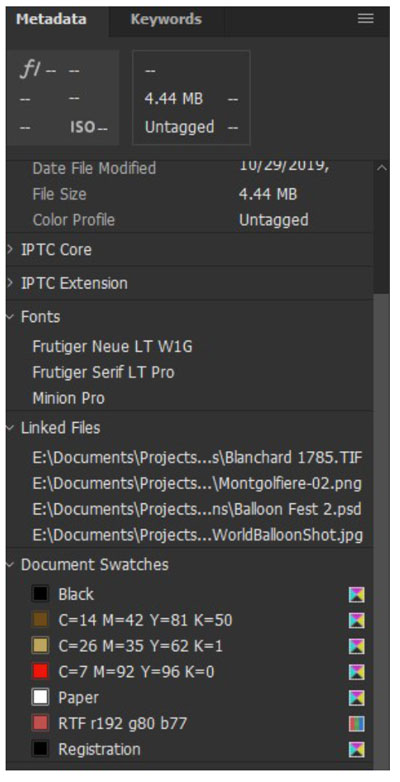
Figure 10. The Metadata panel shows the fonts, linked files, and swatches in an InDesign document.
Metadata
Every file on your computer has metadata, descriptive information that is often defined as “data about data.” A file name and its creation date are the most basic metadata, and if you’ve used any media player app you’re familiar with Artist and Genre categories, which are also metadata. Everything that shows up in a File Info window on your computer is metadata.
Bridge not only lets you see the metadata for a file, it allows you to add or edit copyright information, file descriptions, and many other details that are too numerous to cover here. You can edit them in the Metadata panel or by right-clicking the document thumbnail in the Content panel and choosing File Info. Adding text to the Description field for images or illustrations is a common way to automate adding captions when they are placed in InDesign.
For InDesign documents, the Metadata panel shows the version of InDesign used to create the file, the color profile, the fonts used, all linked files, and color swatches (Figure 10).
Keywords are another kind of metadata usually associated with images, whether your own or licensed stock, but you can add keywords to most types of documents, including InDesign’s INDD and IDML files but not INDB (book) or ASE (Adobe Swatch Exchange) files. Add client and project names or descriptive tags such as Magazine Ad to your InDesign, Photoshop, and Illustrator files to make them instantly searchable wherever they are stored.
Bridge makes it easy to add or remove keywords and supports keyword hierarchy. In Figure 11, I selected a shot of an 18th century ironworks built deep inside a gorge from a visit to a mountain village in the Italian Alps; selecting Alps also automatically selected parent keywords Mountains and Landscape, while selecting Ruins also checked the parent keyword Buildings.

Figure 11. Keywords are easy to add to any type of file in Bridge.
More workspaces
Bridge offers plenty of useful workspaces beyond the default Essentials. You can choose one from the Control panel at the top of the window or from the Window > Workspace menu. The first six on the list also have their own keyboard shortcuts.
Libraries workspace and Libraries panel
Of course, Bridge can also show your CC Libraries (well, assuming you’re online and logged in). Choosing the Libraries workspace (Figure 12) gets you a big Preview window in the middle, the Libraries panel on the right, and your current choice of content in the Content panel.

Figure 12. The Libraries workspace lets you see large previews of items in a CC Library.
The main use of this workspace as currently implemented is to afford a larger view of a CC Library asset than you can get from the Library panel in Bridge or InDesign. That may change as Adobe adds more features to CC Libraries and to Bridge.
The Libraries panel is available in any workspace. You can drag items from the Content panel, individually or en masse, into the currently visible library. For now, this doesn’t work the other way around. You can’t drag, say, a stock image into Bridge from the Libraries panel.
Filmstrip and Preview workspaces
When you need to pick just the right image for a layout, you want to see it large, not as a thumbnail or a small preview. The Filmstrip and Preview workspaces help.
As their names suggest, both workspaces put a big Preview panel in the middle of the window. Filmstrip places the Content panel thumbnails in a strip at the bottom (Figure 13a). Preview is the same, only it puts the thumbnails down the left side. The Preview workspace is not one of the default choices and doesn’t have a keyboard shortcut, so the only way to activate it is to choose it from the list shown in Figure 13B.

Figure 13a. The Filmstrip workspace turns the Content panel into a “filmstrip” under the enlarged Preview panel.
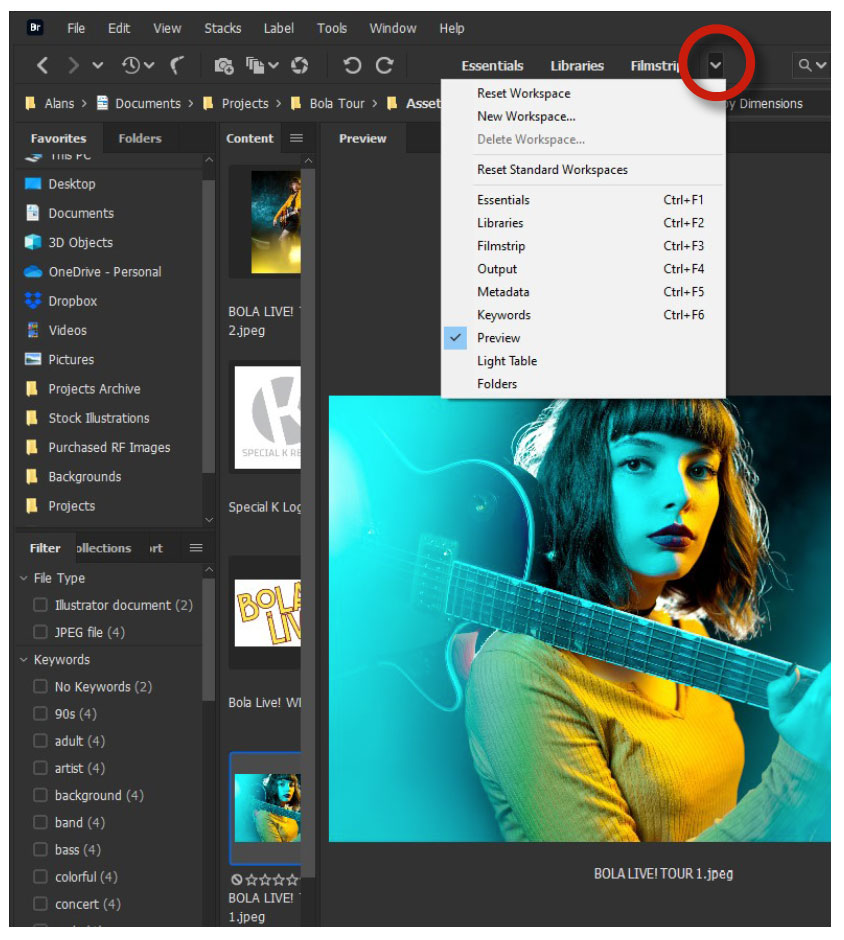
Figure 13b. The Preview workspace is like the Filmstrip workspace, but places the thumbnails to the left. You must select it from the Workspace menu as it has no keyboard shortcut.
The currently selected image—because you’re most likely to use this for choosing images to place in InDesign—shows up fat and sassy in the now-enormous Preview panel.
Light Table workspace
For those old enough to remember, there was a time when selecting the best images from a photo shoot involved hours of crouching over an illuminated table viewing a set of transparencies with a magnifier, shuffling them around into the easiest order to work with.
Bridge’s Light Table workspace (Figure 14) hides all the panels except Content. You and your art director can now shuffle a magazine shoot or set of travel shots to your hearts’ content. The moment you drag an image to a new position in the window, Bridge selects Sort Manually as its sort order, so things will always stay where you put them. (This works in any workspace, not just Light Table.)

Figure 14. The Light Table workspace acts like an old-time art director’s light table. It has no keyboard shortcut, so select it using the workspace menu.
Although you can pick Light Table from the Windows > Workspace menu, it’s often simpler and faster to just press the Tab key, which toggles all the other panels on and off just like in Photoshop, InDesign, or Illustrator, so that the Content panel fills the window just like the Light Table view. Pressing Tab again takes you back to the workspace you were in.
Search: Finding the Files You Need
Bridge is a DAM, a Digital Asset Manager. DAMs are a class of software designed to keep your files organized, categorized, viewable, and easy to find. Although not as full-featured as an enterprise-class DAM, such as Extensis Portfolio, Bridge has plenty of moxie to help you keep fugitive files and feral folders under tight control. (See Issue #109 for a deep dive on DAMs.)
For InDesign users, Bridge’s two big “where is that *!$#% file!?” features are its powerful Search function, which goes far beyond Search in Windows or Spotlight in macOS, and something called Linked Files. First, let’s dive into Search.
Simple search
The Search field in Bridge is at the top right of the window, beside the telltale magnifier icon in the Control panel.
By default, Search in Bridge will look in the current folder and all subfolders for a matching file name or keyword. In my folder of licensed stock photography, a search for frog returns seven images tagged with frog as a keyword, shown in Figure 15.

Figure 15. Find the frogs! A default search looks in the current folder and any subfolders. As with Search (Windows) or Spotlight (macOS), just type what you’re looking for into the search field.
You have other choices, however. The Search menu (Figure 16) offers OS-level search in the current folder or the entire computer.
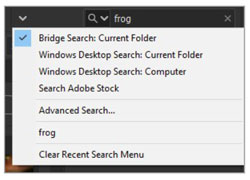
Figure 16. The Search menu offers OS-level search and even lets you search Adobe Stock.
A search for frog using Windows Desktop Search: Computer (in macOS this would be Spotlight) returns what you see in Figure 17: the 7 images, 2 folders with frog in their names, 24 frog sound recordings from my stock audio library, and a couple of other items.
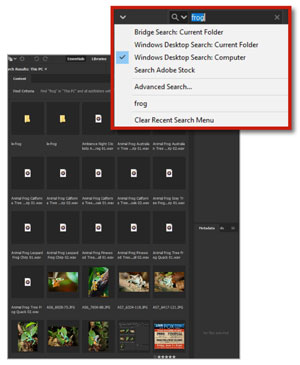
Figure 17. Search is very quick to return results from anywhere on the system.
Then there’s Search Adobe Stock. This opens the Adobe Stock website with your account signed in, runs the search, and, in this case, returns 204,631 results for frog.
Serious searches
Sometimes what you’re looking for goes way beyond just a file name or keyword, and you need more serious search tools. Choosing Advanced Search from the menu opens a new dialog (Figure 18) pregnant with possibility for the serious searcher.

Figure 18. The Advanced Search dialog offers powerful and flexible search options.
How can you use Advanced Search to enhance your froggy search? The first field, Look In, offers a long list of choices (Figure 19). Let’s say you need a frog image that’s at least 3,000 pixels wide, which you know must be somewhere in the Pictures folder because you’re a neatnik (well, I am) and every image you own is there, even if it’s also in a Links folder or two.
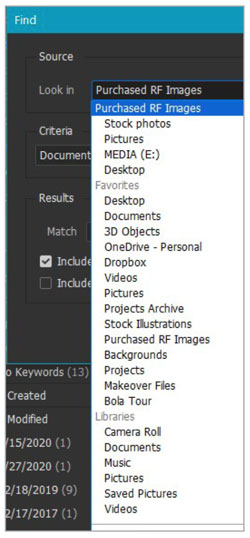
Figure 19. In Advanced Search, you can make a detail choice of where Bridge should look.
First, specify that Keywords contains frog, then click the + sign to the right of that field to add a second requirement: Width is greater than 3,000. The Match field under Results offers two choices: “If all criteria are met” or “If any criteria are met.” In this case you want both a keyword of frog and a width of over 3,000 pixels. Finally, select checkbox for Include All Subfolders. Figure 20 shows the completed dialog box.
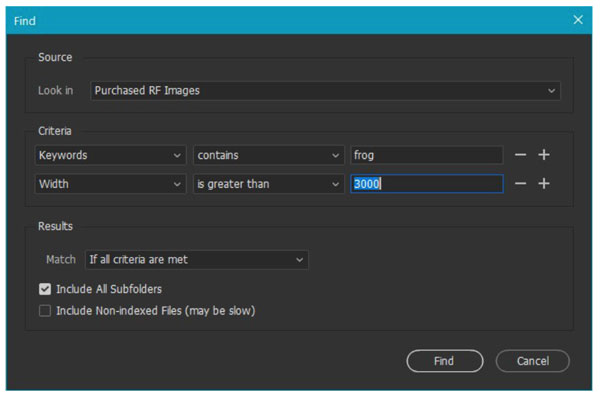
Figure 20. Advanced search for frog images more than 3,000 pixels wide
One of the seven frog images is too small, so this search returns only six (Figure 21).
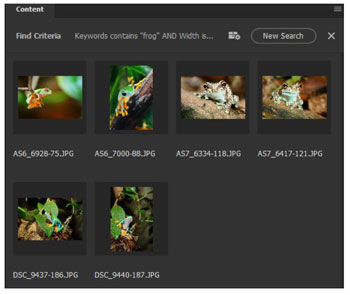
Figure 21. Search returns its results in the Content panel. There are only six frog images greater than 3000 pixels wide.
Now let’s try something a little more esoteric. I need to find a 16-bit Photoshop image of the Matterhorn that’s at least 4,000 pixels wide for a calendar layout. The search settings shown in Figure 22 return 4 images out of 157 PSD files in the Pictures folder (Figure 23).
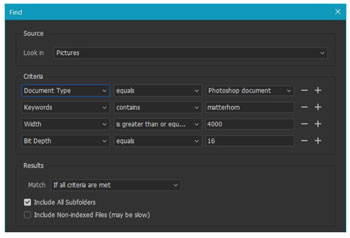
Figure 22. More complex searches are easy using Advanced Search.
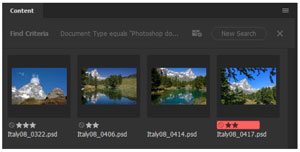
Figure 23. Only four PSD files of more than 150 match our search criteria.
Linked files
The Links panel in a typical InDesign document has a few (or many) placed raster images, perhaps an Illustrator artboard or two, some Photoshop composites, or other file types. These placed files could have come from anywhere among our forest of folders on diverse drives and nested network folders, or from the cloud, Creative or otherwise.
Not that you would ever do this, of course, but sometimes in the mad scramble to meet a deadline, someone might pull files from all over, without keeping careful track of where they come from.
You can expand the Links panel in InDesign to show the location of an asset; but let’s face it, Links panel thumbnails are tiny and the UI is downright awkward. There must be a better way!
Sometimes you need to see all of your placed assets at once, and you may not have InDesign running at that moment. Or, faced with a large number of INDD files (book chapters, for example), you may need to know which ones have placed assets and what they are.
In either case, Bridge is your friend.
If an InDesign document contains placed content, its thumbnail in Bridge is adorned with a tiny link icon in the top-right corner (Figure 24). Right-click the thumbnail and choose Show Linked Files from the context menu (Figure 25).

Figure 24. Notice the tiny Link badge in the top right of the thumbnail, indicating the InDesign document contains linked files.
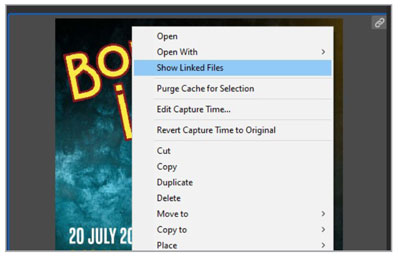
Figure 25. Choose Show Linked Files from the context menu to see all of them in one window, no matter where they are on your system or network.
The Content window instantly displays all the placed items, regardless of where they are physically located. (As of this writing, this works only for files that are on your system. Anything placed from a CC Library won’t show up… to which I’ll add an optimistic “yet.”)
This can be particularly helpful with image-heavy documents, such as catalogs or brochures, where the placed product images may be spread across different folders by category or individual product, but there are many similar uses. If you want to reuse an image from an earlier project, a quick Show Linked Files from the InDesign thumbnail will reveal it, and you can place it in your new document directly from the Content panel.
Fugitive files
What about the opposite case? You know that you used a particular illustration somewhere in some InDesign document, but that was five years ago and you don’t recall which one. For some inexplicable reason, it isn’t in your master folder of illustrations, and you need it now. Or, you have an illustration, and you need to know which documents it’s used in.
Advanced Search to the rescue! David Blatner’s first InDesign tip in his “Best of InDesign Secrets” presentation involves trying to find which InDesign documents contain a placed image with fish in the file name.
I’m not going to spoil it. Just go watch the video at CreativePro and enjoy.
Bridge and Camera Raw
If you have used Adobe Camera Raw or Lightroom to make adjustments to any of your stored images, those adjustments will be stored in the same folder, in a small Extensible Metadata Platform (XMP) “sidecar” file with the same name as the image. These are the Develop settings for that image. You don’t see these extra files in Bridge, but you will in Explorer or Finder.
Any operation inside Bridge will automatically include any sidecar files, even though you can’t see them. Bridge applies Move, Cut, Copy, Paste, or Rename (including Batch Rename) to both the image and its sidecar file so that they never become separated.
Sort: Organizing Files
Bridge offers a far richer set of sorting options than your OS. They can often save time and help you cut through the clutter of a crowded folder so you can keep your attention on the project at hand.
Beyond simply displaying items sorted by file name or date, Bridge offers a literal menu of possibilities in the toolbar (Figure 26).

Figure 26. Use the Sort menu in the toolbar to view your files in any order.
Some are more useful than others:
- Sort by Dimensions shows image files in order of pixel size. I find this more useful than Sort by Size, which looks only at the file size on disk.
- Sort by Color Profile separates CMYK and RGB files.
- Sort by Keywords may be useful, once in a while, but we’ll get to that shortly.
- Sort by Date Created and Sort by Date Modified are helpful when you need to find the earliest or latest iterations of a file. For images, it’s often important to know when you first made a file rather than when you last touched it with Photoshop.
- Sort by Rating and Sort by Label can be big time savers in big folders with large numbers of files, assuming you’ve rated or labeled the ones you are most interested in.
- Sort Manually is what it sounds like. You can sort your files in any way that makes sense for the project you are working on. Simply drag them around inside the window, and they’ll stay where you put them. (As a reminder, any time you drag a thumbnail to a new position in the Content window, Bridge switches to Sort Manually automatically.)
These choices don’t apply only to the folder you’re currently looking at. They are sticky until you change them.
Sort by Date Created and Batch Rename
When you have to put together an album from a wedding or special event where multiple cameras were involved, trying to get them in proper chronological order can be a pain. Two Bridge features make this simple.
Figure 27 shows a set of images taken with two different cameras at the same event; they’re sorted by file name, as you would normally find them. That means all the shots are grouped by camera, Canon or Fuji in this case. The first step is to switch to Sort by Date Created (Figure 28). Now the Canon and Fuji shots are intermingled according to when each shot was taken. This is fine, but Windows and macOS won’t recognize the new ordering and we want it to be permanent.
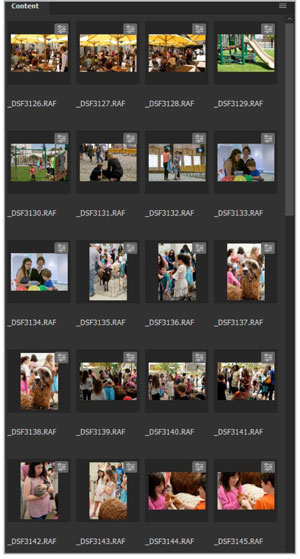
Figure 27. Part of a multi-camera event photo shoot in the default sort order: file names
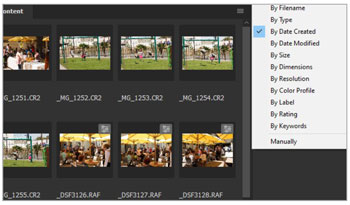
Figure 28. Switching the sort order to By Date Created shows the correct chronological order of the shots.
Now comes the magic part. Bridge has a built-in feature called Batch Rename, activated from the Tools menu or Ctrl/Command+R. Select all (Ctrl/Command+A), and choose Tools > Batch Rename (Figure 29). Take a look at the dialog box (Figure 30), because there’s a lot to unpack here.
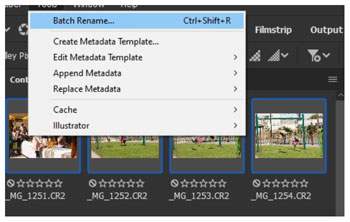
Figure 29. Batch Rename from the Tools menu is one of Bridge’s most powerful tools.

Figure 30. The Batch Rename dialog lets you choose whether to rename in place or move/copy files to a different folder. The rename options are extremely flexible and include adding sequence numbers.
Rename in Same Folder will rename the image files. You could also choose to move or copy them to a different working folder.
In our example, the New Filenames section replaces the file name with the phrase Kids Party_ plus the date, followed by an underscore, and a two-digit—because there are only 98 total images—sequence number. At the bottom of the dialog box you can see a preview of how the renaming will come out to be sure it’s what you want.
The important thing here is that, although we haven’t touched the order of the files on disk, Bridge will use its current sort order when it renames the files (Figure 31). Click Rename, and watch the magic happen!
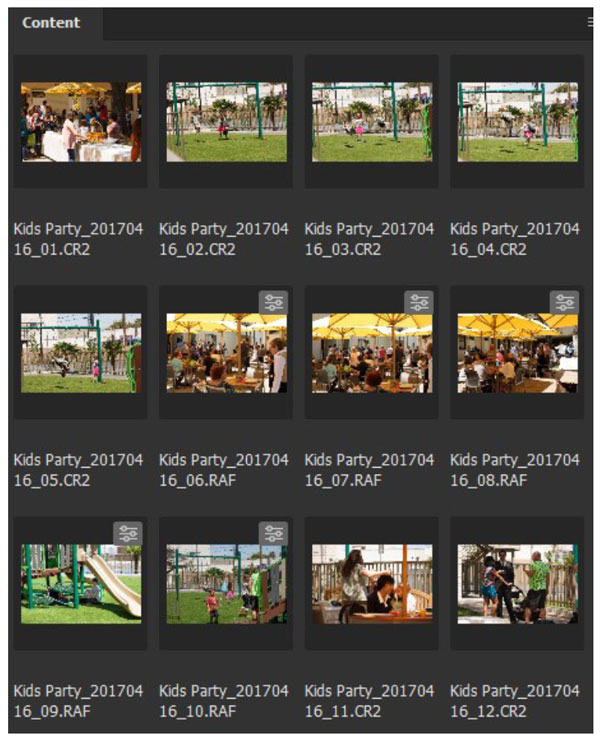
Figure 31. All the files renamed with Batch Rename so they are in the correct time sequence
If you realize that you got the naming wrong, you can use the String Substitution feature to change it, say changing the word Kids to Children in this case. Figure 32 shows that dialog box.
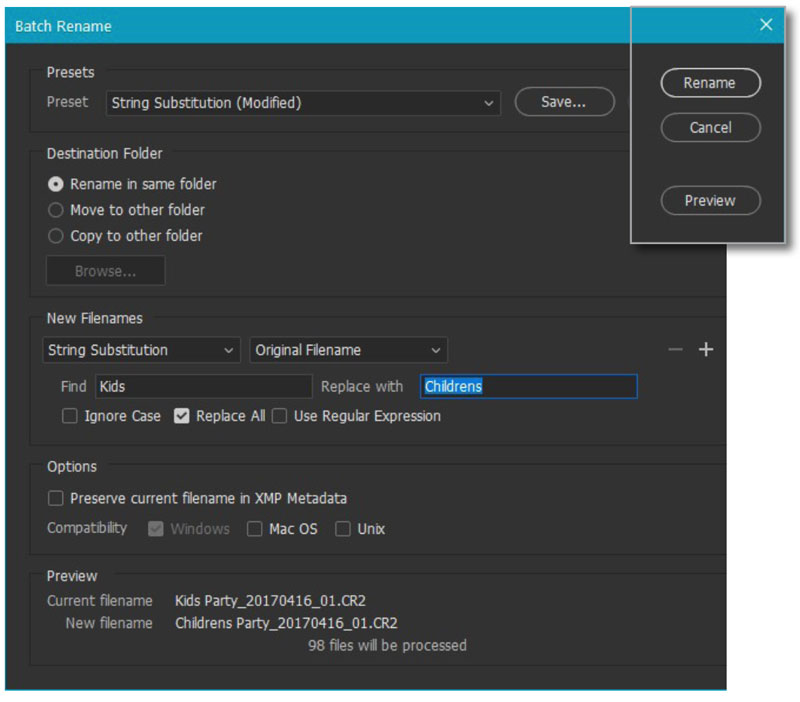
Figure 32. Batch Rename allows String Substitution if you need to modify a set of file names en masse.
Select: Choosing Your Heroes
In the course of building a magazine layout, crafting an ad campaign, or creating a brochure, we accumulate illustrations, sets of alternative layouts, and images galore that go through a process of selection, review, and final approval by the client. So any DAM worth, well, a damn, must have a rich set of selection features.
In Bridge, you can rate each image or illustration (or any file, for that matter) from one to five stars using Ctrl/Command+0, for no rating, through 5, or by clicking the appropriate star (or the No Parking icon) from the set that shows up when the image is selected (Figure 33).
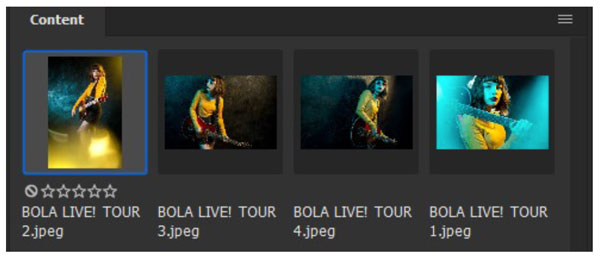
Figure 33. Rating images for a project is an easy single-click.
Bridge also offers a set of labels you can apply to a file. By default, these are as shown in the Label menu in Figure 34.

Figure 34. As a project evolves, you can label artwork for easy identification (and quick access using the Filter panel or Search).
You can change these names (but not the colors) in Preferences (Figure 35) to fit your team’s or your own workflow.

Figure 35. Labels have fixed colors and keyboard shortcuts, but you can change their names to fit the terminology your team prefers.
Notice the keyboard shortcuts, which are also unchangeable and, sadly, only go to 9. Figure 36 shows a typical image folder from a catalog shoot.
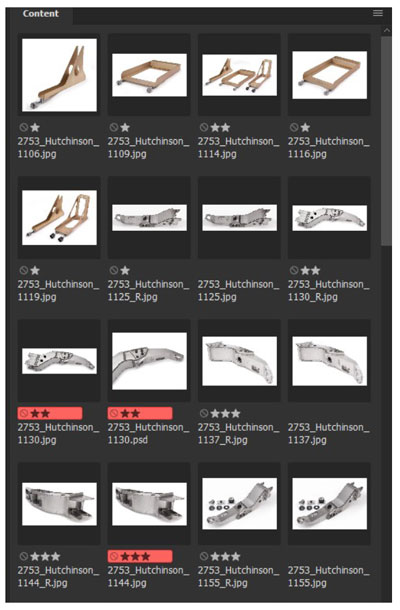
Figure 36. Labeled and rated items show up clearly in the Content panel.
Review mode
As foreshadowed way back, in the “See” section of this article, Bridge has a Review mode (View > Review Mode or Ctrl/Command+B) that is so mind-bogglingly useful that your life story will divide into “before I met Review mode” and “after I became enlightened.” Nothing fancy, just life-changing.
Select a dozen or so images, and press Ctrl/Command+B. Review mode pops them in a full-screen carousel for you to flip through with your arrow keys (Figure 37). This works whether you are working in a single folder or have Show Items From Subfolders active.

Figure 37. In Review Mode you can use the Left and Right Arrow keys to rotate the carousel, Down Arrow to drop an item from the list, and apply ratings or labels using keyboard shortcuts.
While the carousel is up, press H for a heads-up display of all the things you can now do; look it over, and your life will never be the same (Figure 38).

Figure 38. Pressing H reveals the Review Mode Heads-Up Display (HUD). There is an error in the version current at this writing: to show the Loupe you must Ctrl-click on Windows.
As you flip through the images, use the Down Arrow key to “drop” the current front image from the set, allowing you to narrow your choices quickly to just the ones you prefer. As you go, you can rate (1–5) or label (6–9) or mark as rejected (Backspace/Delete) each image, increase (.) or decrease a rating (,), and examine details in an image with the Loupe (Ctrl-click with Windows, simply click with macOS).
Once you have narrowed your selection to just the images you’re interested in, the keyboard shortcut C will make them into a collection, which means it’s time to introduce the next MVF (Massively Valuable Feature): the Collections panel.
Collections
A collection is an arbitrary set of files you need to have quick access to in one place. The Collections panel (Figure 39) is where you gather them.
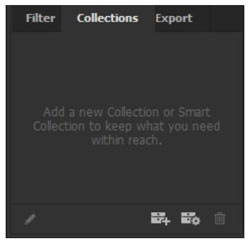
Figure 39. The Collections panel is docked by default with the Filter and Export panels.
The items in a collection can be anything—images, InDesign or Illustrator files, videos, text files, and more—and they can be anywhere on your system or network (but not the cloud). Whether you’re pulling together items for a mood board or managing a complex project, using collections is a great way to cut down on folder navigation and reduce the clutter on your screen and in your creative mind.
Continuing from our Review mode set, Figure 40 shows what happens when you press C for Collection.
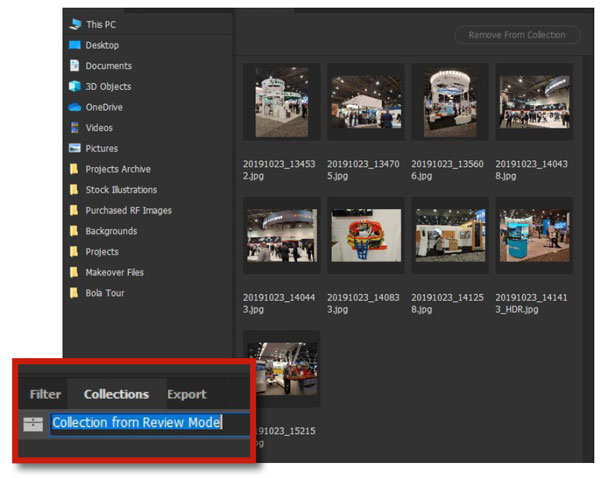
Figure 40. An automatic collection created from the Review mode carousel ready to rename.
Focus shifts to the Collections panel, where you can name the collection for easy identification, and the Content panel shows only the items that you have collected. I called this Trade Show Booth Ideas, and then I navigated to a different folder with more images and dropped some of them onto the collection. It now has 16 images, all accessible in one place (Figure 41).
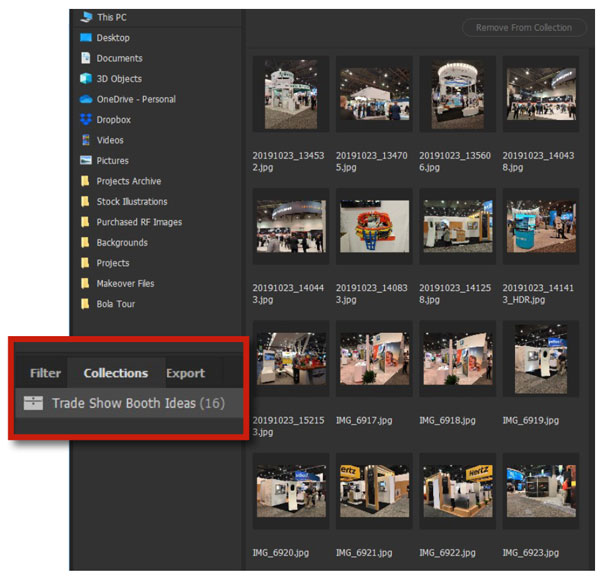
Figure 41. Once the automatic collection is named, you can add more items from anywhere on your system by dropping them onto the collection name.
Whether you create a collection from Review mode or by clicking the New Collection icon in the Collections panel, you end up with a custom-made repository for a project that can save you a ton of time.
As a project evolves, you can add to a collection anytime simply by dragging files onto the collection name in the panel.
Automating search with a Smart Collection
If you have frequent need to do a specific type of search, a Smart Collection is a good way to make it a one-click action. A Smart Collection is really just a saved search query.
Click the New Smart Collection icon to get started. The dialog box looks (and is, in fact) identical to Bridge’s Advanced Search. It will even populate automatically with whatever search you last entered. The one difference, and it’s a useful one, is that you can specify Use Current Folder in the Look In field, so you can perform the same search on any folder you choose.
In the example, I want to see only JPEG or Photoshop images (Figure 42). Once this Smart Collection is saved and named (I called it Image Files), I can navigate to any folder and click the name in the Collections panel to reveal all the JPEG or PSD files in that folder and all its subfolders.

Figure 42. A Smart Collection is like an instant search. One of its most useful features is that you can use it in any folder on your system by choosing Use Current Folder in the Look In menu.
Working Smarter
There are many other workflow speeder-uppers built into Bridge, and I’ve barely scratched the surface, but here are a few tips that can be helpful.
Use the screen, Luke!
Once you begin to get familiar with Bridge, you’re going to want to keep it handy all the time. If you have a multi-monitor setup, give one screen to Bridge so you can drag and drop into your layout. I use an ultra-wide monitor, something I highly recommend, and Bridge is always open. Drag any item into the InDesign window to place it in a layout.
You can take advantage of the your OS’s snap feature that lets you snap a window to one edge of the screen to keep Bridge visible and handy. A free tool from Microsoft called PowerToys takes this one step further for Windows users by allowing you to set up custom screen layouts. Figure 43 shows mine, with Bridge to the right and InDesign, Illustrator, and Photoshop all stacked in identically sized windows on the left. Mac users can take advantage of the SizeUp utility from Irradiated Software to achieve similar results.
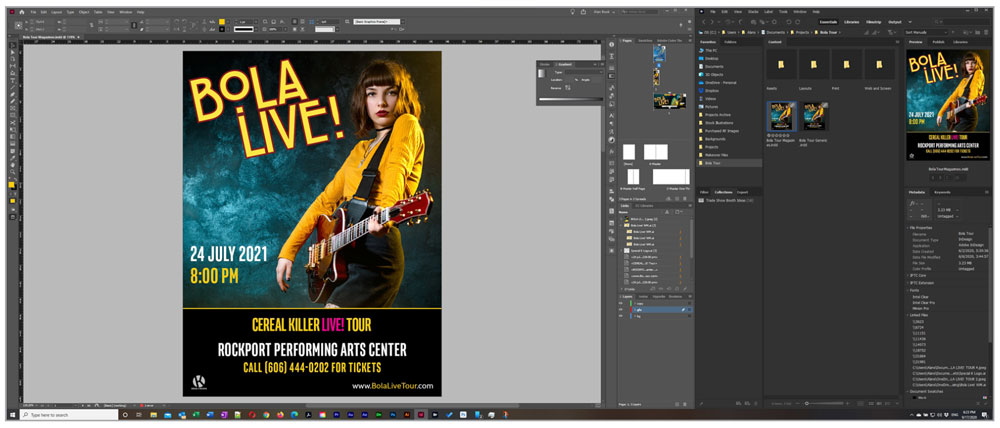
Figure 43. Keep Bridge always visible by opening it on a separate monitor or docking it to one side of your main screen.
For situations where you are real estate challenged, such as when working on a laptop in a random airport hotel room, you can right-click an item in Bridge and choose Place > In InDesign (or InCopy) from the context menu (Figure 44).
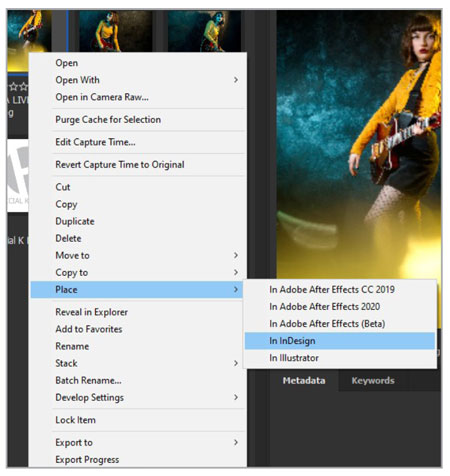
Figure 44. The Place option from the Bridge context menu helps when you can’t keep the application and Bridge windows visible on screen at the same time.
The new Export panel
Tucked in with the Filter and Collections panels, the new Export panel is an astonishingly fast way to create a set of comps to send to a client.
Start by creating a preset like the one in Figure 45. I’ve called it Low Res Comps and set the Saving Options to export to a subfolder called Comps within the same project folder. The preset will save JPG versions at 50% of full size, but you can alternatively specify a maximum width or height using Constrain to Fit.
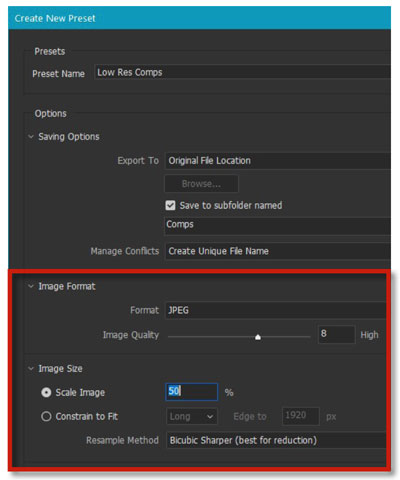
Figure 45. The Export panel dialog lets you create a set of comps or resized images (e.g., for a website) quickly and easily. This is most useful for image files as Export can’t enlarge AI, INDD, or PDF thumbnails.
Drag and drop the images you want to export onto your preset, and then click Start Export. The process is fast.
Fast and easy captions
Because Bridge gives you access to all the metadata for a file, you can add a caption using Bridge’s Metadata panel to edit the Description field for the image (Figure 46).
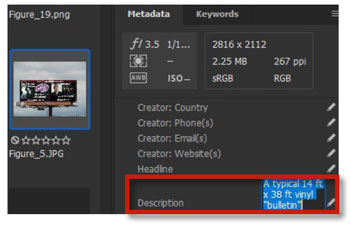
Figure 46. Adding metadata to a file, such as a description for use as a caption in InDesign, is easy.
In InDesign, use Object > Captions > Caption Setup (Figure 47) to target that field in the metadata and automate the process of adding captions when images are placed in InDesign.
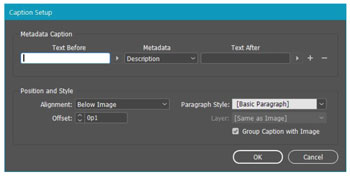
Figure 47. In InDesign, use Object > Captions > Caption Setup to specify the Description field (or any other you choose) to automatically generate a caption for a placed image.
There Is So Much More…
I’ve barely scratched the surface of what Bridge can do. If you’ve never used Bridge, or you thought it was just for Photoshop, crack it open and start exploring! For many of us, Bridge is the hub around which our entire creative workflow revolves. We couldn’t live without it.
Have fun with Bridge, and may you never charge by the hour ever again.
Brand New Bridge Features
The October 2020 release for Bridge (aka version 11.0 or Bridge 2021) included the following notable new features:
Resize images to Fit or Fill In the Export panel you can now choose to resize images so they Fit or Fill a target rectangle area that you define in terms of width, height, and resolution (Figure 48).
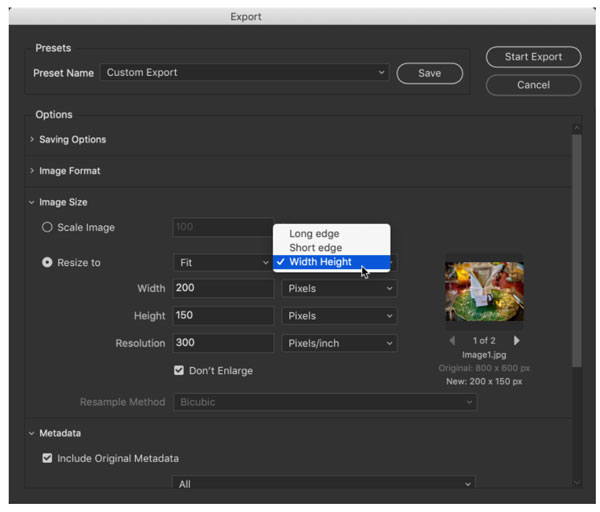
Figure 48. The Resize to Fit feature in Bridge 2021
Video thumbnail previews Just hover your pointer over a video thumbnail to see a quick preview of it without audio.
Encode in Adobe Media Encoder and Adobe Premiere Pro You can quickly send video assets to Adobe Media Encoder and Premiere Pro with new commands in the Tools menu.
Reorder export presets Now you can easily organize the contents of the Export panel by dragging your export presets to arrange them in any order you like. This order will stick across all workspaces.
For a full run-down of what’s new in Bridge (including some important bug fixes), see this page at Adobe.com.
Commenting is easier and faster when you're logged in!

Recommended for you
InDesign Magazine Issue 130: Accessible PDF
We’re happy to announce that InDesign Magazine Issue #130 (February 2020) i...

InDesign Magazine Issue 66: Workarounds
We’re happy to announce that InDesign Magazine Issue 66 (October, 2014) is...

20 Desert Island Typefaces
If you could use only twenty typefaces for the rest of your life, which ones wou...