
Resizing InDesign Layouts
Erica Gamet details the techniques to use when you need to change pages sizes after designing a layout.

This article appears in Issue 120 of InDesign Magazine.
Whether you have a client who keeps changing their mind, or you have to repurpose content in different formats, you know that the resize struggle is real.
There are many ways to change an InDesign file’s page size, switch up the orientation, or make changes to the margins. It’s quite easy, as you’ll see in a moment. But along with those changes, you’ll probably want to adjust the items on the page as well—resizing text and graphic frames, adjusting the position of objects, and so on. Unfortunately, that is often much trickier.
Like so many things in InDesign, there are many ways to resize a layout. Depending on several factors, including your version of InDesign and workflow needs, you’ll need to pick the path that works best for you. Let’s look at each of the methods InDesign offers for this task.
Document Setup
Once the need arises to change up the size of the pages, the easiest way—and possibly the simplest—is to visit the Document Setup dialog box (File > Document Setup). This looks a lot like the “legacy” version of the New Document dialog box. Depending on your version of InDesign, the Document Setup dialog box will present you with most or all of the same options you chose when creating the document, most notably size, orientation, bleed, and margins (Figure 1). (Older versions of InDesign do not include the margin options.)
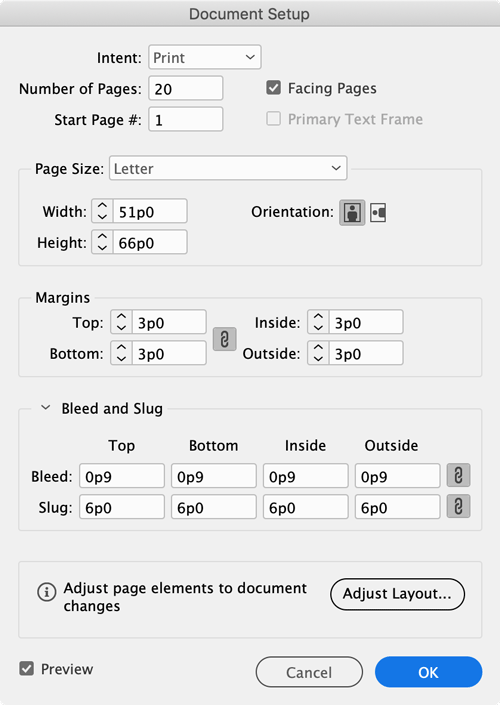
Figure 1
The settings you make here affect the page geometry only—that is, they don’t change the items on the pages. So, for example, if you make your page size larger, all the frames and objects on your page will appear the same, clumped together in the middle of
the page or spread. After making these changes, you will most likely need to manually adjust any page elements.
Because Document Setup doesn’t affect page objects, I rarely use it, except to correct something I overlooked when creating the documents (such as using non-facing pages or setting an incorrect bleed amount).
If you’re using CC2019 or later, you’ll also see the Adjust Layout button in the Document Setup dialog box. That actually takes you to a completely different feature, which does adjust page elements for you. I’ll talk about that in just a moment.
Pages Panel
Document Setup attempts to change all the pages in your document (including your master pages). If you just want to change the size of a specific page, or only some of the pages of your document, the quickest way is to use the Pages panel. Way down at the bottom of that panel is the Edit Page Size button. First select the pages in the panel that you want to affect; then click the button to choose one of the common page sizes in the list (Figure 2). You can also create a custom size here and have it available for future use. To create one, choose Custom at the bottom of the pull-down menu, enter a size and orientation, name the new layout, and click OK.
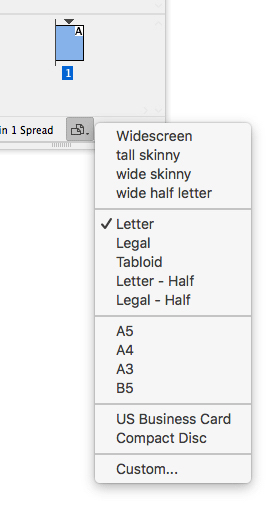
Figure 2
The orientation is built into the custom sizes. That is, if you want a “landscape A4” size, you’ll have to build a custom size that is A4-sized but wider than it is tall. Alternatively, you can use the Page tool, as described next.
Page Tool
InDesign’s Page tool gives you a quick way to adjust selected pages in your document. First, select the Page tool, and then click directly on a page or choose a range of pages. (You can select the pages in the Pages panel, or click with the Page tool on the page itself.) At that point, the page options will appear in Control panel (Figure 3).

Figure 3
These controls let you:
- Change the page size, either numerically in the Control panel or by using the page handles that appear with the Page tool. (Note that changing the size of the page while dragging these handles just gives you a preview, with the page snapping back when you release the mouse. To get the change to stick, hold down the Option or Alt key while you release.)
- Select a preset page size or create a custom layout.
- Change the page’s orientation.
- Set where the master page items sit in relation to the page.
- Choose whether or not to allow objects to move when the page is repositioned.
- Change a page’s Y-coordinate—that is, the vertical position of the page on the pasteboard. You can also manually move the pages by dragging them with the Page tool.
- Change a page’s X-coordinate—that is, its horizontal position on the pasteboard. However, this is a special case that works only when two or more non-facing pages are on the same spread.
Manipulating Margins
Maybe you just need to change the margins for one or more pages. You can assign new margins to existing pages—either for the current page or to a range of pages selected in the Pages panel—by choosing Margins and Columns from the Layout menu. Keep in mind that pages you create afterwards will still inherit the margins from your master pages. Fortunately, you can adjust the margins on a master page by selecting the master page (or master pages!) in the Pages panel before choosing Layout > Margins and Columns (Figure 4).

Figure 4
However, note that changing margins in the Document Setup or Margins and Columns dialog box will not, by itself, change the position of the objects on your pages. That means you may have to tediously adjust your layouts. Fortunately, there are several ways to tell InDesign to move the objects for you.
Layout Adjustment
In versions earlier than CC2019, the Margins and Columns dialog box offered a checkbox called Enable Layout Adjustment (Figure 5).
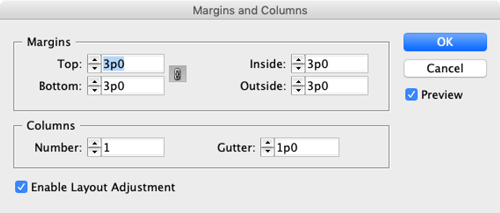
Figure 5
When enabled, this feature would force InDesign to adjust objects on the page to accommodate those new margins. The feature worked well for simple documents (such as single-column book layouts), but required objects to be aligned to margins, guides, and page edges to work. It was a good start, but was often clumsy and haphazard, and not the timesaver many users were hoping for.
Liquid Layouts
InDesign CS6 introduced a new feature called Liquid Layout. Because of its association with Alternate Layouts, which were touted for use in digital publishing, Liquid Layout was often overlooked. But this feature was—and still is—a wonderful option for controlling what happens to items when a page size or orientation is changed.
An example of where this comes in handy is if you want to set up a template for a vertical ad, but you know the page dimensions will change for various publications—in other words, when you want different-sized versions of the same content. The biggest drawback is that for a lot of Liquid Layout’s magic to kick in, you have to manually prep your document with “Liquid Page Rules.”
The easiest way to access these rules is to select the Page tool, click on a page, and choose the rule from the Liquid Page Rule popup menu in the Control panel. Or, if you want to affect multiple pages, you can select them all in the Pages panel, and then choose Layout > Liquid Layout to open the Liquid Layout panel (Figure 6).
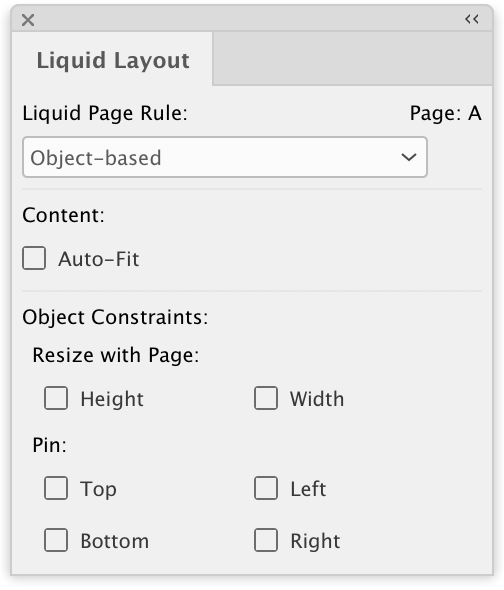
Figure 6
This first step is to set the rule that will govern each page when a change is made (see the sidebar “The Liquid Page Rules”). Each page can have its own rule. Once you choose a rule for the pages that need it, adjust the page size or orientation using the method of your choice, and the objects adjust according to the rule you chose (Figures 7a & 7b).

Figure 7a

Figure 7b
For example, if you choose the Scale rule, all the objects on the page will resize proportionally to fit the new page size. If you need to make a simple change to your document (for example, changing the size from Letter to Letter-Half), this is a simple and quick way to adjust all the objects on the page.
The Liquid Page Rules
InDesign’s Liquid Layout features are a powerful way to control how objects on your page will behave when the page size changes. You can choose one of four “liquid page rules”:
- Scale: Scales all the objects on the page to fit within the page as it adjusts. This is the only liquid page rule that scales text.
- Re-center: Re-centers all the objects on the new layout, without scaling or fitting.
- Guide-based: Adjusts all the objects by shrinking or expanding frames that touch special guides (called liquid guides); great for simple pages with few objects, such as one large text frame per page.
- Object-based: This is the most powerful liquid rule: it lets you specify settings for each object on your page. To use this method, use the Page tool to select an object on the page, and then set these options in the Liquid Layout panel:
- Choose whether or not to constrain the object’s height and/or width
- Apply Auto-fit to images, if necessary
- Use the series of circles and dots that appear on the selected object to pin and constrain when and where the adjustment should occur (left, right, top, bottom)
For an in-depth look at Liquid Layout Rules, check out my multi-part article on CreativePro.com
Tip: After you select a rule, you can preview how the new layout will look, and how the objects on the page will resize or reposition. With the Page tool selected, grab one of the handles around the page’s outer edges, and drag. When you’re done previewing, let go of the mouse button; the page snaps back to where it was.
Some of the liquid page rules (especially Object-based or Guide-based) can take quite a bit of setup, but they give you a lot of control over every element on your page. If you make the same adjustments frequently—such as adjusting an ad to fit different sizes—consider setting the Liquid Page Rules and options as part of a template.
Adjust Layout
The two previous options (Layout Adjustment and Liquid Page Rules) are both helpful but frustratingly flawed in their own ways. However, with the release of CC2019, we are pretty close to a button that says, “Make all the changes automatically for me.” This new ability goes by the name Adjust Layout. (Confusing because the name is so similar to the old “Layout Adjustment.”)
Adjust Layout gives us the missing piece of the puzzle when making changes to a document’s layout, that is, when pages are resized or margins have changed, adjusting the elements on the page to fit as well, even if the objects aren’t touching margin guides, and without so much manual prep. That said, while it’s close to a magic button, you will still probably need to make minor tweaks to your layout after adjustment. But we’re getting ahead of ourselves; let’s see how the feature works, first.
You can access the Adjust Layout options in one of four ways: under the File menu, from within the Document Setup dialog box, via the Properties panel, or inside the Margins and Columns dialog box.
The first three options—which all open the same Adjust Layout dialog box—allow you to adjust page size, orientation, margins, and bleeds across the document (Figure 8). However, when you enable Adjust Layout in the Margins and Columns dialog box, it will affect only the current page or selected pages.
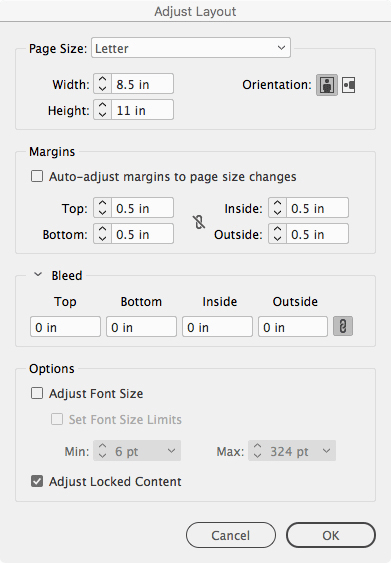
Figure 8
Whichever route you take to get to Adjust Layout, you’ll see the page objects scale and move to fit any new page parameters you’ve entered. Of course, nothing is perfect: vector shapes created in InDesign may change in unexpected ways, so that’s something to keep an eye on. Similarly, anchored objects can occasionally act in crazy ways after resizing.
That said, most objects resize or reposition beautifully with the Adjust Layout feature, even objects that are snapped to the bleed guides! If you’ve ever manually re-adjusted every image and frame to fill back out to the bleed, you know how much time this will save.
I should point out that when graphic frames are resized, how their images are treated depends on the fitting options you may have set prior to the readjustment. For instance, if you chose a fitting option such as Fill Frame Proportionally and turned on the Auto-fit checkbox, the image should continue to honor that setting. Of course, if you don’t like the image fitting results, you can always employ CC2019’s new Content-Aware Fit to each image that needs it after the transformation.
The Adjust Layout feature also gives you the chance to adjust the font size in any affected text frames. This can come in handy when sizing a tabloid-sized poster down to a small ad, for instance. As text frames are reduced in height and width to fit the new layout, InDesign will make a best guess at an appropriate font size so that the text doesn’t become overset in the frame (Figures 9a & 9B). You have the option of setting a minimum and maximum amount, which can keep it from resizing beyond what you think is acceptable.

Figure 9a

Figure 9b
However, if you’ve set up your document using text styles—which I obviously always recommend—choosing the font adjustment option will leave you with a document full of style overrides (Figure 10).

Figure 10
So, while the font size adjustment option might work with short documents like a single page flyer, you may be better off in the long run if you leave that option off and instead adjust the font size by redefining your text styles.
Which resizing route is best?
There are a lot of ways to resize and manipulate pages and the items on the page. Which route you take depends on where your document is, where it needs to go, and how much control you need to have along the way. Here’s an at-a-glance guide to five methods.
DOCUMENT SETUP
- Adjusts most page attributes: size, orientation, bleed, slug, intent, and (in CC 2019) margins
- Objects on the page aren’t affected unless you also have assigned liquid layout rules beforehand
PAGE TOOL
- Can select individual pages, a range, or all pages
- Visually resize and test out the results
- Override liquid layout rules set on each page
- Change size and orientation and create custom page sizes
ENABLE LAYOUT ADJUSTMENT
- Only objects at margins affected
- Results can be less obvious/effective than expected
- Only works on pages that have margins adjusted
LIQUID LAYOUT/LIQUID PAGE RULES
- Control over items and their relationship to the page, margins, and other objects
- Lots of prep necessary for some of the rules
- Each page can have a different rule; one rule per page
ADJUST LAYOUT (new in CC 2019)
- Adjusts objects to margins, rules, guides
- Objects on the page scale and change to fit new layout
- Option to adjust font scaling
Keep in mind that Adjust Layout will affect only pages that don’t have local page-size overrides. That is, individual pages that you’ve resized using the Page tool or via the Pages panel won’t get changed, and there is also no adjustment to the objects on those pages. So if you’re working in a document with several mixed page sizes, you probably won’t get much use out of Adjust Layout.
Also note that neither the Page tool nor the Edit Page Size button in the Pages panel give you access to Adjust Layout. Maybe a future version will give us the option of adjusting the size and layout on a page-by-page basis.
Scripted Solutions
Besides InDesign’s built-in options for resizing documents, you can also make use of a script from Id-Extras called QuickResize ($59). When you run the script, you get a simple dialog box where you enter what you want the document size to be. That’s it. The script takes care of everything else by changing the page size, scaling objects, adjusting grids, etc. Check out Bob Levine’s review in issue #81 for full details.
Ever wish you could resize a page to fit a selected object? You can, with this script written by Peter Kahrel. And if you need help installing the script, read this post.
The Journey Continues
As you can see, there are many ways to adjust the size and layout of your InDesign document, and which route you choose to take depends on many factors. One rule I live by is to pick a direction that works best for your needs and stick with that option. As we’ve seen, each option brings its own set of pros and cons (exactly which are which will be different for everyone), so best to “pick a lane” and stay in it.
While the mechanics of design is a bit of a science, at its core design is an art that involves the human touch. For that reason I doubt we will never have—or trust—a fully-automated process. I’m just grateful for new timesaving features that make layout move quicker, leaving the final say to us humans.
Tips for Resizing
Check out these articles for more on the topic of resizing:
Commenting is easier and faster when you're logged in!

Recommended for you
InDesign Magazine Issue 130: Accessible PDF
We’re happy to announce that InDesign Magazine Issue #130 (February 2020) i...

InDesign How-to Video: Use an InDesign File as a Graphic Part 2
In this week’s InDesignSecrets video, Erica Gamet demonstrates another use for p...
InDesign How-to Video: Create a Hyperlink Style
In this week’s InDesignSecrets video, David Blatner explains how to create a def...