
Adjusting Space Between List Items
Chad Chelius shows how to make great-looking lists with a minimum of hassle.


This article appears in Issue 116 of InDesign Magazine.
I have an obsession with styles. There’s just no way to be efficient in InDesign without them! This is because many of the features in InDesign that make our lives easier—such as table of contents, cross-references, and running headers and footers—all require that you use styles. In addition, many output formats, including EPUB, accessible PDF Files, and HTML also require the use of styles for predictable and quality output. Let’s not forget the fact that styles make editing and updating the visual appearance of a document incredibly fast and easy.
So everyone knows you should have a style for each kind of paragraph in your document—headings, body text, and so on. Unfortunately, sometimes this means having to create two or three different styles for the same kind of paragraph. Case in point: items in a numbered or bulleted list (what some people call ordered or unordered lists).
The Problem with Lists
Let me show you why lists have always been a problem when it comes to paragraph styles. It’s due to InDesign’s inability to account for variances in different situations throughout the text. In Figure 1, you can see a sample of a sidebar that contains a bulleted list and some body text.

Figure 1. A typical example of a list between paragraphs of body text.
The body copy (the main paragraphs in Figure 1) is formatted with a Space After value of 9 points to create a visual separation between the paragraphs. The paragraphs in the list have a style that contains no Space Before or Space After, which keeps them snug together. And this solution works well for most of the paragraphs… but you can see the dilemma that
occurs: although there is reasonable space before the first bulleted item, the last bulleted item is smack up against the top of the next body copy paragraph.
The classic solution
To address this problem in InDesign CC 2018 and earlier, the solution is to create an additional paragraph style. You could create a style named something like body_after_bullet (Figure 2), which adds Space Above, and then apply it to the paragraph after the list; or you could create a new style (such as “bullet_last”) which adds additional Space Below, and apply it to the last bulleted item in the list. Some people take it even further, making three different styles: one for the first item in a list, one for the middle items, and one for the last item in the list.
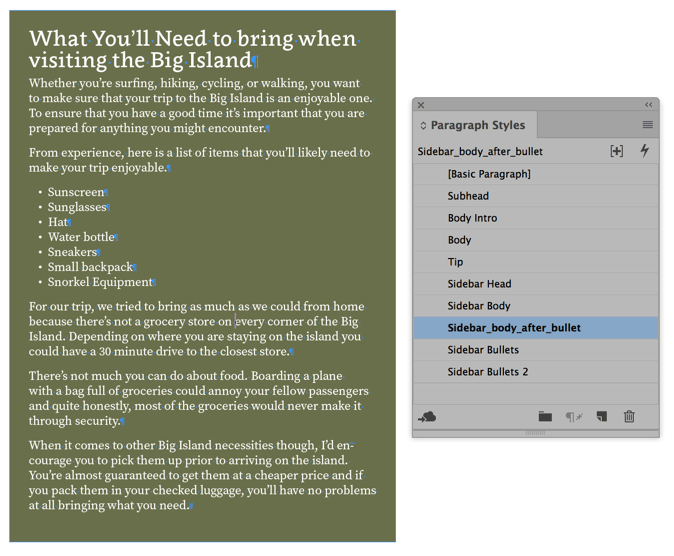
Figure 2. An additional style created to add extra space above the body style that follows the last bullet.
Any of these solutions work. However, they all make applying styles a bit less efficient. Not only do you need to make additional styles (because you have to account for all of the exceptions each time they occur in the text), but if the text changes (for example, a new item is added at the end of the list) you will have to go back and change the styles applied to the paragraphs.
There is also a workaround that involves the Span Columns feature that you can read about in this tip at InDesignSecrets.
Sadly, these workarounds are all we had for almost two decades. It’s madness!
The new solution
Fortunately, the 2019 release of Adobe InDesign finally gives us the ability to address this problem using a much more elegant solution, one that many InDesign users have been requesting for quite some time. The feature is called Space Between Paragraphs Using Same Style, and you’ll find it in the Control panel (in paragraph formatting mode), the Paragraph panel, and the Indents and Spacing section of the Paragraph Style Options dialog box (Figure 3).
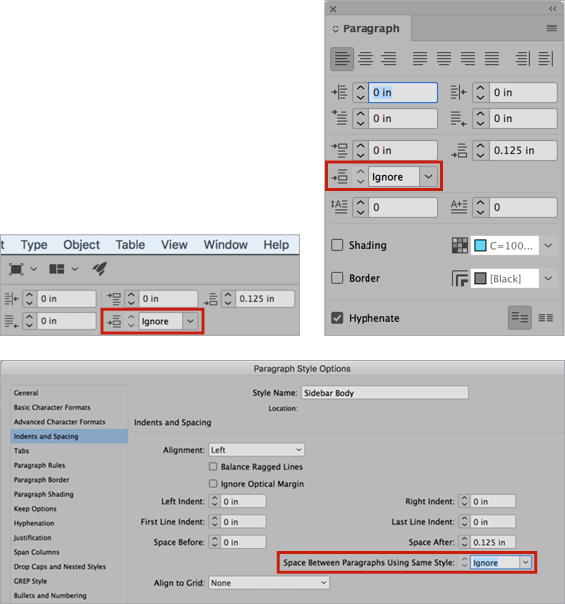
Figure 3. The Space Between Paragraphs Using Same Style options from left to right (the Control panel, the Paragraph panel, and the Paragraph Style Options dialog box).
The Space Between Paragraphs Using Same Style option (yes, it’s a mouthful!) works by controlling the space that is specified between paragraphs with the same style applied. It’s important to understand that the “space” it’s referring to is the Space Before and Space After values defined in the style. Typing an additional return between paragraphs is not counted as additional space between paragraphs! (But you probably know that you shouldn’t add blank paragraphs to control spacing, right? Use Space Before and Space After.)
The default setting for this new feature is “Ignore”—this essentially disables this option, and the styles behave as they have in the past. So when you upgrade to InDesign CC 2019, initially styles will work the same as always.
To enable the Space Between Paragraphs Using Same Style option, you need to choose a value from the drop-down menu or enter a value in the field. Then paragraphs adjacent to one another that use the same style will use the value you chose instead of the Space Before/Space After values defined in the style. For example, if you set this to zero, then InDesign will not add any space between those paragraphs.
Don’t be confused by the default options in the drop-down menu. Adobe has provided a set of default options in 6-point increments for you to choose from; however, you can simply type the exact value that you’d like defined in the field for that drop-down menu (Figure 4).
Figure 4. Entering a value in the Space Between Paragraphs Using Same Style field.
Let’s take our sidebar text example to see how this feature can simplify the process of applying styles while still accounting for differences in applied styles throughout the text. For our Sidebar Body style, we set the value of both Space Before and Space After fields to 9 points. Initially, this is going to add a total of 18 points of space between each successive body paragraph. However, next we’ll enter a value of p9 (or 9 pt) in the Space Between Paragraphs Using Same Style field (Figure 5). That way, the Space Before and Space After values are ignored when successive body paragraphs appear in text. However, when a new style is encountered (such as the bulleted list in our example), the Space Before and Space After values are honored.

Figure 5. Space Before/After values defined as well as the Space Between Paragraphs Using Same Style value.
Another way to achieve the same effect would be first to apply Space Before of 9 points to the body text. Next, apply both a Space Before and Space After of 9 points to the list paragraph style. And finally, set the Space Between Paragraphs Using Same Style value to zero for the list style! One way isn’t better than the other; InDesign just lets you achieve the same result in different ways (Figure 6).

Figure 6. Left: Sidebar with only Space Before and Space After values applied. Right: With Space Between Paragraphs Using Same Style value added.
Elegant, efficient styles
The Space Between Paragraphs Using Same Style option allows InDesign users to minimize the number of styles required to properly format text and to avoid human error(s) that could be caused by forgetting to apply the appropriate style at those critical locations throughout text. Personally, I’m already using this feature in my projects, and I’ve found it to be a nice timesaver.
I think this is a great start, and I commend the InDesign team on their work. I’d love to see them take this feature a step further by adding “if/then” functionality that would allow me to control how much space is utilized when a specific style is encountered. For now though, I’ll enjoy the new functionality that this feature provides.
Commenting is easier and faster when you're logged in!

Recommended for you

A Script to Convert GREP Styles to Character Styles in InDesign
Use this free script to replace GREP Styles with locally applied Character Style...

InDesign How-to Video: How to Create Numbered List Styles
In this week’s InDesignSecrets video, Laurie Ruhlin shows us how to quickly styl...

InDesign Magazine Issue 115: Adobe Stock
Issue 115 of InDesign Magazine include articles on Adobe Stock, CC 2019, ID-Extr...