


If you’re new to Adobe Illustrator, you may be wondering what the big deal is. Many folks are competent using Photoshop and other programs to make print graphics, web comps, and many other types of projects. What makes Illustrator so appealing to users, is that it is a completely vector-based application with incredible flexibility and power for creating designs of all types. Just about anything you create in Adobe Illustrator can be scaled to any size without any degradation in quality or ill effects (don’t try that with a pixel-based image from Photoshop). If that’s not enough, the ease by which you can manipulate content will surely convince you once you take it for a spin.
As an Illustrator user for more than 20 years, I’ve put the program through its paces and have taught many users how to take advantage of the features of Adobe Illustrator to do everything from creating simple logos to creating gauges for locomotive consoles. I’ve discovered over the years that even seasoned users of Adobe Illustrator don’t take advantage of all of the capabilities that Illustrator has to offer. Here’s a list of 5 essential tips that any Illustrator user (but especially a new user) needs to know.
1. Create Global Swatches
Swatches allow designers to save a color for reuse at another time during the design process. Think of a swatch as mixing a can of ink or paint that you’ll be able to open up at a later time and use it to paint something else. Swatches allow users to consistently apply color to objects in their design quickly and efficiently. Often times, new Illustrator users simply mix colors on-demand using either the Color panel or the Color picker. Doing so can lead to inconsistent coloring of objects in a design. Not good if you want your work to look professional.
To make swatches even more powerful, you should always create a Global Swatch. What distinguishes Global swatches from non-global swatches is that Global swatches create a connection between the swatch and the object(s) that the swatch is applied to. With non-global swatches, if you edit the swatch at any point, the swatch will change color, but none of the objects that have been colored using that swatch will update. But with a Global swatch, any change you make to the swatch will immediately update all objects that have been colored using that swatch. You can imagine how useful this is when a client comes back and asks for a color change in your design!
To create a Global swatch, simply click on the New Swatch button at the bottom of the Swatches panel. In the New Swatch dialog box, define the color mode and values for the swatch that you’re creating, but most importantly enable the Global checkbox to make this swatch a Global color.
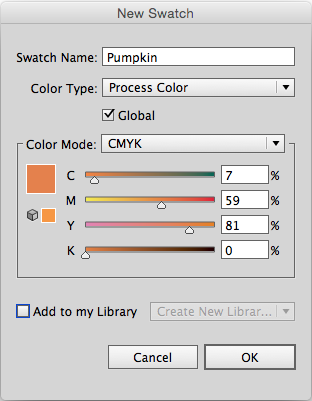
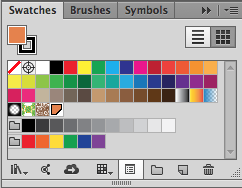
Global colors are easy to identify in the Swatches panel by the small triangle in the lower-right corner of the swatch icon.
2. Learn to Use the Transform tools
Although it’s easy enough to scale and rotate objects using the Selection tool in Illustrator, the Transform tools offer enhanced features that help you to transform objects with more precision and control than the Selection tool. When I speak of the transform tools, I’m referring primarily to the Scale, Rotate, Reflect, and Shear tools. Although technically Adobe categorizes these tools under the classification of Reshaping tools, for the purpose of this article I’ll refer to them as the Transform tools
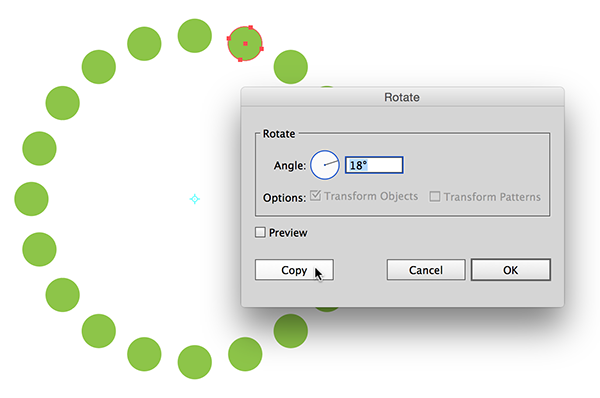
One of the really powerful aspects of the transform tools, is that they utilize a reference point around which the transformation will take place. With an object selected, you’ll notice that a crosshair appears in the center of the selected object by default. So any transformation that you apply with any of the transform tools will be relative to this reference point. But you can change this! With a transform tool selected, click once anywhere relative to the selected object and you’ll define a new transformation point. Now just click and drag to begin the transformation process and the object will be transformed based on this new reference point.
If you want to transform an object precisely, you can Option/Alt + click with a transform tool to display the respective transform dialog box and enter a value for transformation. In addition, if you double click on a transform tool, you can define properties for the transformation. For example, the Scale tool gives you the ability to scale patterns applied to an object as well as the strokes and effects applied to the object as well.
3. Learn to Use the Pen Tool
Many new Illustrator users that I talk to admit that they tried using the Pen tool and after 5 minutes, gave up and accomplished the task using some other time-consuming method. The Pen tool is by no means an easy tool to master, but with a little guidance and practice you’ll be amazed at the power and control you have over editing and creating shapes using the Pen tool. There are plenty of good videos out there on the topic but most importantly, you need to practice. Practice, practice, practice! I can honestly say that it will be one of the best investments of your time in your design career. I say this because Illustrator, InDesign, Photoshop, and Flash all have similar Pen tools, and once you know how to use it in Illustrator, you’ll be able to take advantage of it in all of these Adobe applications.
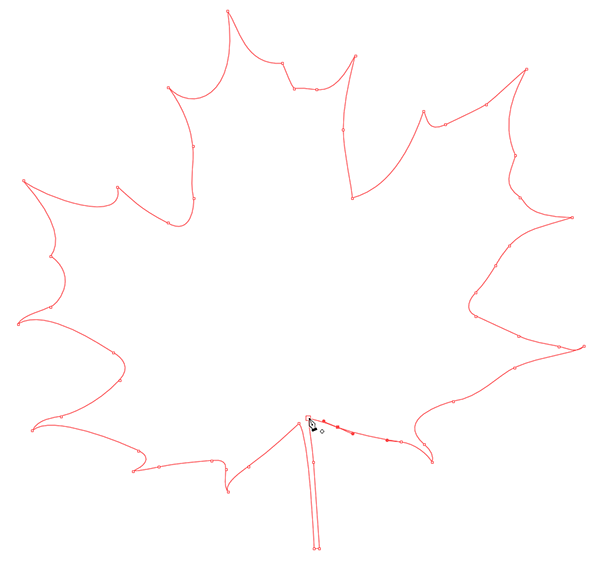
My suggestion is to learn the basics, then start drawing elements in Illustrator. Start with something basic like a heart or a clover, then progress to more complicated objects such as the maple leaf above. The more you practice, the better you’ll get and the more productive you’ll be.
4. Take Advantage of Symbols
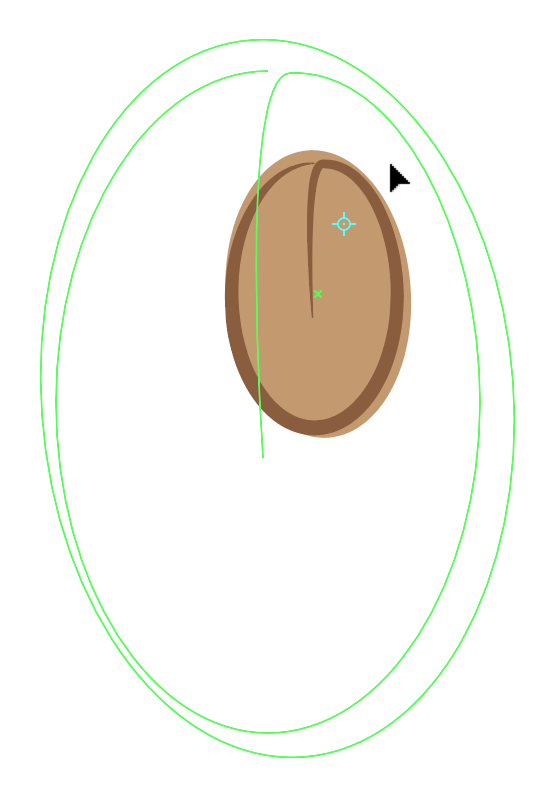
In many designs, artwork may be repeated multiple times to create a desired effect. More often than not, designers will simply duplicate a piece of artwork several times and reposition and resize the copies as needed. Although this method is affective to achieve the desired result, it’s not very effective when the client decides that a piece of repetitive artwork needs to be altered. It doesn’t matter if it’s a color change, size change, or any other change, the process is going to be a manual one. Fortunately, there’s a better way; Illustrator has a feature designed specifically for this situation. That feature is called symbols.
When you create a symbol from a piece of artwork by dragging the artwork to the Symbols panel, you can drag that symbol onto your artboard for re-use as many times as you wish. Furthermore, each time you drag the symbol from the Symbols panel to the artboard, you create a Symbol Instance. A Symbol Instance is tied to that original symbol and updates whenever the symbol is modified, making it incredibly quick and easy to make an adjustment to all of the symbol instances in a document.
To edit a symbol, either double-click on the symbol in the Symbols panel, or double-click on an instance of the symbol on the artboard. This takes you into symbol-editing mode where you can make modifications to the symbol that will update for all instances of the symbol. For example, in the image below, the coffee beans are symbol instances. So, you could edit the symbol to change the fill of one and they would all change.


When using symbols, you can scale, rotate, and reposition the instances and still maintain their connection to the symbol. The 2015 release of Illustrator CC adds a new feature to symbols called Dynamic Symbols which allows users to edit properties of symbol instances while still maintaining their connection to the symbol itself and will still update if the symbol is ever edited. In addition, there are a total of 8 symbolism tools designed to manipulate sets of symbols in various ways.
5. Take Advantage of the Appearance Panel
Another feature that many Illustrator users neglect to learn is the Appearance panel. The Appearance panel provides fine control of the appearance of objects in Illustrator and allows users to create complex appearances out of basic paths. If you draw a shape in Illustrator and open the Appearance panel, you’ll see that Illustrator displays the current fill and stroke of the selected object. All filters applied in Illustrator from the Effect menu will also be displayed in the Appearance panel and it is where you go to make adjustments to those applied effects.
What makes the Appearance panel so powerful, is that you can apply multiple strokes, fills, and effects to a single object, creating incredibly complex designs on a very basic path. Take a look at the example below. I took a single line and applied several strokes to the path layered on top of one another to create a road graphic. With the Appearance panel, all of these attributes are applied to a single object.
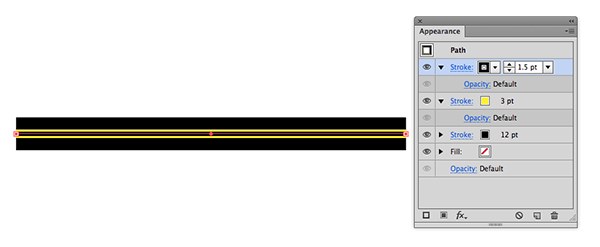
Now, if I need to add a curve to the road, there’s only one path to edit. I can make the change in seconds and it looks perfect. Compare that what you’d have to do if you used three separate paths layered them on top of each other. It would be painstaking work to get the curves to be identical.
Finally, to make appearances even more powerful, you can capture the appearance attributes of an object by saving them as a Graphic Style that can then be re-applied to other objects with the click of a button.
Whether you’re a newbie or a long-time user who never quite mastered Illustrator, try these 5 tips and you’ll be well on your way to being a power user!
This article was last modified on July 28, 2022
This article was first published on March 25, 2016
Commenting is easier and faster when you're logged in!

Recommended for you

AI in Ai
Improve your vector art workflow with new artificial intelligence features in Ad...

Making Abstract Line Art in Illustrator
Learn how to create stunning abstract line art effects and apply them in a varie...
How to Transform Effects While Drawing in Illustrator
Learn how to set up effects ahead of time, so that transformations occur automat...