


Warping point type
The text on a path is more interesting than straight lines would be, but you’ll warp the text to make it more playful. Warping lets you distort type to conform to a variety of shapes, such as an arc or a wave. The warp style you select is an attribute of the type layer—you can change a layer’s warp style at any time to change the overall shape of the warp. Warping options give you precise control over the orientation and perspective of the warp effect.
1. Scroll or use the Hand tool to move the visible area of the image window so that the sentences to the left of the model are in the center of the screen.
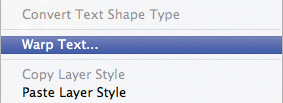
2. Right-click (Windows) or Control-click (Mac OS) the What’s new with Games? layer in the Layers panel, and choose Warp Text from the context menu.
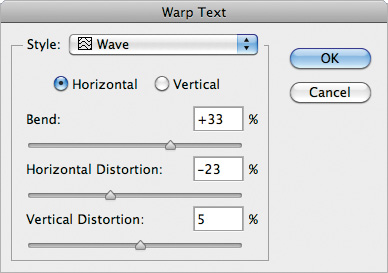
3. In the Warp Text dialog box, choose Wave from the Style menu, and select the Horizontal option. Specify the following values: Bend, +33%; Horizontal Distortion, -23%; and Vertical Distortion, +5%. Then click OK.

The words “What’s new with games?” appear to float like a wave on the cover. Repeat steps 2 and 3 to warp the other two text layers you typed on a path.
4. Save your work.
Designing paragraphs of type
All of the text you’ve written on this cover so far has been a few discrete words or lines—point type. However, many designs call for full paragraphs of text. You can design complete paragraphs of type in Photoshop; you can even apply paragraph styles. You don’t have to switch to a dedicated page layout program for sophisticated paragraph type controls.
Using guides for positioning
You will add paragraphs to the cover in Photoshop. First, you’ll add some guides to the work area to help you position the paragraph, and create a new paragraph style.
1. Drag a guide from the left vertical ruler, placing it approximately 1/4” from the right side of the cover.
2. Drag a guide down from the top horizontal ruler, placing it approximately 2” from the top of the cover.
Adding paragraph type from a sticky note
You’re ready to add the text. In a real design environment, the text might be provided to you in a word-processing document or the body of an email message, which you could copy and paste into Photoshop. Or you might have to type it in. Another easy way to add a bit of text is for the copywriter to attach it to the image file in a sticky note, as we’ve done for you here.
1. Double-click the yellow sticky note in the lower right corner of the image window to open the Notes panel. Expand the Notes panel, if necessary, to see all the text.


2. In the Notes panel, select all the text. Press Ctrl+C (Windows) or Command+C (Mac OS) to copy the text to the clipboard. Close the Notes panel.
Tip: If you accidentally select the “DIGITAL” text, press Shift as you start to drag the text box, and then release it to continue to drag. Pressing Shift ensures that Photoshop creates a new text layer.
3. Select the Model layer. Then, with the Horizontal Type tool, drag a text box on the right side of the magazine cover. The text box should be about 4 inches by 8 inches, about 1/4” from the right edge of the cover. Align the top and right edges using the guides you just added.
4. Press Ctrl+V (Windows) or Command+V (Mac OS) to paste the text. The new text layer is at the top of the Layers panel, so the text appears in front of the model.
The pasted text is huge, because your default is set to 144 pt text. You’ll change it all to a readable size before stylizing it.
5. Click in the pasted text, and press Ctrl+A (Windows) or Command+A (Mac OS) to select all the text. Then change its size to 18 pt in the Character panel.
6. Select the first three lines (“The Trend Issue”), and then apply the following settings in the Character panel:
• Font Family: Myriad Pro (or another sans serif font)
• Font Style: Regular
• Font Size: 70 pt
• Leading: 55 pt
• Color: White
7. Click the Paragraph tab in the Character panel group to make the Paragraph panel active.
8. With “The Trend Issue” still selected, click the Right Align Text option.
9. Click the Character tab to open the Character panel again. Then select just the
word “Trend,” and change the Font Style to Bold.
10. Click the Commit Any Current Edits button in the options bar.
11. Click in the blank area of the Layers panel to ensure that no layers are selected.

You’ve formatted the title.
Creating paragraph styles
You’ll create a paragraph style to format the rest of the text. A paragraph style is a collection of type attributes that you can apply to an entire paragraph with a single click. Paragraph styles in Photoshop are similar to styles in page layout applications such as Adobe InDesign and popular word-processing applications, but you’ll probably notice some differences in the way they work. By default, all text you create in Photoshop has the Basic paragraph style applied.
1. Click the Create New Paragraph Style button at the bottom of the Paragraph Styles panel.
2. Double-click Paragraph Style 1 to change its attributes.
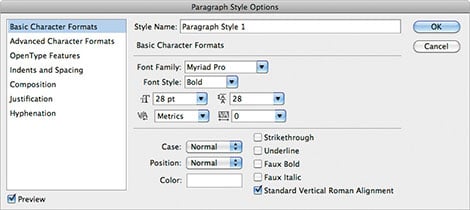
3. In the Paragraph Style Options dialog box, specify the following settings:
• Style Name: Cover Teasers
• Font Family: Myriad Pro
• Font Style: Bold
• Font Size: 28 pt
• Leading: 28 pt
• Color: White
4. Select Indents And Spacing from the list on the left in the Paragraph Style Options dialog box.
5. Choose Right from the Alignment menu, and then click OK.
You’ve created a style that you can apply to quickly format the teaser titles on the cover. You’ll create another style for the subheadings, which should be smaller.
6. Click the Create New Paragraph Style button at the bottom of the Paragraph Styles panel again.
7. Double-click Paragraph Style 1, and then specify the following:
• Style Name: Teaser subheads
• Font Family: Myriad Pro
• Font Style: Regular
• Font Size: 22 pt
• Leading: 28 pt
• Color: White
8. Select Indents And Spacing from the list on the left in the Paragraph Style Options dialog box.
9. Choose Right from the Alignment menu, and then click OK.
This article was last modified on January 18, 2023
This article was first published on July 27, 2012
Commenting is easier and faster when you're logged in!

Recommended for you

Using the Fade Command in Photoshop
Ever wish you could partially undo a change you made to an image in Photoshop? Y...

Better Tools for Tones: Why I Don’t Look at the Histogram
The histogram—the graph of tonal levels you see in photo-editing software—helps...
Three Tips for Using Illustrator’s Pattern Brushes
If you haven’t delved into making custom pattern brushes in Illustrator, y...