Working With Type in Photoshop CS6
Making a clipping mask and applying a shadow
You added the letters in black, the default text color. However, you want the letters to appear to be filled with an image of a circuit board, so you’ll use the letters to make a clipping mask that will allow another image layer to show through.
1. Open the circuit_board.tif file, which is in the Lesson07 folder. You can open it using Bridge or by choosing File > Open.
2. In Photoshop, choose Window > Arrange > 2-Up Vertical. The circuit_board.tif and 07Working.psd files appear onscreen together. Click the circuit_board.tif file to ensure that it’s the active window.
3. Select the Move tool. Then, hold down the Shift key as you drag the Background layer from the Layers panel in the circuit_board.tif file onto the center of the 07Working.psd file. Pressing Shift as you drag centers the circuit_board.tif image in the composition.

A new layer—Layer 1— appears in the Layers panel for the 07Working.psd file. This new layer contains the image of the circuit board, which will show through the type. But before you make the clipping mask, you’ll resize the circuit board image, as it’s currently too large for the composition.
4. Close the circuit_board.tif file without saving any changes to it.
5. In the 07Working.psd file, select Layer 1, and then choose Edit > Transform > Scale.
6. Grab a corner handle on the bounding box for the circuit board. Press Shift as you resize it to approximately the same width as the area of text. Pressing Shift retains the image proportions. Reposition the circuit board so that the image covers the text.

7. Press Enter or Return to apply the transformation.
8. Double-click the Layer 1 name, and change it to Circuit Board. Then press Enter or Return, or click away from the name in the Layers panel, to apply the change.

Tip: You can also make a clipping mask by holding down the Alt (Windows) or Option (Mac OS) key and clicking between the Circuit Board and DIGITAL type layers.
9. Select the Circuit Board layer, if it isn’t already selected, and choose Create Clipping Mask from the Layers panel menu.

The circuit board now shows through the DIGITAL letters. A small arrow in theCircuit Board layer and the underlined type layer name indicate the clipping maskis applied. Next, you’ll add an inner shadow to give the letters depth.
10. Select the DIGITAL layer to make it active, click the Add A Layer Style button at the bottom of the Layers panel, and then choose Inner Shadow from the pop-up menu.
11. In the Layer Style dialog box, change the Blending Mode to Multiply, Opacity to 48%, Distance to 18, Choke to 0, and Size to 16. Then click OK.


12. Choose File > Save to save your work so far.

Tool tips from the Photoshop evangelist
Julieanne Kost is an official Adobe Photoshop evangelist.

Type tool tricks
• Shift-click in the image window with the Type tool (T) to create a new type layer—in case you’re close to another block of type and Photoshop tries to autoselect it.
• Double-click the thumbnail icon on any type layer in the Layers panel to select all of the type on that layer.
• With any text selected, right-click (Windows) or Control-click (Mac OS) on the text to access the context menu. Choose Check Spelling to run a spell check.
Creating type on a path
In Photoshop, you can create type that follows along a path you create with a pen or shape tool. The direction the type flows depends on the order in which anchor points were added to the path. When you use the Horizontal Type tool to add text to a path, the letters are perpendicular to the baseline of the path. If you change the location or shape of the path, the type moves with it.
You’ll create type on a path to make it look as if questions are coming from the model’s mouth. We’ve already created the path for you.
1. In the Layers panel, select the Background layer.
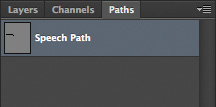
2. Select the Paths tab in the Layers panel group.
3. In the Paths panel, select the path named Speech Path. The path appears to be coming out of the model’s mouth.
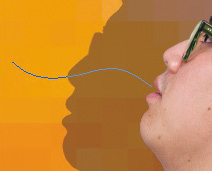
4. Select the Horizontal Type tool.
5. In the Character panel, select the following settings:
• Font Family: Myriad Pro
• Font Style: Regular
• Font Size: 16 pt
• Tracking: -10
• Color: White
• All Caps
6. Move the Type tool over the path. When a small slanted line appears across the I-bar, click the beginning of the path, and type What’s new with Games?

7. Select the word “GAMES,” and change its font style to Bold. Click the Commit Any Current Edits button in the options bar.
8. In the Layers panel, select the What’s New with Games layer, and then choose Duplicate Layer from the Layers panel menu. Name the new layer What’s new with MP3s?
9. With the Type tool, select “Games,” and replace it with MP3s. Click the Commit Any Current Edits button in the options bar.
10. Choose Edit > Free Transform. Rotate the left side of the path approximately 30 degrees, and then shift the path up above the first path. Click the Commit Transform button in the options bar.

11. Repeat steps 8–10, replacing the word “GAMES” with PHONES. Rotate the left side of the path approximately -30 degrees, and move it below the original path.
12 Choose File > Save to save your work so far.





When I Click on the path where the horizontal line crosses the type tool image I get a small circle about .25 inch to the right and no text can be entered. Tried all sort of ways but can’t make the text appear. What a bummer!