


I recently ran down the top fifteen differences between PowerPoint on the Mac vs. the PC—more specifically, the things you cannot do on the Mac that you can on the PC. But believe it or not, there are actually a few advantages that the Mac has over its Windows counterpart.
Admittedly, this won’t be quite as long an article as the previous one, but let’s do our top five, counting down from least to most awesome!
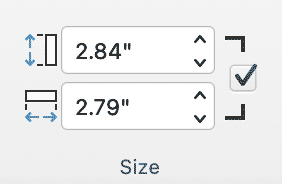
- One Click-access to Lock Aspect Ratio. On the PC you can only lock the aspect ratio of an item in the Format panel, and that can only be brought up via a right-click or a nearly hidden arrow in the corner of the Size controls in the ribbon. On the Mac, however, this feature is always available with a check box right next to the Size controls in the ribbon.
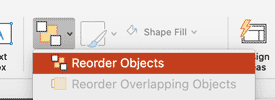
- Reorder Objects. This is a weird one with a user experience that feels like it doesn’t even belong in Microsoft Office. Click Reorder Objects in the Arrange tools and you’ll enter a 3D Tron-like world of dimensional layers—one for each item on your slide. Like the name implies, you can physically reorder these layers, changing the Z-order on your slide. It’s fun, maybe, but I much prefer just using Selection Pane when I need to adjust layering.
- Animate as Background. This may be the one true design feature that can be found only on the Mac (although it can be played back on Windows.) Animate as Background applies a Ken Burns effect that pans and zooms a background by automatically creating a series of motion paths and grow/shrink animations.
Whenever you select an image on a slide, you will see “Animate as Background” as an option on the far right of the Picture Format tab. Clicking this will bring up a window with that image and instructions to “Click on what’s important to guide the animation path.” Select as many points as you like on the image and click Apply.
What happens next is that PowerPoint fits the image to full-screen and applies a series of slow and subtle animations that pan and zoom your image to feature the parts of that image in the order you just selected. Again, think of Ken Burns slowly moving one of those Civil War images around the screen, and you get the idea. The animations are typical motion paths and grow/shrinks that you could have created manually, but the feature will save you loads of time if this is the effect you’re after. You can, if need be, edit the animations as you would any others.

I have used the feature when creating image-only slideshows to give things a bit of movement and depth, but you could easily use it to give graphic backgrounds just a little something extra under text.
- Custom keyboard shortcuts via Mac OS. Now we get to something that makes Windows users drool because it’s technically not a Microsoft feature at all, but rather a macOS one. A little-known feature of macOS is that you can change and customize the File menu functions for any program. Adobe allows custom keyboard shortcuts, but this is a feature of their individual programs—something few other applications have, including Microsoft’s.
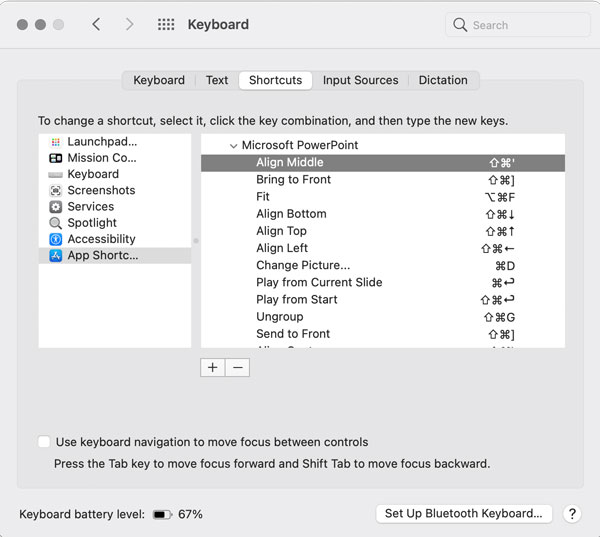
Under Apple System Preferences, go to Keyboard, then Shortcuts and finally App Shortcuts. Here you’ll be able to add PowerPoint as an application and then enter any File Menu item (you need to spell it exactly as it appears in PowerPoint), and then enter a keyboard shortcut. And that’s it! If a shortcut already exists in PowerPoint, whatever you entered will override the default, and you’ll see your new shortcut listed in the File menu.
I have a dozen or so custom shortcuts, but by far the most useful are the align and distribute tools that have no shortcuts at all in PowerPoint on the Mac or the PC despite being some of the most often used tools. With these custom shortcuts enabled, I can align and distribute items in fractions of a second just by using the keyboard. I also like to make my shortcuts consistent across programs. For example, I have set F5 as Export in PowerPoint and just about every other program that has an Export function.
- Double-click for format panel. We now come to one of the most basic differences, but it lands at #1 for me because I use it many times a day without even thinking—that is, until I have to work on a PC. And it’s simply this: To pull up the contextual Format panel for shapes, text boxes, or charts, just double-click the item. That’s it! On the PC, you can double-click to the end of time, but the only way to reveal the Format panel is to right-click and select it.
As always, let me know if I missed anything that you’ve found works only on the Mac when it comes to PowerPoint.
This article was last modified on December 13, 2021
This article was first published on June 28, 2021
Commenting is easier and faster when you're logged in!

Recommended for you

How To Animate Hand-drawn Text in PowerPoint
Learn how to make an animation follow the path of a line with the Ink Replay fea...

PowerPoint for Print Documents
Using PowerPoint to make documents for print output is not as crazy as you might...

How to Create Focus with Animation in PowerPoint
Learn how to create focus on a topic or bullet point by creating simple fade-in...