
Web How-To: Creating Pop-Up Menus in Dreamweaver and GoLive

Creating GoLive Pop-Up Menus
Things work a little differently in GoLive. Unfortunately, GoLive doesn’t support nested layers, so we can’t use the above method. GoLive is also more restrictive on what you can attach behaviors to than Dreamweaver. However, we’re not going to let that slow us down. We’ll just change our meth-odology to the graphical text style of pop-up menus rather than CSS. Let’s look at a slightly different kind of pop-up menu and how to build it.
Note: You can also build this style of menu in Dreamweaver.
Click-pop: The rollover pop-up is only one of the types of pop-ups being used on the Web. Another type is what we like to call the “click-pop” pop-up menu. This type of menu is triggered when a user clicks a button and the menu stays up until she clicks again. This style of menu is especially useful if you’re just updating content on a page instead of actually jumping to a new page altogether. A good example of this would be changing an image on a page in a catalog so that a viewer can look at all the colors a particular item comes in. Graphical pop-up menus are also popular because they usually look a bit snazzier.
We used GoLive to set up a normal Web page. For the majority of the page we created simple tables with images, as you can see in figure 9. Up to this point the page is just your basic HTML page, but we’ll soon change that.
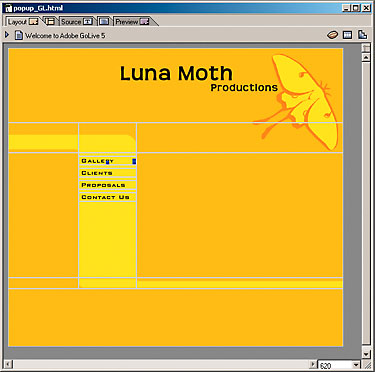
Figure 9: Here’s the page we’ll be working with in GoLive.
Floating Boxes: For the pop-up we need to add a new layer, which GoLive refers to as a floating box. Click and drag the Floating Box object from the Objects palette onto the page. It doesn’t really matter where you put it since you’ll have to position it manually anyway. Be sure to give the floating box a name in the Floating Box inspector. We named our floating box “menuGallery.”
Once you’ve created the floating box you can add the layout and images for the pop-up menu easily. You can use a simple table layout as we’ve done in figure 10. Once you’ve set up your graphics, you can switch to the Preview tab to see how it looks in a browser. You may need to adjust the floating box position a few times to get it right.
Once the floating box is set up, click on the outline of the floating box to bring up the Floating Box in-spector. Now is a good time to set the menuGallery layer as invisible by default. We can make it visible to work on it by using the Floating Box palette, but by default the floating box will be invisible when you first enter the page through a browser.

Figure 10: Our table layout was easy to place into the floating box.
Adding Actions: GoLive handles actions a bit differently than Dreamweaver. It basically supports three different types of actions: on Load-, Link- and Timeline-based. For our purposes, we’ll be focusing on the Link-based actions.
The first thing you want to do is make the image a rollover. To do this, switch to the Smart Objects tab in the Objects palette, and then drag the Rollover object onto the image you want to turn into a rollover. You can then specify the rollover image in the Rollover inspector, as shown in figure 11.
Setting an image as a rollover automatically makes it a link and allows you to define link actions for it. To do so, switch to the Actions palette and you’ll notice that there’s a list of events in the Events section of the palette. We want the pop-up menu to appear when you click the button, so choose mouseClick from the list. Now, just click the New Action button to set the action for that event. Choose Action > Multimedia > Show/Hide in order to set the properties for showing or hiding floating boxes, as shown in figure 12. Choose your box from the pop-up menu and set the Mode to toggle. This way you click once to open the box and once more to close it again. Switch to Preview to see how it works.
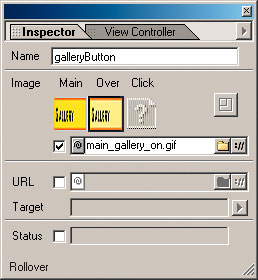
Figure 11: The Rollover inspector makes it very easy to add rollovers in GoLive.
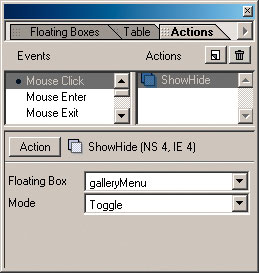
Figure 12: The Actions palette allows us to create and configure our simple action that does the whole pop-up menu.
Finishing Touches: That’s really all there is to it. Add some more rollovers to your pop-up menus and the main menu and you’re all set. It’s also a good idea to add extra show/hide actions to all mouseClick events to make sure that all the other menus are closed before you open a new one. Go about it exactly as we described earlier, but use the new action button to add a separate action to close the other menus. It’s a piece of cake!
Open Options
Both Dreamweaver and GoLive are capable of making menus, but Dreamweaver is a little more flexible when it comes to adding behaviors to your Web site. We’ve shown you two different meth-ods of creating pop-up menus, which can be very helpful in creating usable, interesting Web sites.
This story is taken from “Inside Web Design” (Element K Journals).

Creativepro.com readers can subscribe to Element K Journals at a discount. Click here to learn more.
This article was last modified on January 8, 2023
This article was first published on October 11, 2002
Commenting is easier and faster when you're logged in!

Recommended for you

Making Calendars the Andrews McMeel Way
See how one of the biggest calendar publishers around gets the job done.

The Inspired Type Designs of Sofia Mohr
Sofia Mohr has been very busy the last few years. This Brazilian architect, who...

SmileOnMyMac Updates PDFpen
SmileOnMyMac has added new link features to PDFpen 3.1, its PDF editing and form...