
Web How-To: Creating Pop-Up Menus in Dreamweaver and GoLive

Building a Pop-Up Menu in Dreamweaver
The first pop-up menu we’ll create is a menu that pops up when the mouse is over the button. We’ll use the graphic in figure 2 since we’ll be using HTML text for the actual menu options. (Editor’s note: Dreamweaver MX now has an automatic pop-up generator, but you can also use this method, and you’ll need it for earlier versions.)
To get started, you’ll want to set up your page the same way as you would normally set up any Web page. In our case, we’ve used tables to break up the page and we’ve added our main menu, which will have the pop-up menus coming off of it. Figure 4 shows the basic layout of our page be-fore we start building the pop-up menus. We’ll build the Products menu since it’s the first item in our navigation. We’ll then create all the other menus in the same manner.
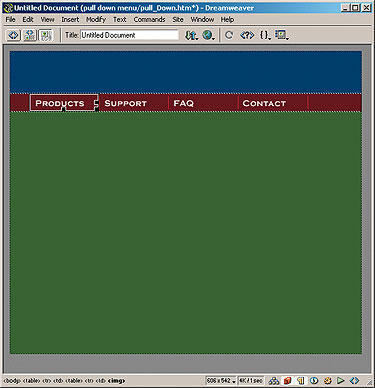
Figure 4: We’ve already laid out the basic page in Dreamweaver.
Creating the Layers: Once your basic page layout is complete, you need to create the layers that will hold the menus and menu items. To do this, click the Draw Layer button on the Objects panel and draw a new layer in the document in the general location of where the Products menu will appear. Be sure to make the layer larger than our menu. You can now access the layer’s properties in the Properties panel. You shouldn’t need to mess with the properties much, but it’s a good idea to give the layer a useful name so you can keep your layers organized as your page develops. We named our layer “productMenu.”
Now, we need to place the menu image into the layer. To do this, make sure that the insertion point shows up inside the layer. You may need to click in the layer. Then, click the Insert Image button on the Objects panel and the Select Image Source dialog box appears, allowing you to specify a file or URL for the image. Once you select the menu image, it appears in the layer. Now, resize the layer so that it’s tight around the image. If it’s any larger than the menu, it will throw off your rollover detection. In figure 5, you can see our first layer with the menu image in it.
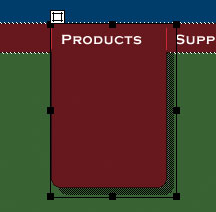
Figure 5: Here’s the menu properly positioned in a layer.
Nesting Layers: Now we need to add the text that will be used as the menu items. To do this, you need to add a sec-ond, nested layer on top of the menu layer. A nested layer is a layer within a layer and it allows you to control the position and visibility of multiple layers at the same time. With the menu layer still selected, click the Draw Layer button and draw a new layer inside it while holding down the [option] key ([Alt] in Windows). Name the new layer “productText.” According to Macromedia, this should automatically cause the new layer to become nested in the first, but it’s best to be sure. Choose Window > Layers to bring up the Layers panel. If the layer nested properly, it should look like ours does in figure 6. If they both look the same, then they didn’t nest properly and you’ll need to nest it manually. Click and drag the second layer, while holding down the [command] key ([Ctrl] in Windows), onto the menu layer. It will become nested, but it will mess up the alignment, so you’ll have to readjust it.
Once you play with the layers a little bit you’ll get a feel for what nesting them does. For example, if you click on the productMenu layer and move it around you’ll notice that the productText layer stays positioned relative to the menu layer. Also, if you change the visibility of the productMenu layer, either through the Layers panel or through the Properties panel, the productText layer changes as well.
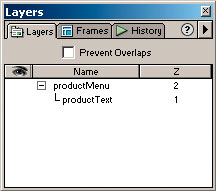
Figure 6: This is what the Layers panel should look like when you have nested layers in your document.
Adding Text: Now let’s add some menu options to our pop-up menu. Since we’re using text for our options, we can do all of the formatting with CSS. It may be helpful to refer back to the article “Understanding Typography Controls with CSS,” where we discussed creating CSS in Dreamweaver in more depth. Type your menu op-tions into the productText layer with single line breaks by pressing [shift][enter] between each option. Now you can set up a simple CSS class to adjust the look and line spacing for the options, you can also specify an A:hover selector class to give the link text a rollover effect without images. Our final menu setup is shown in figure 7. It’s a good idea to check alignment and such in a browser (IE 5 or NN 6) before you set up the scripts.
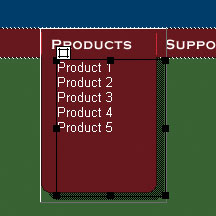
Figure 7: All our layers are positioned and we’re ready to add the behaviors.
Making It Pop: Getting the menu to actually pop up is quite easy in Dreamweaver. However, there are some tricks you need to know. It’s easiest to step through the procedure in the same way a user would navigate the site. By default your menu won’t be visible when a user arrives at your site, so let’s make the pop-up invisible so we can access the main menu button. To do so, click in the Eye button in the Layers panel to turn off the visibility of the layers and their contents.
Now, click on the main menu image that will be used to trigger the pop-up menu — in our case, it’s the Products button. Now, choose Window > Behaviors to open the Behaviors panel. Click the Add Actions button and select Show-Hide Layers. The Show/Hide Layers dialog box appears, listing all available layers in your document, as shown in figure 8. Since our layers are nested, all we need to do is choose Layer “productMenu,” click Show, and then click OK. Now the new behavior shows up in the behavior window, but it may not have the correct event. Events are what trigger the action part of the behavior. In this case, you want it to be triggered by an onMouseOver event. If it doesn’t say onMouseOver in the Events column for your action, click on the pop-up menu and choose onMouseOver from the list. Now if you test your page in a browser, the menu should pop up when you roll over the Product button. You’ll notice that it doesn’t go away, though, so that’s what we’ll tackle next.
Now that our menu appears, we need to make it disappear when you roll off it. As with the previous behavior, this is pretty straightforward. First, bring back the menu layers by clicking on the Eye icon in the Layers panel. Dreamweaver lets you attach a behavior to any object, and you want to attach this one directly to the layer itself. Click the Layer icon in the upper-left corner of the productMenu layer. This selects the layer itself as opposed to the contents of the layer. Use the Behaviors panel to add another show/hide layer action. This time you want to hide the productMenu layer. Be sure the event is set to onMouseOut, which is the “off” part of our rollover, and you’re ready to go. Before you test this in a browser, remember to turn off the layer visibility so it starts as if you were first entering the page.
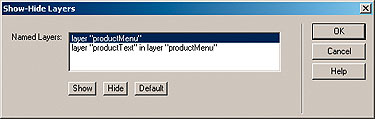
Figure 8: Set the behaviors action to show the productMenu layer when you roll over the button.
One Small Problem: If you just tested that last part as we suggested, then you may have noticed one small problem. If you move your mouse over the Products button the menu appears, and if you move your mouse off the menu it disappears. This is good, but here’s the problem: If you move the mouse onto the menu and then try to choose a menu option, the whole menu disappears before you can click on anything. Oops, slight problem.
Here’s what’s happening. When the mouse moves from being over the productMenu layer to being over the productText layer it triggers the onMouseOut event. Unfortunately, JavaScript doesn’t con-sider a nested layer the same object in regards to rollover events. So what do you do? Easy, you just need to remind the scripts that we need those layers visible while we’re choosing an option.
To do this, select the productText layer like we did the productMenu layer. Now add a show/hide layer action and set it to an onMouseOver event. This tells the browser to keep those layers open even though there’s an onMouseOut telling it to close them. Remember to turn off the layer’s visibility and test it again in a browser. Now everything should be working great. Repeat these steps for the rest of your menus and you’re all done.
This article was last modified on January 8, 2023
This article was first published on October 11, 2002
Commenting is easier and faster when you're logged in!

Recommended for you
Solving Word Workflow Problems With Style Mapping
I received an email from an editor who was using Microsoft Word to set and style...

Proofing: The Customer is Always Right…Right?
TWGA has released its special report, "Proofing: The Customer is Always Rig...

Pictopia Launches National Geographic Online Photo Store
Pictopia https://www.pictopia.com, the premier photo commerce provider to the wo...