

Illustrator’s new Intertwine feature makes a simple job of what was once a laborious, time-consuming, and complex task. As the name implies, it allows you to intertwine objects so that they appear to be both above and below neighboring objects. Here’s how it works.
Start with two rings
These rings are easily created by drawing a circle, duplicating it to make a smaller circle, then subtracting the front shape using the Pathfinder panel. Our next task is to intertwine them. 
Choose the menu item
Select both circles and choose Object > Intertwine > Make. The cursor changes to a Lasso: drag it over the areas you want to intertwine, as shown here. 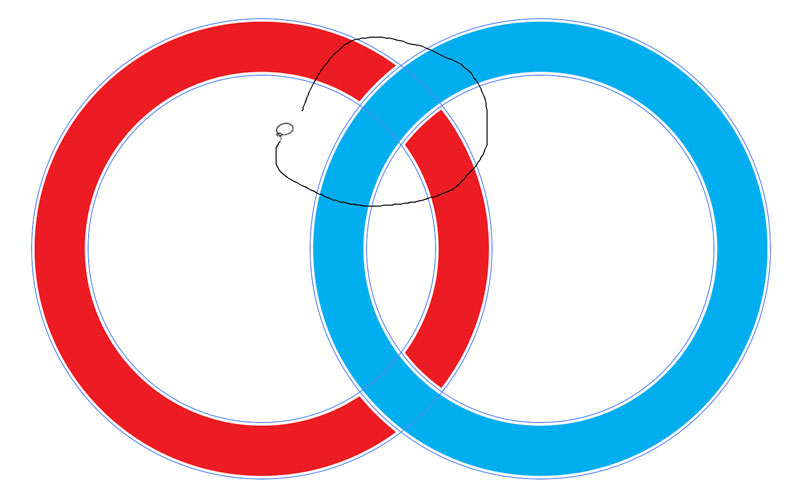
One step – done!
Release the mouse button and the segment that was at the back is now at the front. Not only that: note how the white stroke applied to both rings is now maintained on the segment of the red ring that’s in front of the blue one. 
Making a monogram
A monogram consists of two or more letters that overlap, and are intertwined. We’ll start with the word PRO, set in the font Trajan because it has an attractive tail on the R. Make each letter as a separate object, and arrange them so they overlap. 
Convert to outlines
The Intertwine feature can’t work with live text, so choose Type > Create Outlines. This also gives the opportunity to modify the shapes of the letters. Here, I’ve extended the stem and tail of the R so it projects below the other characters. 
height=”570″ />
Add a stroke
Adding a white stroke separates the letters, emphasizing each as a distinct object and preventing them from blending together visually. But by default, strokes are aligned with the center of the path: this makes fine serifs much too thin. 
Modify the stroke
Change the Stroke alignment from Center to Outside, using the Stroke panel. Now each letter appears in full, with the stroke pushed to the outside. Since it’s on a white background, the stroke is visible only over the other letters. 
Choose Intertwine
As above, choose Object > Intertwine > Make to begin the process. I’ve started by looping around the point at the top of the P where it overlaps the R. You need to make sure you enclose the whole overlap area when you drag. 
The first overlap
Here’s the result of that first step: The top of the P now appears in front of the R, then goes behind it as it continues its curve. 
Over-then-under
The rule for monograms is that the intersections alternate between above and below. Since the top left of the R goes beneath the P, the top right needs to go in front of the O. Use the Lasso to loop around the intersection to produce the effect. 
The finished result
Continue around each character, alternating the intersections, and you’ll end up with a result like this. It now takes just a few minutes in Illustrator, but before this update this would have been a remarkably complex procedure. You can return to modify the effect at any time by choosing Object > Intertwine > Edit. 
Commenting is easier and faster when you're logged in!

Recommended for you

This Month in InDesign Articles, Number 141
News, tutorials, tips, and more from around the Web for InDesign users.
InFocus: April 2017
A bewitching bouquet of InDesign-related goodies, just in time for spring.

Designing Business Cards, Part 2
This article is the second in a series in which I’ll use business cards to...