


Part 1: Import and organize photos
Part 2: Edit photos
Part 3: Output images
So far in this series, you’ve seen how to use Adobe Lightroom to manage and edit your images. However, creating a perfectly crafted collection of well-edited images is of dubious value when no one else sees it. That’s why Lightroom has output options that make it easy to get your images into print or electronic form.
But First, a Few Workflow Tips
Lightroom is designed to handle your entire post-production workflow. While there are no hard-and-fast rules to workflow, these general guidelines are usually fitting for just about anyone:
- Begin by collecting all of the images from a shoot. In Lightroom, this process happens when you import your images into the Lightroom library. As you saw in part 1, Lightroom automatically groups your images into Shoots.
- Work your way through your shoot, applying ratings to your images. Lightroom allows star ratings of one to five. Depending on how organized you are, you can rate your images with varying degrees of granularity. I typically give my choice images five stars and leave the rest unrated. At this point, you could also assign keywords to your images. However, because Lightroom is still beta and its library structure is in flux, keywording now is probably not wise, as your keyword metadata may not be carried through to future releases.
- Once you’ve made your selects, edit them to taste.
- Output your edited results in whatever media you need.These days, most jobs require output in not just one but several media; for example, you may need to post a Web page to get art director approval before generating final electronic files or prints. Lightroom can handle all of these.
Making Collections
To facilitate the workflow described above, Lightroom provides a feature called Collections, which lets you create albums of images. In the Library module, you can use Collections in combination with the Filters function to quickly create groupings of your selects.
After rating your images, use the Filters function in the left-hand pane to automatically winnow down what you see (Figure 1).
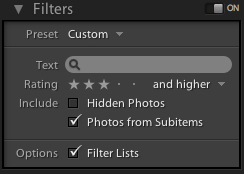
Figure 1. I configured the Filter menu to find all photos in the current shoot with a rating of three or more stars.
The filter operation affects whatever you’re looking at, whether that’s All Photographs or a specific shoot. After filtering, your Library window shows only the images that match the rating you choose to filter for.
Now that you’ve automatically filtered your select images, you can put them into a Collection so it’s easier to select them later. In the Collections section of the left-hand pane, click the + button to create a new Collection, and give it a meaningful name. Press Command-A/Control-A to select all the images you’ve filtered. Check the Include Selected Photos box to automatically include your selected photos in your new collection (Figure 2).

Figure 2. I created a new collection to hold the selects that I made from a big event shoot.
Next, turn off image filtering by clicking the On switch next to the Filters heading in the left-hand pane. You now have a collection that contains only your choice images. With this collection, you don’t have to look at your reject images if you don’t want to, but they’re still in your library should you need an alternate image later.
Note that you can also add images to a collection by manually dragging them into the collection.
Output a File
These days, photographers rarely have a call to deliver prints to a client. Most often, you need to ship electronic files over the Internet or by snail mail. Lightroom’s well-rounded export feature lets you resize, name, and save a file in a single step.
Remember, Lightroom is non-destructive, so the pixel data in the images in your Lightroom library isn’t changed by your edits. Rather, those edits are stored in a list that’s applied to an original image file whenever Lightroom renders the image to the screen or outputs it. This means that you don’t need to go through a specific resizing step before you save, as you do in Photoshop. Nor do you have to keep separate versions of your document in different sizes. Instead, sizing takes place during the Export step. Your original master version, with non-destructive edits, is still in your Lightroom library, so you can export any other size at any time.
To export images from Lightroom, first select the images you want to export, then choose File > Export, or press Command-Shift-E/Control-Shift-E. Lightroom will invoke its Export dialog box (Figure 3).

Figure 3. In the Lightroom Export dialog box, you can specify names for your exported files, as well as size and file format.
The Export dialog box is straightforward. In the Export Location field, you specify a location for your exported files. The Put in Subfolder option lets you tell Lightroom to automatically create a new subfolder for your exported images.
In the dialog box’s File Naming section, you specify a naming convention. Press the + button to the right of the File Naming field to add additional criteria to your name (Figure 4).
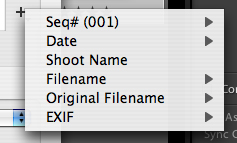
Figure 4. You can build filenames out of many different automatically generated criteria.
You can elect to have any combination of sequential numbers, date, original filename, new file name, EXIF information, or the name of the shoot. You can arrange these elements in any order.
In the File Settings section, you can choose a File Format (JPEG, PSD, TIFF, or DNG) and a color space. By checking the Constrain Size box, you can specify a size into which you want the images to fit. This lets you size a batch of images to fit within specific dimensions without having to worry about their orientation.
In the Post-processing section of the Export dialog box, you can specify an action to take after the export. You can have Lightroom open the folder that the images were exported to, burn them to a disk, or open the exported images in Photoshop.
After exporting, if you need to output additional images at different sizes, simply execute more Export commands.
Moving Binders
While exporting pictures is a simple way to move finished images, the resulting files are “baked,” meaning you can’t adjust or remove any of your Lightroom edits. To retain editability while moving images from one copy of Lightroom to another, export a Photo Binder.
A Photo Binder is a folder with all of the master image data for the images you’re exporting, plus all the metadata with the edits you’ve applied to those images. When you import a Photo Binder into another copy of Lightroom, everything in the binder is editable.
To export a Photo Binder, select images, then choose Library > Export Photos as Photo Binder. To import a Photo Binder into Lightroom, select Library > Import Photos as Photo Binder.
You can also burn the Photo Binder to a disc by choosing Library > Burn Disc as Photo Binder.
Making Slideshows
Lightroom includes a module that builds a slideshow from the images you’re browsing, which can be your entire library, a Shoot, or a Collection.
To create a slideshow, simply click the Slideshow button at the top of the Lightroom window or press Command-3/Control-3.
When in the Slideshow module, Lightroom displays a filmstrip at the bottom, which lets you view and re-order the slides you’ve selected. The right-hand pane contains configurable playback parameters, such as border and shadow controls, background color or image, metadata displays, and text controls.
The Identity Plate is meant for you to brand a slideshow. You control the contents of the Identity Plate by choosing Lightroom > Identity Plate Setup, and you change the position by dragging the Identity Plate around. I’ve never found this to be a particularly useful feature, so I usually turn it off.
Below the slide display, an Add Text button lets you enter a text caption for each slide.
To play your slideshow, use the transport controls beneath the slide window, or press Command-Return/Control-Return. Lightroom displays its slideshows at full screen size, and you can cancel at any time by pressing Escape.
Using the Slideshow > Export Slideshow, you can export your slideshow as a PDF. There is currently no way to export as a QuickTime movie.
Printing
It’s simple to create single-image prints or contact sheets with Lightroom’s Printing module. You select the images you want to print, then click the Print button at the top of the Lightroom window, or press Command-4/Control-4.
In the right-hand pane of the Print module, you can activate the display of EXIF and metadata information, page numbers, crop marks, borders, your identity plate, and more.
Lightroom also provides pre-defined print layouts. In the left-hand pane, use the Template Browser to select different print layouts and contact sheets. Use the Filmstrip pane to select which images you want in your contact sheet.
To create your own layouts, use the controls in the Page Layout section of the right-hand pane to specify the number of images you want on the page, as well as the spacing, borders, and other layout options. You can add custom layouts to Lightroom’s printing template gallery by clicking the Add button at the bottom of the left-hand pane.
Finally, the Print Job controls allow you to specify a resolution, sharpening amount, printer profile, and rendering intent for your current job. For more on profiles and rendering intent, check out “Get Great Profiles from Desktop Printers.”
Lightroom beta 4 doesn’t have any soft-proofing features, nor does it have controls for turning black point compensation on and off. For these features, you’ll have to continue printing in Photoshop.
Web Output
Lightroom has a simple Web module that works like the program’s other output modules. Select the images you want to post on your site, then click the Web button, or press Command-5/Control-5.
The Web layout presets are in the left-hand pane. You can create your own designs using the controls in the right-hand pane. You can modify two types of basic galleries with the layout controls.
Once you’ve configured your Web gallery to your liking, use the Output section at the bottom of the right-hand pane to preview your site in a Web browser or to upload the site to an FTP server.
Lightroom’s slideshow and printing modules aren’t intended to be a substitute for a dedicated presentation or Web design application. But they do give you an easy way of getting proofs to clients, and they facilitate the revision and final selections and edits you need.
Don’t forget that Lightroom’s feature set is still changing. Keep an eye on creativepro.com for updates.
This article was last modified on January 18, 2023
This article was first published on November 1, 2006
Commenting is easier and faster when you're logged in!

Recommended for you

CreativePro Tip of the Week: Using the Oil Paint Filter in Photoshop
This CreativePro Tip of the Week on using the Oil Paint filter in Photoshop was...

Mount July Camera Filters Take the Instagram Look to the Next Level (and into Real Life)
When digital designs imitate real life we sometimes label it “skeuomorphism,” bu...
Pixelstick Takes Light Painting to a New Level
Have you ever tried light painting by moving a light source around while you tak...