


Part 1: Import and organize photos
Part 2: Edit photos
Part 3: Output images
If you’re a digital photographer who normally works in Photoshop, you owe it to yourself to try Photoshop Lightroom, a workflow-management/image-processing tool that’s now a free beta and should ship in a final version early next year. While Lightroom lacks many of Photoshop’s editing functions — there are no brushes, rubber stamps, layers, or text tools in Lightroom — its digital photography workflow may be better for you than a combination of Photoshop and Bridge, or Photoshop and your operating system’s file manager.
I’m going to look at a few simple concepts that will make your switch from Photoshop to Lightroom easier. Don’t worry; this “switch” is not a one-way trip. If you decide you’re not interested in continuing with Lightroom, you can easily go back to your current workflow.
In this first installment, I’ll cover Lightroom’s importing and organization features. In Part 2, I’ll go into Lightroom’s editing tools and how they compare to Photoshop’s. Part 3 will cover output.
What You’ll Find in Lightroom
Photoshop is the best general-purpose graphics application out there. Everyone from photographers to Web designers to pre-press experts to feature film special effects companies use Photoshop. But because it can be all of these things to all of these people, it’s not designed specifically for the way a photographer needs to work. For example, when you’re just back from a shoot, you typically want to work through your images quickly, sorting them and applying corrections. Lightroom makes that post-production much faster because you don’t have to hassle with open and save dialogs, or with keeping track of files.
You should find that Lightroom can handle 80 to 90% of your editing tasks. What it won’t handle is selective editing — the type that usually requires a masking operation — and painting operations.
Importing and Organizing
As a Photoshop user, you’re probably accustomed to organizing your files using the File Explorer in Windows or the Finder on the Macintosh. You sort your images into folders and when you want to edit one, you open it in Photoshop. If you’re using Photoshop CS2, you might use Bridge to browse your folders and identify the file, then launch your files into Photoshop from Bridge.
Lightroom is a full image-management system that replaces an OS file manager and Bridge. Before you can work with an image, you must import it into Lightroom. Once you’ve imported images, you’re meant to manage them completely from within Lightroom.
If you manage your images using Windows’ File Explorer or the Mac’s Finder, the idea of having to import an image into a program just to edit it can seem like a real slow-down. But after spending a little time in Lightroom, you’ll discover its advantages.
To import images, select Import from Lightroom’s File menu. You’ll see a standard Open dialog box from which you can select single or multiple images, entire folders, or any combination thereof. After selecting your images, you’ll see Lightroom’s Import dialog box (Figure 1).
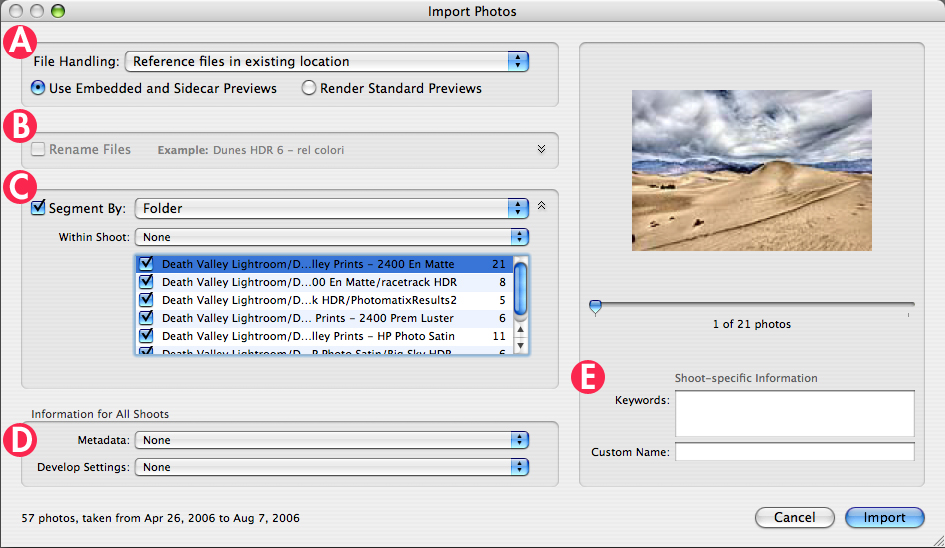
Figure 1. Lightroom’s Import dialog gives you all the controls you need to organize and prepare your images upon import. For a larger view click on the image.
Lightroom beta 4 has several import options. The most important is the File Handling menu (A), where you specify the location of imported images. You can copy images into Lightroom’s internal, managed library, or leave images elsewhere and create a reference to them.
The advantage to placing images inside Lightroom’s managed library is that you won’t have to worry about accidentally pulling the rug out from under Lightroom by moving a file. With Lightroom in control of your file-management tasks, you’ll never break the link between Lightroom and its source files. And by backing up your Lightroom library, you’ll know that you’ve backed up all of your images and the other utility files Lightroom needs to function correctly. The Lightroom library is simply a folder, and you can define its location.
The File Handling pop-up menu has several options. Copy Files to Lightroom Library and Move Files to Lightroom Library both place your images in the Lightroom library folder. The only difference is that the Copy option leaves a copy in the original location, while Move deletes the original.
The option to Reference Files in Existing Location leaves your images where they are and stores a pointer to them. The main advantage is that you can import images on volumes you don’t intend to keep online — CDs, DVDs, network volumes, etc. This option also allows you to preserve organizational structures you defined in your file browser. If you’ve been placing images into a page-layout, video, 3D, or Web-design program, leaving your images where they are might be essential to other workflows that involve those images.
The Copy Photos as Digital Negative option converts your image to Adobe’s Digital Negative (DNG) format and then imports the resulting file into the Lightroom library. While most people think of DNG as a Raw-only format, it’s also capable of handling non-raw files, such as TIFFs, JPEGs, and PSDs. The advantage of importing as DNG is that all of the metadata associated with the file is rolled into the DNG file, so you don’t have to keep track of separate image and metadata files if you later decide to move the image. Be warned, though, that importing as DNG can be slow.
Note that you can freely mix and match file-handling options within your Lightroom library. You can import some images as references, and move or copy others into the Lightroom library.
Beneath the File Handling popup of the Import Photos dialog box, you’ll find two radio buttons: Use Embedded and Sidecar Previews and Render Standard Previews. Lightroom builds and stores high-res preview files for your imported images. These previews speed navigation and let you continue to work with images even when the source files are offline.
If you select the option to Use Embedded and Sidecar Previews, Lightroom uses the preview images that might be embedded within the images themselves. Render Standard Previews causes Lightroom to make its own previews. Preview building slows down the import process, but if your images don’t have previews or have only low-res previews, telling Lightroom to build its own preview thumbnails is a good choice.
In the Rename Files pane (B), you can rename your images as you import them. Figure 2 shows you what the pane becomes when you check the Rename files box.
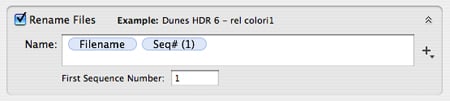
Figure 2. You can rename your files as you import them into Lightroom.
The Lightroom library is divided into Shoots, which are analogous to projects or albums into which you group related shots. Shoots can, in turn, be divided into folders.
The Segment By pane in the Import dialog (C of Figure 1) lets you automatically divide imported images into folders based on the current folder structure you’ve defined in your file browser, or by the date each image was shot.
The Within Shoot popup menu lets you specify which Shoot you want the images imported into. If you select None, Lightroom creates a new Shoot. If you have existing shoots in your library, you can select them from the Within Shoot popup menu.
The remaining fields in the Import Photos dialog box — Information for All Shoots (D) and Shoot-specific Information (E) — let you specify metadata and keywords. However, the metadata and keywords functions seem to be in flux in beta 4, so I don’t recommend that you spend a lot of time applying metadata or keywords in case the information is lost as Adobe continues to rev the software.
Once you’ve imported your images, they appear in the specified shoot in the Shoots portion of the Library panel. Any segments you’ve specified appear as subentries beneath the Shoot name.
To view a shoot, simply click on its name in the Shoots panel (Figure 3), and all of the thumbnails within that shoot will appear in the both in the browser view (the large section in the middle of the Lightroom window) and in the Filmstrip at the bottom of the window.
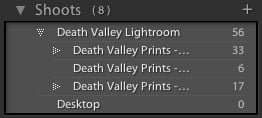
Figure 3. The Shoots panel lets you select a shoot to view.
Browsing Your Library
Library browsing in Lightroom is straightforward with a lot of similarities to Bridge, but you’ll also find many advantages over Bridge’s approach.
Like Bridge, Lightroom displays thumbnails with filename and pixel dimensions, as well as overlaid badges that indicate whether metadata or edits have been applied. You can control exactly how to display thumbnails by choosing View > View Options, which brings up the Library View Options dialog box (Figure 4).
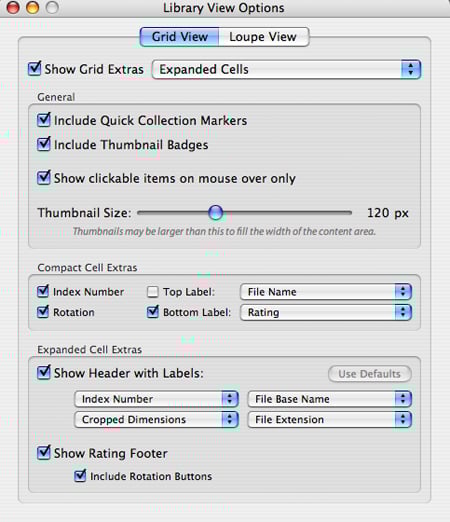
Figure 4. The Library View Options dialog box lets you specify exactly what you want displayed on your image thumbnails.
Unlike Bridge, Lightroom provides a special Loupe view which lets you zoom in on an image to see it at full size. At the bottom of the browser window, there are simple icons for changing from Grid view to Loupe view. These controls also let you change the sorting order of your thumbnails and the thumbnail size, and they access special compare views, which I’ll get into below.
As in Bridge, you can rotate images by clicking on the rotation icons at the bottom of each thumbnail. You can also assign ratings by clicking on the dots on each thumbnail, or by working with the metadata panel on the right side of the screen. Again, investing a lot of time in applying metadata may not be wise at this stage of Lightroom’s development.
Interface Tricks and the Loupe
Lightroom’s Loupe has no corollary in Bridge, but it can be a welcome tool when browsing through a series of images. Try this:
- Select a thumbnail.
- Press ` to activate the Loupe. The image will now fit your browser window.
- Click on the image with the mouse. The image will zoom in to 100%.
- Drag with the mouse to pan.
- Click again to zoom out to Fit size.
- Press ` to return to Grid view.
For checking the sharpness of a series of images, or for checking fine exposure details, the Loupe is very handy.
One of the coolest things you can do in Lightroom that you can’t do in Bridge is to compare images side-by-side. Give this a try:
- In the Filmstrip pane at the bottom of the window, select several images. Shift-click to select contiguous images or Command/Control-click to select non-contiguous images.
- Press C to enter Compare mode. Your images will be displayed side-by-side. You can continue to add or remove images from the selection by command/control-clicking on images in the Compare window or in the Filmstrip pane.
- When you’re finished comparing, press G to return to Grid view.
Another nice feature that Bridge doesn’t have is the ever-present histogram in the upper-right corner of Lightroom’s main window. The Histogram panel always shows the histogram of the currently selected image and makes it simple to analyze the exposure of a series of images without opening and closing a lot of documents. If you’ve shot a bracketed series of photos and want to know which one has the most editing potential, Lightroom’s histogram is a great tool.
Finally, a few quick interface tricks:
- Lightroom presents a lot of information and interface on the screen at once. Note that most panels can be closed to easily reduce screen clutter. Each panel has a small arrow next to it that toggles its visibility. Most also have keyboard shortcuts, which you can find by examining the View menu. To completely remove a panel from the interface, right-click on the panel’s name. You’ll be presented with a pop-up menu that lets you choose which panels are visible.
- Use the Interface tab of the Preferences window to change the size of the Lightroom interface typefaces.
- To create a new, empty Shoot, or to create a subfolder within an existing shoot, use the + button above the Shoots list. The – button deletes a shoot.
Lightroom facilitates all of the operations you’re used to performing in Bridge. What’s more, when it comes time to find an image in your library, the sorting and searching features inside of Lightroom are much easier to work with than using Bridge to navigate your entire file system.
Organizing is just part of Lightroom. In part 2, I’ll go into Lightroom’s image processing tools, which have many similarities to Photoshop’s but some important differences.
This article was last modified on December 14, 2022
This article was first published on October 18, 2006
Commenting is easier and faster when you're logged in!

Recommended for you

Compositing a Scene into a Head in Photoshop
However much you may toy with people’s expressions using the Liquify filte...

Know Your Photoshop File Sizes
How can one Photoshop image grow and shrink dramatically during production, even...

Batch Process Images with PhotoBulk
If you work on a Mac and regularly have to process images to size, optimize, or...