
Using Layers in InDesign
Use layers in InDesign to unlock creative and time-saving ways to improve your design and workflow.


This article appears in Issue 19 of CreativePro Magazine.
InDesign’s Layers panel can be your secret weapon in the battle to produce great documents with maximum flexibility and efficiency. This often-underused panel can do more than simply organize pieces of your document. You can use it to improve your workflow and overcome all sorts of production challenges.
In this article, we’ll review some of the basics of using layers, as well as techniques for unlocking their full power.
Layering the Foundation
If you’re not familiar with how layers work, here’s one way to think about them: Imagine your document as a multi-story building, with the layers as the building’s stories or floors. When you open the Layers panel, imagine you are looking at a clear glass building from the street level (Figure 1). The default layer in a new document—Layer 1—is like the first floor. Each layer you add appears above Layer 1, like a new floor in a building, and just like those floors, new layers are numbered sequentially.

Figure 1. Looking at your document in the Layers panel is like looking at a transparent glass building from the street. Everything on Layer 1 is below Layer 2, which is below Layer 3, and so on.
You can have multiple InDesign objects on Layer 1, just like my chair, desk, and quadruple-shot latte (which sits dangerously close to my MacBook) all reside on my first floor. You can move the items around, but any item on the second floor—Layer 2—will always be above the first—Layer 1—unless you physically bring it downstairs.
Now, as you look at your layered document, think of yourself as having a bird’s eye view of your building. You might be able to see through a skylight to the floors below (if you have transparency effects applied to your objects), but generally, the items on the top floors (layers) will hide the items on the bottom floors from your view (Figure 2).

Figure 2. Objects on Layer 2, like the navy square, will always be above objects on Layer 1, where the three pink shapes are positioned.
Most people understand this basic function of layers, but let’s spend some time in the Layers panel to understand the tricks you can do with it—tricks that will keep your house in order.
Locking and Hiding Content
You can use the Layers panel to access objects on your spread. Click the disclosure triangle to show a list of every object on that layer. Hide an entire layer or any of the objects on the layer by clicking the eye icon. The icon will disappear, as will your object. Of course, it’s still there—just hidden.
To lock or unlock an entire layer or individual objects on that layer, click the lock icon. You don’t see the lock icon? That’s because each layer is unlocked by default. Just click in the column between the eye icon and layer name, the lock icon will appear, and all the objects on the layer will be locked.
The same is true for objects on an active spread. To see the objects on each layer of a page, click the disclosure triangle to the left of the layer name to expand it. You can lock or unlock any of the individual objects. (Thankfully, this shows the objects on your current spread only, not your entire document.)
And then, there are parent pages. Like layers, parent pages are also global to the document. And, like any other page throughout the InDesign file, parent pages also recognize layers. In the hierarchy of layer objects, the objects on a parent page are on the bottom (Figure 3).

Figure 3. Using the building metaphor, think of the objects on a parent page as the flooring. The objects on the parent page are below anything else on that layer but above the elements on the layers below.
Understanding this layer hierarchy can unlock creative and time-saving ways to improve your process and your workflow.
Tip: Start your documents with one foundational parent page on which you base all the parents you use. That way, when you edit this parent page, your edits will affect every single page in your document, and when you use layers for some of the tips to follow, such as taming your guides and grids, they will apply to the whole document.
Note: The Layers panel does not show the objects on the applied parent page. For example, if you have a text frame with a page number on the A-Parent but are currently viewing page 1 (with the A-Parent applied), you will not see the text frame for the page number. To see all the objects on a parent in the Layers menu, double-click that parent page to make it the active page.
Headers and Footers Above All Else
I use InDesign’s default Layer 1 for most of my text content, photos, and other routine page elements. Some of my pages have objects that bleed, however; and I never want to worry about other elements (like headers, footers, and page numbers) getting covered up. The solution is a new layer that always appears above my default layer.
Remember, parent page elements are at the bottom of the layer. To ensure they are above the document content, I navigate to the Layers panel and Option/Alt-click the plus sign at the bottom of the panel to add a new layer. The new layer appears in the panel above my current layer, and I rename it Header and Footer. (Whenever possible, give your layers meaningful names to remind you of their purpose when you open the file a week later—or next year.) Now, I can add my header text and page number on the parent page and on the new Header and Footer layer, so objects on Layer 1 will never cover them up (Figure 4).

Figure 4. Adding the page number on a new Layer 2 (renamed Header and Footer) means I don’t have to worry about the gray rectangle on Layer 1 covering up the page number.
Tip: Object frame colors are based on the layer color as indicated by the colored vertical bar to the left of the layer name in the Layers panel. So, by default, Layer 1 frames are blue and a new Layer 2 will be red. It’s easy to see which objects live on which layer based on the frame colors. If you want to change these colors, right-click the layer in the Layers panel and choose Layer options for [Layer Name].
Watermarking Pages
One of my favorite aspects of the Layers panel is the flexibility it affords by letting you show and hide individual objects or entire layers. Maybe you need to add a Top Secret Draft watermark on every page until the client approves the final document. Rather than adding and deleting a text frame every time, simply add a new layer to the top of the layer stack, rename it Watermark, and edit the parent page by placing the Top Secret Draft text on the new layer. When the document is approved, simply hide the Watermark layer, and the text magically vanishes (Figure 5).

Figure 5. Using a layer for watermarking is an easy way to add flexibility to your draft review workflow. Simply toggle the eyeball on for a draft, then toggle it off for the final.
Managing Guides
Do you have so many guides, you can’t see the forest through the trees (or content through the guides)?
Add a new layer, and go to your parent page. Choose Layout > Create Guides and create guides for two columns. Create new layers for other column and grid configurations you might need (say, three columns, four columns, 3 × 3 grid, 4 × 6 grid). Then, whenever you need those flavors of guides and grids in your layout, simply turn on (or unhide) the layer or layers you need (Figure 6).

Figure 6. Rather than creating a mess of guides based on your needs for each layout, try adding guides as layers and turn on only the ones you need when you need them.
After you create these guides, you can change their color. Select them on the page, right-click, and choose Ruler guides. I like to match the guide color to the layer color.
Improving the Look of In-House Printing
Let’s face it. Sometimes you get so down to the wire that sending your well-designed, full-bleed document to a print service provider is simply not an option. You’re left to use your office inkjet printer—which leaves an inconsistent white border around every page.
When you’re stuck in this situation, one way to create a professional-looking document is to create an In-House Printing layer that can add a simple white stroke around the perimeter of your pages. This technique offers a consistent, no-bleed look on every page without resizing images or reapplying object styles.
From the base parent page, create a new layer above all others. Name the new layer In-House Printing, and add an empty frame the size of the page. Give your frame a 48-pt (or so) stroke with the [Paper] swatch, aligning the stroke to inside. Now, turn on the layer for a sleek and modern design (Figure 7).

Figure 7. Once again, layers come to the rescue when you must print a full-bleed document on a printer that can’t print to the edge of the page.
Hidden Layers for TOCs
Have you ever wanted text to appear only in a table of contents you generate and not on your layout? Be honest: You’ve turned the text white, exiled it to the pasteboard (but still overlapping the frame on the page) or hidden it behind something, amirite?
Just because you hide a layer doesn’t mean you can’t access content for the TOC. Go ahead: Add that header to your page, put it on a hidden layer, and add it to your table of contents (Figure 8) with the option Include Text on Hidden Layers activated. (For more on creating a TOC, see Keith Gilbert’s “Easy TOC Formatting” in InDesign Magazine, Issue 30.)

Figure 8. Add text from a hidden layer to the table of contents with the click of an option in the Table of Contents dialog box.
Secrets and Notes
Did you know you can put content on a nonprinting layer? You can add notes, images, screenshots, secrets, and whatever else you want to communicate with your fellow InDesign users in Normal view (not even Preview mode divulges our mysteries), all on a nonprinting layer.
Note: A nonprinting layer is not the same as a hidden layer! InDesign will never print or export the contents of an active nonprinting layer, making it a safer alternative to relying on a designer to hide a layer before sharing a document with others.
To ensure your super-secret notes remain in what-happens-in-InDesign-stays-in-InDesign status, right-click your layer and select Layer Options for [Layer Name]. Deselect the Print Layer option (Figure 9), and now your secrets are safe with InDesign. The layer name in the Layers panel becomes italic, like a subtle wink to our shared knowledge.
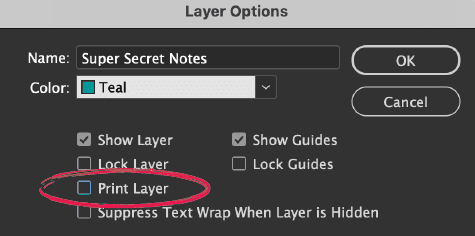
Figure 9. A nonprinting layer allows you to add instructions and notes that will appear on screen only.
Saving and Sharing Layers
Here’s a mystery that most InDesign users have pondered at one point or another: How do you save layers for use in other documents?
In other panels, such as Swatches or Paragraph Styles, the panel menus offer a Load command to navigate to other files to import the colors, styles, and such, or they let you easily add to a selected Creative Cloud Library. In the Layers panel, those options don’t exist. What’s a designer to do?
Way back in InDesign Magazine Issue 18, Branislav Mili? offered a solution that still works today:
- Add an object to each of your layers.
- Select all the objects and drag them to a Creative Cloud Library.
- Create a new document.
- Navigate to the Layers panel menu, and turn on Paste Remembers Layers (Figure 10).
- Drag the objects from the Library to a page.
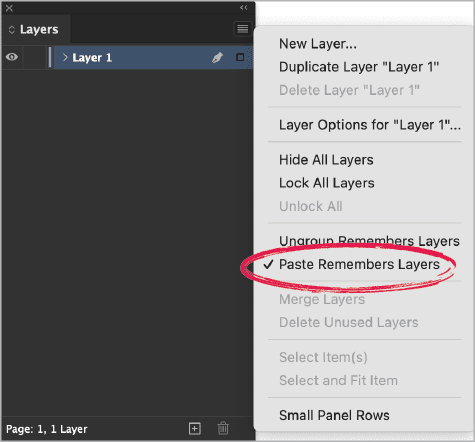
Figure 10. The Paste Remembers Layers option enables you to use your new layers in any document if an object exists on the layer.
Note the layers that just appeared in your Layers panel. Delete the objects and begin your layout magic!
Lighten Your Labors with Layers
There are so many benefits of structuring your InDesign documents with layers. Using layers can give you the confidence that essential content from parent pages won’t inadvertently get obscured by other page elements, and objects can be added to layers for global hiding/revealing with ease. You can use layers to quickly select content on the current spread, as well as to lock or hide specific content throughout the document. With the help of a Creative Cloud Library, you can also save layers for use in other files. Finally, you can prevent production notes or any other information from accidentally appearing in your output by putting it on a nonprinting layer. Planning and building layers in InDesign takes only a few minutes, but it can save you hours of work in the long run. Once you get in the habit of using layers, you’ll wonder how you ever got along without them.
Commenting is easier and faster when you're logged in!

Recommended for you

How to Convert InDesign Layers to Photoshop Layers
Myra Ferguson shows you how to turn your multi-layered InDesign document into Ph...

How to Filter and Sort Photoshop Layers
Learn how to easily organize and find your Photoshop layers.

InDesign How-to Video: Move Layers From InDesign to Photoshop
In this week’s InDesignSecrets video, David Blatner shows off a script to send a...