

I remember the first time I tried to use the Pen tool in Illustrator back in 1989. I dragged along a curve that I wanted the line to follow. Instead of a curve, a straight line shot out nowhere near my original intent. Thinking it might get fixed if I tried again, I dragged along a similar direction. The lines only skewed out even worse. I closed the document vowing never again to try to use the dreaded Pen tool.
Later on I had enough nerve to try again with step-by-step instructions and finally mastered the concept of the Pen tool. It’s actually very mathematical with tangent lines directing the angle and height of the curves at each point.
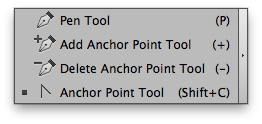
Four Pen controls for all three programs
Fortunately, the Adobe engineers have been quite stringent in keeping the Pen tool working exactly the same in InDesign, Illustrator, and Photoshop. The only differences are some of the enhancements that make it easier to use the Pen tool in certain programs.
Each program contains four aspects of the Pen tool. There’s the Pen tool itself. This is the primary tool for creating lines and curves. Then there’s the Add Anchor Point tool. This allows you to click on a line segment to add a point to the path. Next there’s the Delete Anchor Point tool. This deletes any point that the tool hovers over. Finally there’s the Anchor Point tool in Illustrator, the Convert Direction Point tool in InDesign, and the Convert Point tool in Photoshop. Despite the name changes, these tools let you change the direction of curves as well as change them from curves to corner curves and corner points.
Photoshop adds a Freeform Pen tool which is quite useful for those who have never mastered the Pen. However, as you’ll see, this tool is a duplicate of a tool found in the other two programs.
The four Pen tool controls in Illustrator

The four Pen tool controls in InDesign

The five Pen tool controls in Photoshop
Pen Tool commands and modifiers
Click the P on the keyboard and you’ll get to the Pen tool in all three programs. In Illustrator and InDesign you can click the = key to get to the Add Anchor Point tool, click the – to get the Delete Anchor Point tool, and Shift-C to get the Anchor Point or Convert Direction Point tool. Photoshop doesn’t give keystrokes for these last three tools. You can’t even assign the same keystrokes as in Illustrator or InDesign as Photoshop only allows the letters A-Z for tool keystrokes. Fortunately you don’t have to use the keyboard shortcuts for any of the tools once you are working with the Pen.
Working without keystrokes
All four tools work identically. Drag or click with the Pen to create curves or line segments. Still in the Pen tool, place the cursor over a line segment to add a point. Place the cursor over an anchor point to delete a point. Hold the Option/Alt key to convert a point.
The convert point tools in Illustrator and InDesign work identically. Click to convert a curve point to corner point with straight line segments. Drag on the point to change the shape and direction of a curve point. Drag the Bezier handle to convert a curve point to a corner point with curves. Photoshop does the same with the exception of converting a curve point to corner point. It can only change the direction of the Bezier handles and change a curve point to a corner point with curves.
Illustrator’s enhanced cursors
Up until this point (no pun intended) all three programs have identical Pen tool behaviors. As is fitting for the program that has had a Pen tool the longest, Illustrator has a unique enhancement that makes it easier to draw with the Pen.
With the path selected, position Illustrator’s Anchor Point tool near a line segment. You’ll see a black curved arrow with a curve next to it. This indicates that you are near a line segment and can drag to create a curve for that segment. This is incredibly helpful if you want to create a corner curve point. Instead of having to drag out the Bezier handles and then manipulate them, you can simply drag on the segment. I wish InDesign and Photoshop had this feature!
Photoshop’s rubber band
The Photoshop engineers must have felt they needed to make it easier for “pixel pushers” to use a vector tool. So they created a rubber band effect to make it easier to use the Pen tool. With the Pen tool chosen, look under the gear symbol for the Rubber Band checkbox.

The Rubber Band checkbox to turn the Rubber Band effect on or off
Once the Rubber Band is chosen, the Pen tool shows the path as it will be drawn..
Pens and Pencils
Photoshop has another Pen called the Freeform Pen. This Pen lets you drag around the image in the way I originally though the Pen tool would work. So why don’t Illustrator and InDesign have such an easy Pen tool? Well, actually they do—it’s the Pencil tools. With the Pencil tools you drag around to create a path that follows your drag. The Freeform Pen tool works the same way.
However, unlike the Pencil tools, Photoshop’s Freeform Pen tool has a magnetic option. With this turned on, the path automatically “snaps” to the visual edge of an image.
In closing
Jackson Pollack summed up the usefulness of the pen this way:
When I say artist I mean the man who is building things –
creating molding the earth –
whether it be the plains of the west –
or the iron ore of Penn.
It’s all a big game of construction –
some with a brush –
some with a shovel –
some choose a pen.
This article was last modified on May 16, 2014
This article was first published on May 16, 2014
Commenting is easier and faster when you're logged in!

Recommended for you

Top New Features in Photoshop
A little over a week ago, Adobe rolled out updates for Photoshop, Muse, and the...
The NYIP Complete Course in Professional Photography Now Available Online
Press Release New York Institute of Photography Launches Online Professional Pho...
Photoshop Quick Tip: Applying OpenType Alternates
As Ilene Strizver wrote in a recent TypeTalk, you can use alternate characters i...