Using InDesign, Illustrator, and Photoshop Together: Linking and Embedding Files

Many of my students ask why Adobe doesn’t just combine InDesign, Photoshop, and Illustrator into one super-application that can do everything—layout, images, paths, etc. Well, actually there is such an application. I call it “InDe-Illu-Shop.” But you don’t open it with a single click. You open it by launching each application separately; then, you use them as a single application.
In this first article on using InDesign, Illustrator, and Photoshop together, I’ll cover how to use each program as your main layout tool. In future articles, I’ll cover moving vectors between the apps, coordinating colors, working with the interface, layers & text, and exporting and printing.
Placing art into InDesign
Most people use InDesign as the “hub” for their projects. They import images from Photoshop and Illustrator onto their InDesign pages. Here are some tricks that can make this process more seamless so the applications work as one.
File formats
Use native Photoshop or Illustrator files. InDesign likes them the best and you have no problems going back to modify them—especially if you haven’t flattened the layers.
File > Place
The most basic way to import files into InDesign is with the File > Place command. You then choose the files you want to place, click OK, and add them to your documents. But you don’t have to add each file one at a time.
Power Tip: You can load up your cursor with as many files as you want. For instance, if you choose three files from one folder and click OK, you move back to the InDesign page with a loaded cursor. But you don’t have to place those files right away. You can select File > Place again and navigate to a new folder. Choose more files. Mix Photoshop with Illustrator files. You’ll see the loaded cursor icon increase the number of files it has loaded. With this technique you can add as many Photoshop and Illustrator files as you need.
Once you have the loaded cursor use the left/right arrow keys to cycle through the items in the queue. Use the Escape key to delete items in the queue. Switch to any tool in the toolbox to delete loaded cursor completely.
Power Tip: If you switch to another document, or even another application, your loaded cursor will still be active when you switch back to InDesign. This makes it even easier to switch from one application to another.
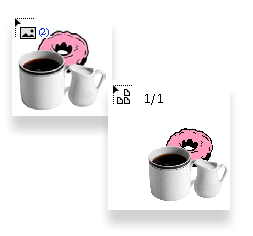
The Place cursors for InDesign (top left) and Illustrator (bottom right).
InDesign files into InDesign
It may seem like the snake swallowing its own tail, but you can place InDesign files into other InDesign files. InDesign treats these files as PDF documents. Then when you modify the original InDesign file, the placed graphic updates. Use this for items such as direct mail coupons that need to be inserted into many documents.
Placing images into Illustrator
I know many companies that use Illustrator, not InDesign, as a page layout program. They create short-copy projects, such as wine labels and CD covers, with lots of vector and pixel graphics. And for their needs, there’s nothing wrong with using Illustrator as their hub with placed images.
Placing Photoshop files
There’s not much difference from InDesign when you place Photoshop files into Illustrator. You load up your cursor and then click or drag on your document. You see the same preview with a number indicating how many files are in the queue. However, there is a big difference if you choose to link or embed the files.
The main difference is you can choose whether to link or embed the files as you choose them. InDesign only lets you embed files after they are in the document. Illustrator has an option to link or not in the Place dialog box. If you link files, you can still embed them after the fact.
If you link Photoshop files in Illustrator you won’t be able to apply Illustrator’s live effects to the files. However, you can use the Embed commands from Illustrator’s Links panel to change a files status.
Placing Illustrator files
Like Photoshop files, you can place Illustrator files into other Illustrator files. You have a choice as to whether or not to link or embed. Linked Illustrator files can be modified and updated within the document into which they are placed. They appear in the Links panel with icons that show if they are missing or modified.
This article was last modified on October 21, 2013
This article was first published on October 21, 2013
Commenting is easier and faster when you're logged in!
Recommended for you

American Flag Stroke Style
Learn how to take control of the Stroke Styles dialog box and create a flag flyi...

Adobe’s Free InDesign Templates Now Available at InDesignSecrets
Adobe stopped shipping their free InDesign templates with CS5. Now you can find...

Successful Branding with Brochures
You’re on vacation and see an attractive hotel. A literature box on its fr...


