Using InDesign, Illustrator, and Photoshop Together: Getting the Most From the Interface

When Adobe first created the concept of a “Creative Suite,” they wanted to make all the applications work and look as much alike as possible. But as Ralph Waldo Emerson said: “A foolish consistency is the hobgoblin of little minds, adored by little statesmen and philosophers and divines.” It’s just not possible for the three applications in “InDe-Illu-Shop” to work exactly the same, despite the best intentions of the Adobe software designers.
However, that’s not to say that the applications don’t have their similarities. You just have to know what’s similar and what’s not.
50 Shades of Interface
There are two types of InDe-Illu-Shop users: those who love the dark interface and those who can’t see anything in the dark. I’m one of the latter, which is surprising since I live in New York City, where everyone wears black.
When switching back and forth between the three programs, it is sometimes a little confusing to tell which program you’ve jumped into. Yes, there are plenty of clues, especially in the tools, to tell you which program is which, but Adobe has done such a good job of standardizing the icons for various panels, that it isn’t always immediately obvious.
Before I could set a custom interface color theme, I used to play with the Tools panel to let me know which program I was working on. I put InDesign’s tools on the left; Photoshop’s tools on the right, and I set Illustrator’s tools in two columns.
But now I simply set the color theme for each program to a different shade. InDesign gets the lightest shade because I use it the most; Illustrator gets the next lightest; and Photoshop gets the darkest. You can set the interface to whatever shade you want for your favorite program.
You would think that all three programs would use exactly the same controls to set the interface appearance. But each engineering team has its own ideas of what makes the best controls.
InDesign’s Appearance settings
To set the interface theme in InDesign, choose Preferences > Interface and then set the color theme. You can choose one of the four pre-set colors or use the slider to set a specific level of brightness.
Illustrator’s Brightness controls
To set the interface theme in Illustrator, choose Preferences > User Interface. You can then choose one of the four Brightness settings or use the slider to set a custom shade. This is exactly the same functionality as InDesign’s controls. However, the slider in Illustrator has little tick marks to indicate the amounts shown in the menu. But don’t let those tick marks fool you. You can set the slider anywhere along the path.
Photoshop’s Color Theme
Finally, in Photoshop, choose Preferences > Interface. Then click on one of the four interface color swatches. You only have the interface swatches as controls; there isn’t any slider.
With each application using a different color theme, it’s easier for me to recognize where I am. As you can see, Illustrator’s Medium Light is a quite similar to InDesign’s Light. So I still use a double column Tools panel in Illustrator to help differentiate the two programs. Meanwhile, Photoshop’s black hole of an interface makes it instantly obvious where I am.
Consistency in Widgets and Icons
I’ve always told my students that nothing is in the interface for decoration. Every little arrow, dot, line, etc. means something and is clickable. Here are the widgets and icons that appear in all three programs.
Tools triangles
Look carefully at the icons in the Tools panel. See that microscopic triangle next to some of the tools? That triangle indicates that the spot in the tool panel is shared by other tools. Some are related to the visible tool, like the various flavors of the Pen tool. But others are less obvious, like the Eyedropper under the Measure tool. However, the engineers for each program have done a good job in making these tool sets consistent. The Eyedropper in InDesign has the same alternate tool in Photoshop and Illustrator.
Press and hold on the tool for a moment—you don’t have to hit the triangle exactly—to see what else is in that tool’s drawer.
Illustrator’s portable tool slots
Illustrator has two other features for its tools that are not always obvious to folks used to other programs. When you press to open the additional tools, there is a thin area to the right of the tools. Click that area and the tool drawer is released into its own panel. This panel can be moved anywhere on the screen and arranged into vertical or horizontal orientation. You can then position these additional tool sets right over your work area. I wish InDesign and Photoshop had such a feature.
And Illustrator even goes one step further, giving you the ability to create as many Tools panels as you want. Choose Window > Tools > New Tools panel. Name the panel. And a new mini-panel appears! Drag any tools into this new panel. And then position the panel anywhere on the screen. You can even duplicate tools for every corner of your workspace. So you’re never far from your favorite tool.
The Ubiquitous Field controls
If there’s one interface control that is found almost everywhere, it’s the Field control for entering point sizes, percentages, coordinates, etc. Most of it is standardized between the three applications, but there are some features unique to each application.
The basic field
The simplest type of field lets you highlight the information in the field and enter a new amount. In addition, once the field is active, you can use the up/down arrows to increase or decrease the amount in the field.
It’s also important to remember that you’re not stuck with the default measurement for the document. If you’re working in pixels, you can still enter an amount in inches (” or in), picas (p), points (pt), millimeters (mm), centimeters (cm), and more. InDesign also has units such as agates and ciceros that are unique for page layout. And the program does unit conversions for you, so you don’t have to sit there trying to remember how many points/picas per inch or inches per milimeter.
Fields with a menu
The next type of field is accompanied by a small, downward-pointing triangle. This is a field that lets you choose from a list of preset items. The field for font point sizes is an example of this type of field.
Up/Down arrow controls
The next type of field has a set of up/down arrows to the left of the field. These arrows let you increase or decrease the amounts in the field by specific increments. Illustrator and InDesign both have these types of controls for many of their fields.
Once the amount in the field is selected, the up/down keys on the keyboard also allow you to increase or decrease the units in the field in the same increments.
Photoshop’s scrubbing controls
If you take a quick look at the same fields in Photoshop, you might think that it doesn’t have any equivalent feature to the up/down arrows. But it does!
Position your cursor over the label for a field, and you’ll see a “finger cursor.” Drag right/left to increase/decrease the amount in the field.
Illustrator’s hyperlinked panels
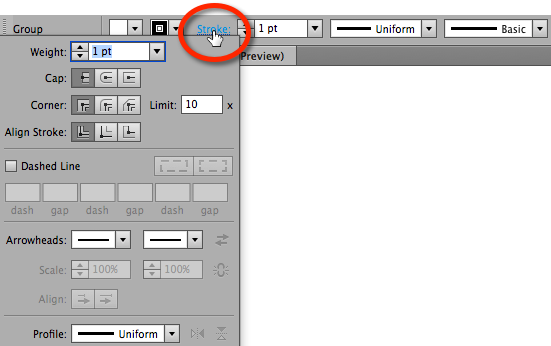
I once saw Mordy Golding, a former Illustrator product manager, give a class where he boasted that he keeps none of his panels visible, except the Tools panel. He uses the hyperlink controls for the panel labels in the Control panel to access the controls in the hidden panels. These hyperlinks are visible as blue labels. Click the hyperlink and the panel appears at that position. This is much easier than remembering where you stored the panel on the screen, and it saves more of your screen for displaying your artwork.
Do the Math
One of the hidden features in the InDe-Illu-Shop application is the ability to “do the math” in fields.
Suppose you have a field showing the width of an element as 2.45″. Then a boss or client comes along and tells you to increase the width by 1.036. Instead of taking out a piece of paper to do the math, just type so the field looks like 2.415″+1.036. When you hit the return/enter key, the application adds the two amounts for a total of 3.451″. Similarly, you can substract by using the – (hyphen) sign.
But field mathematics are even more sophisticated. That same person tells you to increase the width by 2p4 (2 picas and 4 points). That’s way too complicated for my feeble brain to do. Fortunately all you have to do is type in the field so that it looks like 2.415″ + 2p4. By adding the unit of measurement, the application not only does the math, it also does the conversion from picas to inches.
You can also do multiplication and division by entering a * (asterix) for multiply and / (forward slash) for division.
Preview Modes
Most designers need a way to quickly show and hide all the guides, edges, and non-printing characters that clutter up their view of the document. InDe-Illu-Shop programs let you do this, but the default keys are different. Illustrator and Photoshop use the F key to cycle through the preview modes. But InDesign uses the W. Why the difference? Beats me.
However, all three programs use the Tab key to show or hide all the panels in one fell swoop. And they also use Cmd/Ctrl-R to show or hide the rulers.
Drawing tools
Learn the shortcuts for drawing tools in one program, and you’ve got them down for all three.
- Hold the Shift key when drawing a new object with one of the shape tools to constrain the shape to its perfect equivalent—a perfect ellipse is a circle, a perfec
t rectangle is a square. - Hold the Opt/Alt key to draw starting from the center.
- Hold the spacebar to reposition the object as you draw.
- Hold the Shift key when moving objects to to constrain the movement 90- and 45-degree angles.
- Hold the Opt/Alt key as you move an object to copy it to a new position. This tip also works when dragging objects between layers.
Think like an Adobe Engineer
The secret to working with the InDe-Illu-Shop interface is to think like a software engineer. As I said earlier, nothing is there for decoration. If you know something works a certain way in Illustrator, look to see if it will do the same for the other two programs. But don’t be angry when the programs don’t work similarly. If they did, I wouldn’t have a job writing articles like this.
This article was last modified on January 5, 2023
This article was first published on March 10, 2014
Commenting is easier and faster when you're logged in!
Recommended for you

Better Tools for Tones: Why I Don’t Look at the Histogram
The histogram—the graph of tonal levels you see in photo-editing software—helps...

The Digital Art Studio: 5 Favorite Illustrator CC Features
If you’ve ever experienced a power outage, you’ve also likely found yourself ref...

Create Patterns With Adobe Capture CC
How do you create beauty? There’s the old fashioned way: First, create the...


